The week before the start of the Australian Open didn’t see many of the top players in action, but we were still entertained. Starting off on the negative side, Alex de Minaur suffered an abdominal injury during the ATP Cup and will have to sit out of the Australian Open, crushing the hopes of Australian fans who were betting their money on the “Speed Demon”. Some other shocking news came with the positive doping exams of Nicolas Jarry and Robert Farah, who are suspended until further notice. Things are not looking great for South American tennis!
Now to the good part – the NextGen was extremely well represented this week. Following Roger Federer’s prediction, Andrey Rublev has started the year accomplishing some pretty special things. He conquered his second ATP title in 2 weeks, showing that he might do some damage in the Aussie Open draws. Ugo Humbert, the 21-year-old Frenchman, conquered his first ATP title after defeating some big names that included Denis Shapovalov, John Isner, and Benoit Paire. Well done!
On the women’s side, Ashleigh Barty was able to bounce back from her early loss last week, and conquered the title in Adelaide. The other WTA of the week saw Elena Rybakina continue her momentum from last week’s final in Shenzhen and go all the way in Hobart. This hot start of the year shows that she might be going far in Sydney.
Lastly, once again we were able to see players coming together to help Australia after the fires. Several of the top ATP and WTA players came together during the Rally for Relief, an event that raised $3.5 million USD for the victims of the fires.
There’s obviously one thing to look forward to this week, and that is the Australian Open. The first Grand Slam of the year has finally arrived, and we are extremely excited about it. Could this be the Grand Slam in which a NextGen player finally dethrones the Big 3? We’ll see about that. Some of our favorite first round match ups are: Sam Querrey vs Borna Coric, Reily Opelka vs Fabio Fognini, and Steve Johnson (coming from a Challenger title) vs Federer. Should be a very interesting first week at the Aussie Open.
What We’re Up To
Karue continues to keep up the good work with Naomi during the Australian Summer, this week at the Australian Open. She’s starting her campaign to defend her title against M. Bouzkova.
Gui is sorting out some last details of the My Tennis HQ website before we can finally launch it officially.
Stay tuned for some very cool content coming out this week!
The sport of tennis has gone through some dramatic changes through time. If you watch tennis videos from the 1950s and compare them to recent videos, they will look like very different sports. From clothes to rackets to rules, all the major aspects of tennis have evolved with time. And among all these aspects, one that changed significantly was the need for good tennis volleys.
In the past, the majority of tennis points were played with one of the players (or both) at the net hitting volleys. Because the courts were very fast and the rackets were smaller, good players used to try to get to the net as soon as possible. Needless to say, they needed to have good volleys. As time went on, both courts and tennis balls became slower, rackets became bigger but lighter, and players became stronger and faster. These changes made the overall tennis game slower, which means that players are not rewarded as much for going to the net – since their opponents have more time to react. As a consequence, players began focusing more on their groundstrokes than on their volleys, and nowadays even some of the best tennis players in the world will admit they have a pretty pathetic net game.
Volleys are one of the trickiest shots in tennis. When watching professionals play, volleys seem very easy and automatic. On the other hand, when you’re playing tennis and you suddenly have a tennis ball rushing towards your face, volleys don’t look that easy anymore.
Tennis volleys require touch, speed, skill, fast reflexes, a steady hand, and precision – which makes them one of the most admirable shots in tennis.
While players and coaches tend to not spend as much time working on volleys anymore, having a solid game can give you an edge on the tennis court. Volleys are great not only for singles, but for doubles as well. By having a good net game, you’ll be able to be more aggressive, shorten points, run less, and win more.
Pretty good deal if you ask me.
In this article, we will cover the basics of volleys, including what a volley is and how you can hit one. We’ll also cover some of our best tips and strategies to take your tennis volleys to the next level. Whether you are a beginner or a more experienced player, you will be able to get something out of this read.
If you wish, you can skip to the specific section that interests you. The information below is outlined in the following way:
Tennis Volley Definition
Forehand Volley
Backhand Volley
Tennis Volley Grip
Tennis Volley Step By Step
Tennis Volley Footwork
Tennis Volley Position
Tennis Volley Backswing Technique
Tennis Volley Tips
Bes Tennis Volley Drills
Tennis Volley Definition
In essence, volleys are part of your net game, which means that you will hit these shots without letting the ball touch the ground before you hit it. These shots are mainly used to finish the point, after you were able to move your opponent around by hitting successful groundstrokes. They are also used a lot more frequently during doubles matches. Depending on how you hit your volley, it will be qualified as either a forehand volley or a backhand volley.
Forehand Volley
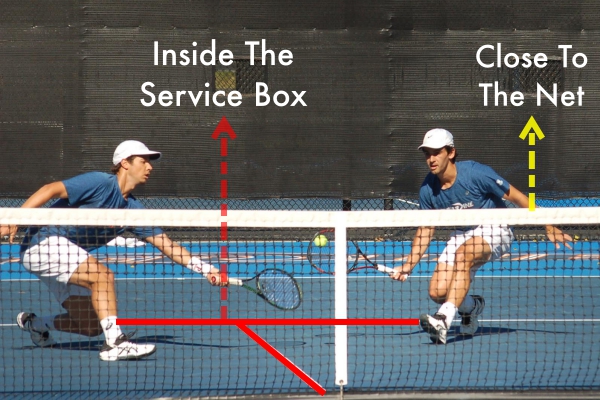
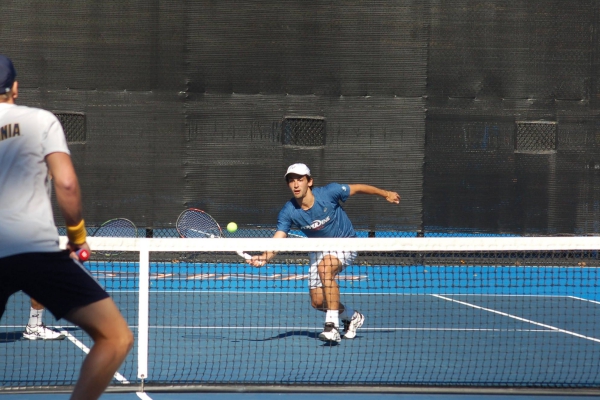
The forehand volley is a fairly simple movement, in which you use only one arm to hit a ball by your dominant side, without letting the ball touch the ground. A player usually hits volleys when standing close to the net and inside the service box. It requires firm hands and fast reflexes.
Backhand Volley
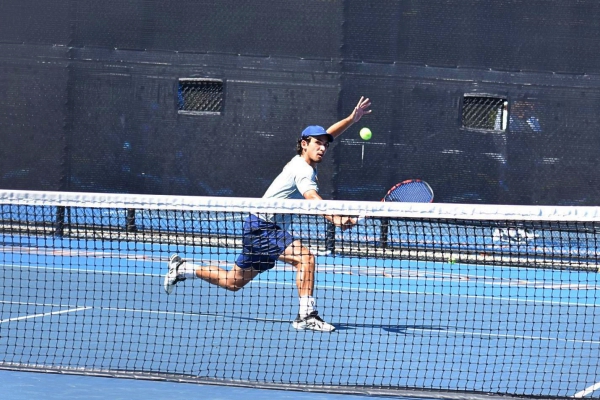
The backhand volley looks a lot like a backhand slice, but without letting the ball touch the ground. Once again, a volley usually occurs when you are standing close to the net. A backhand volley always happens on your non-dominant side. While backhand volleys are normally taught as a one-handed shot, it is not uncommon to see players hitting backhand volleys using both hands.
Backhand volleys are an important part of your net game since they will allow you to shorten the points and take time away from your opponent.
Tennis Volley – Grip
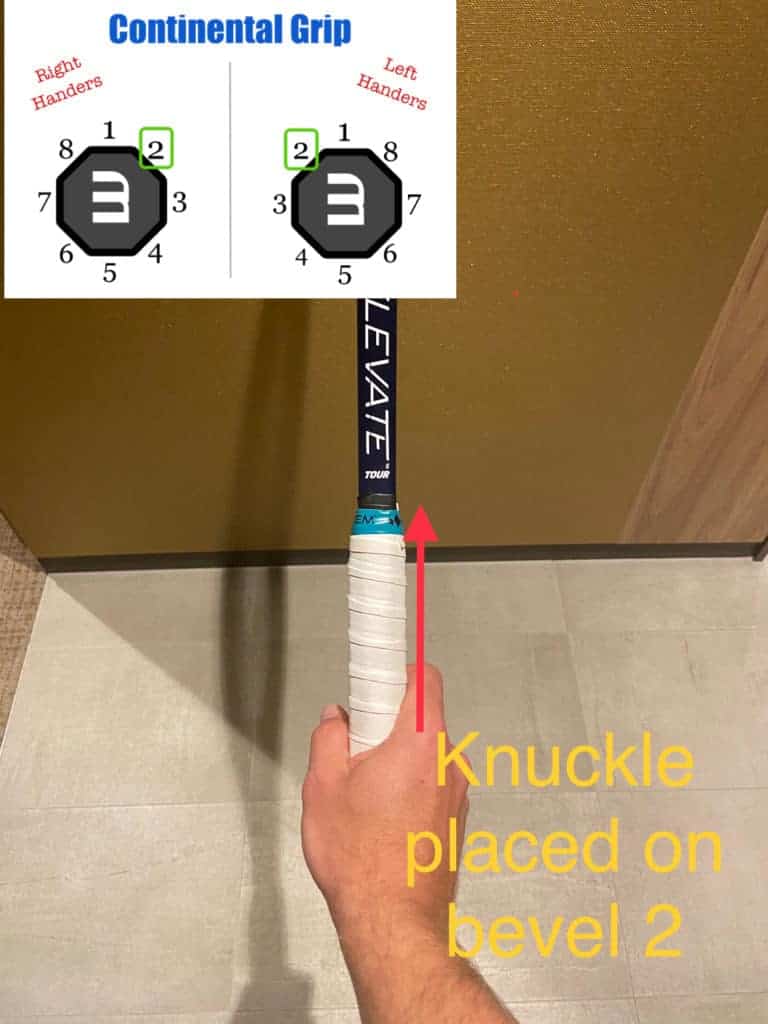
When you’re hitting tennis volleys, it all comes down to speed and control – which is why you should hit your volleys using a Continental grip. The benefits of using this grip for your volleys is that it is very quick to set up, and you won’t need to change it between your serve, forehand volley, backhand volley, and overhead. While the Continental grip doesn’t allow the player to add a lot of spin to the shot, that is not a problem since volleys do not require spin.
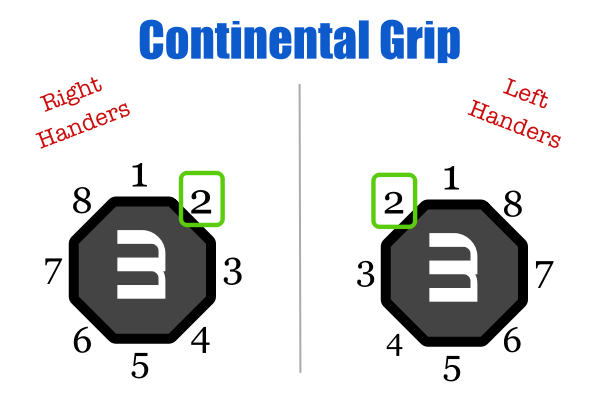
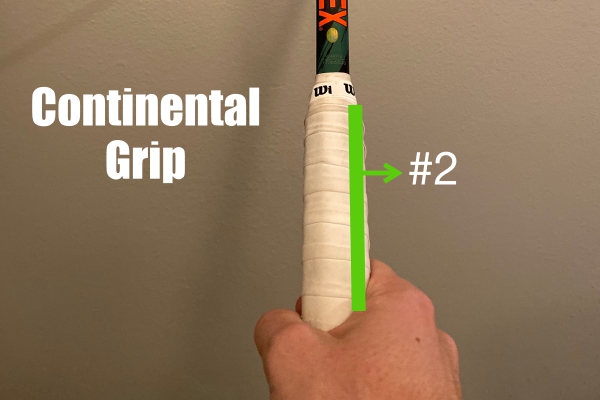
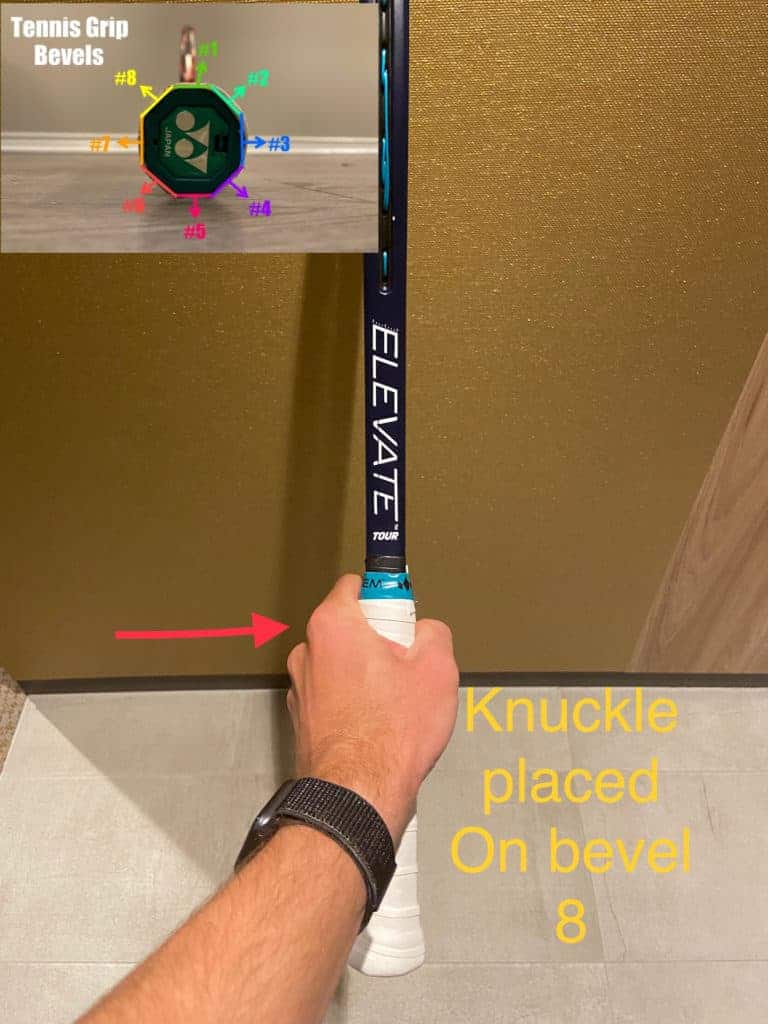
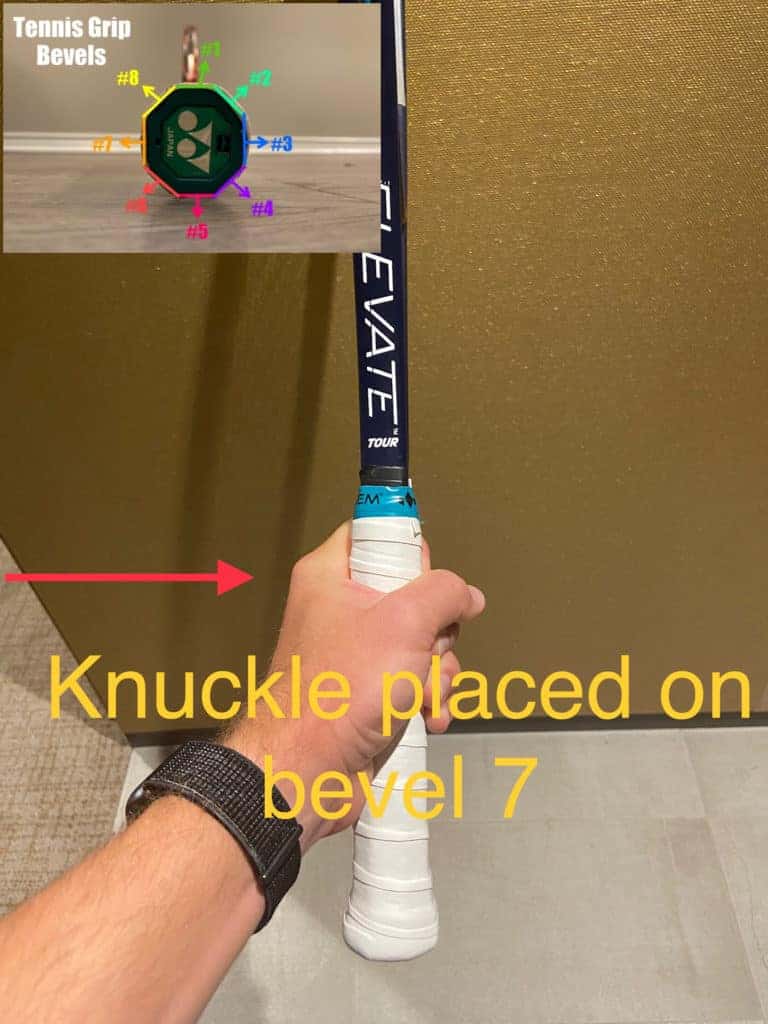
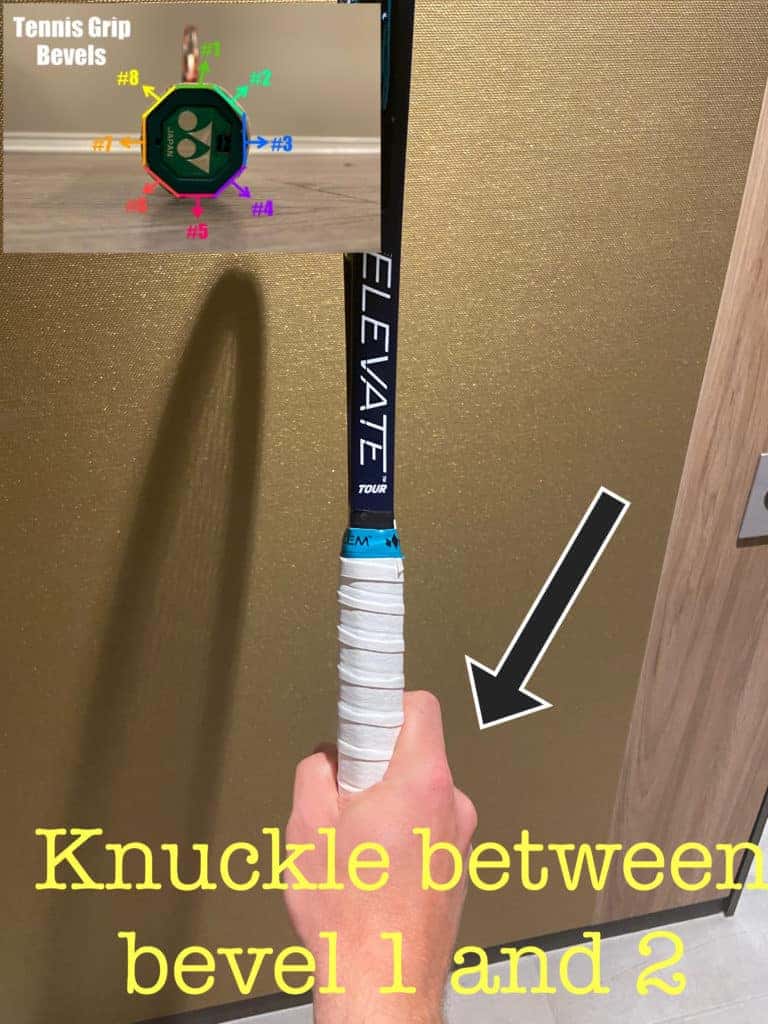
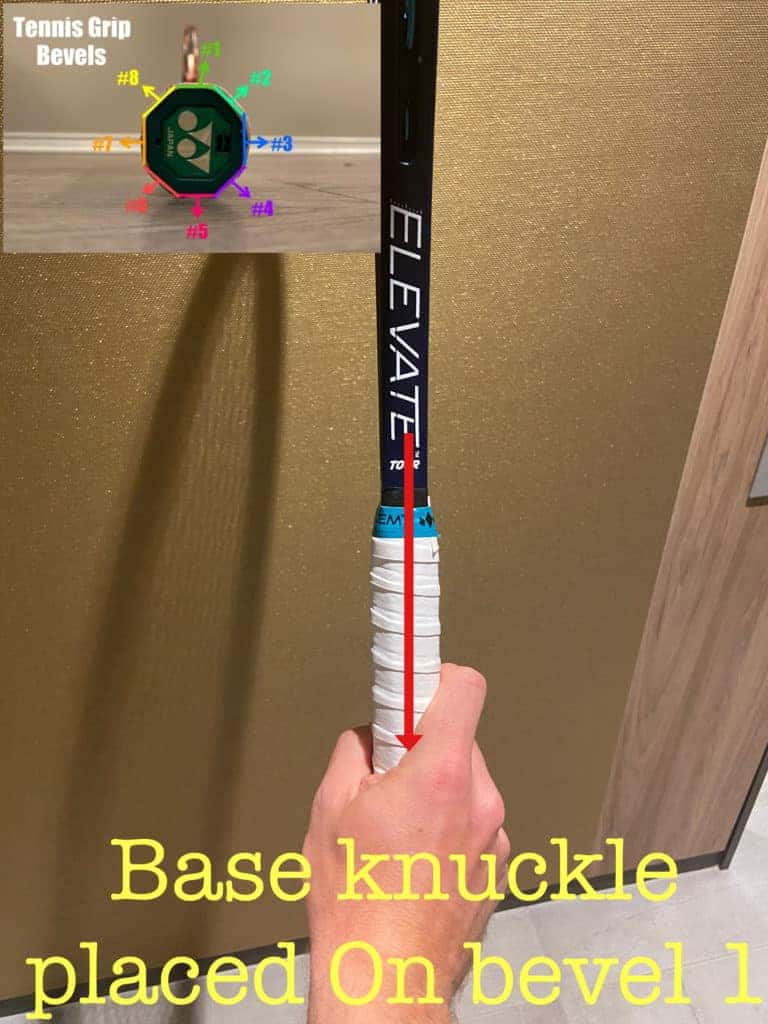
In order to use a Continental grip, you should hold your racket as if you were “giving it a handshake”. The knuckle of your index finger should be right on bevel #2. The Continental grip is excellent for hitting shots that do not require much topspin, like serves, volleys, slices, and overheads.
Tennis Volley – Step By Step
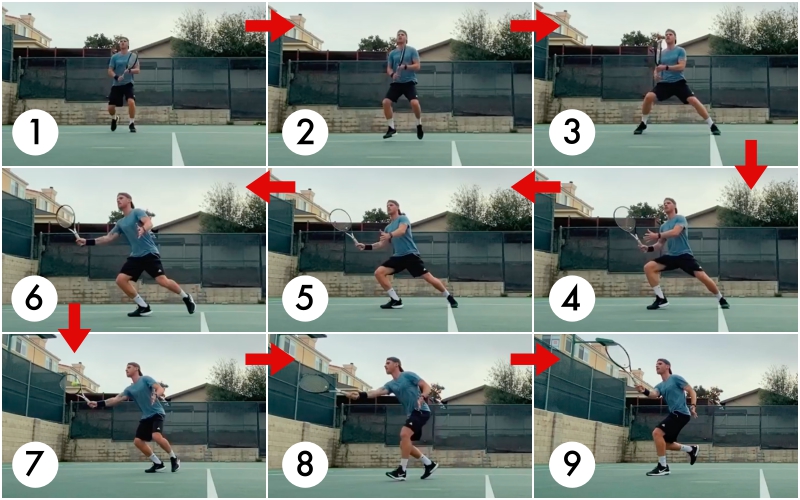
While tennis volleys look very simple, there are actually a lot of things going on at the same time. As you become comfortable with this shot, these things will become automatic and you won’t have to really think about them. However, when you’re first learning how to volley, you should understand the biomechanics of a well-executed volley. We’ve broken down the volley into 9 different steps (as you can see in the image below) so you can have a good idea of what you should be doing. You can follow these steps for both forehand and backhand volleys.
Remember, though, that once you become comfortable with volleying, your stroke should be one smooth movement and not a series of small movements.
Balanced Base: Keeping your knees slightly bent and your body weight in the front of your feet, the first step to a good volley is to have a solid base with your legs – ready to move in any direction. Your legs should be spread at your shoulders’ width.
Split Step: The second step will be the jump that will get you ready to change directions (better known as a split step). The most important aspect of the split step is to time it well, and you should begin jumping as your opponent hits his shot. Your jump should be both forwards and up.
Wide Landing: The landing after the split step should be done with your legs opening wider than the width of your shoulders. This will allow you to cover a bigger share of the court.
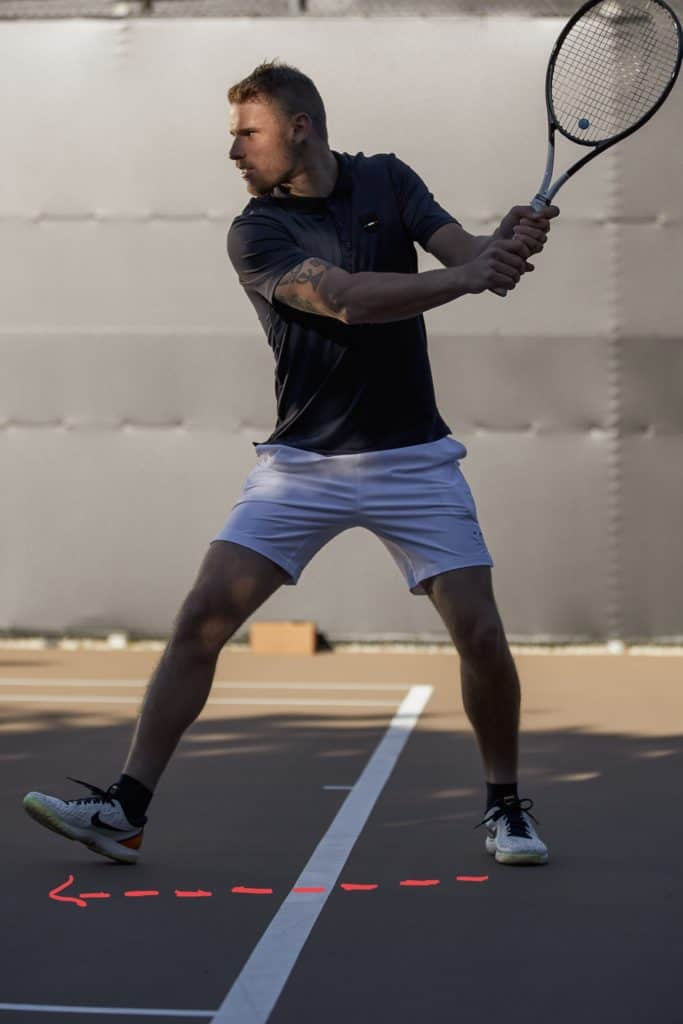
Side Identification: This is the step where quick reflexes will make a huge difference. Once you realize whether the ball is coming to your forehand or backhand side, you can start turning your body that way. Notice in the image how the outside foot starts turning to the forehand side. You’ll begin your shoulder rotation with both of your hands holding the racket, and you will eventually release one of them and use it to point to the ball.
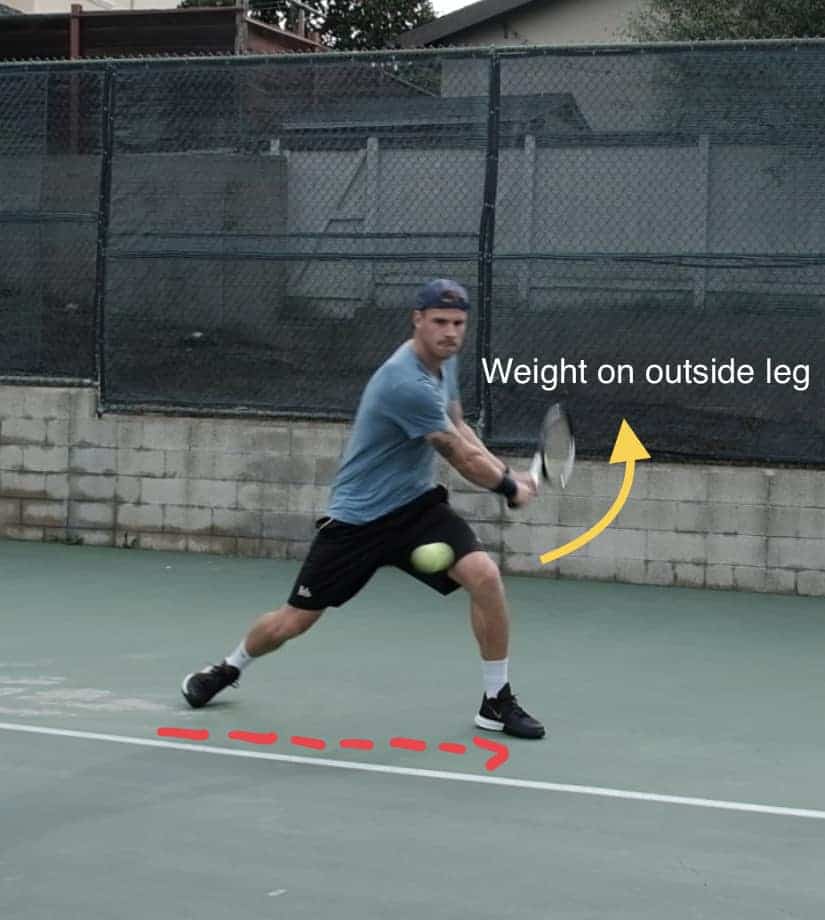
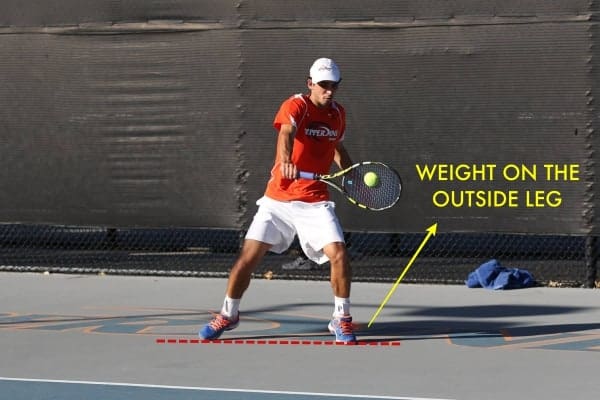
Weight Shift: Now that you know where you will be hitting the volley, you should begin shifting the weight of your body that way. You should try to put most of the weight on the outside leg. Keep your elbow slightly bent and the head of the racket higher than your hands.
Elbow Extension: Keeping your eyes on the ball, you’ll gradually extend your elbow. You always want to make contact with the ball in front of you.
Clean Contact: As you can see in the image, the contact point happens in front of you, and since your body should be moving forward, you shouldn’t have to hit the ball hard. You’re essentially just using the pace your opponent hit the shot with.
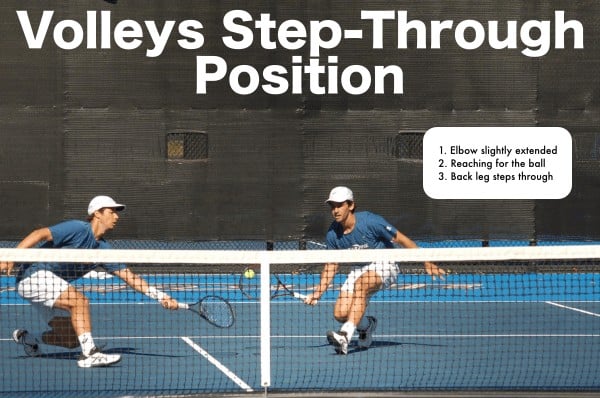
Leg Step-Through: At this point, your back leg should be landing in front of your outside leg. This will ensure that you have an aggressive stance in your volleys – and it’s the step we refer below as the “Big Step”.
Follow Through: Finally, you should do a short follow-through after you hit your volley. This won’t be nearly as long as a groundstroke follow-through; it is just enough so you can catch the racket with the other hand and move on to the next volley.
Tennis Volley – Footwork
A player’s volleys are only as good as his footwork. Since volleys happen so quickly and there is not much room to compensate with a full swing, having efficient footwork is paramount. Just like a lot of other things in tennis, simpler volleys are better volleys. Below we’ll cover a few tips to have a good volley footwork.
Keep Your Knees Bent: You should keep a slight bend in your knees at all times when you’re at the net, as this will allow you to change directions better and jump more explosively.
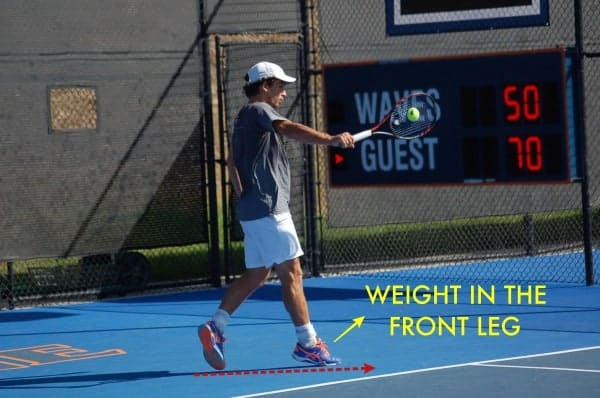
Keep Your Weight In The Front Of Your Feet: If you are able to, you can even keep your heels off the ground. By doing so, you will easily keep your knees bent and you will inevitably keep your whole body leaning forward – a great aggressive stance.
All About Quick Feet: When you’re at the net, it all comes down to how quick you can be. Your feet should stay light, but able to explode at all times. You should think of it as if you were trying to “float”
The Smaller The Step, The Better: With the exception of the one big step when you hit the ball, you should try to take small steps. By doing so, you’ll be able to change directions faster.
Listen To Your Big Step: When you’re taking your big step in order to hit the volley, you should try to stomp your foot, even to the point at which you can hear it. By focusing on that, you’ll have an aggressive footwork, meeting the ball in front of you.
Tennis Volley – Position
When you’re hitting volleys, there are essentially two positions your body should go through. They are the neutral position and the step-through position.
Neutral Position
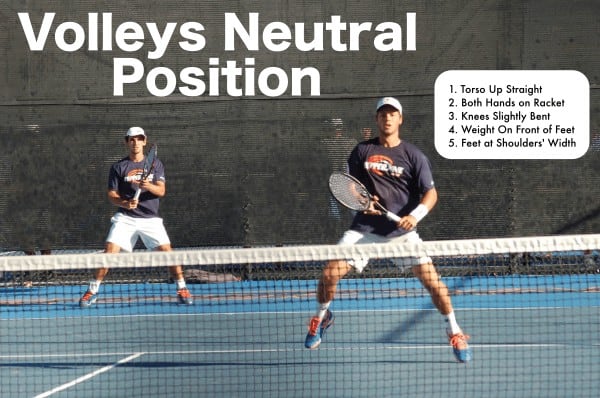
This is the stance you’ll usually use before doing your split step. Your feet will be spread at about shoulders’ width, your knees will be slightly bent, your body weight in the front of your feet, both hands on the racket, and your torso standing up straight.
In defensive volleys, this is the only position you will use. Since the ball is coming at you faster, you don’t have time to step through with the back leg. So in order to hit successful defensive volleys, your neutral position should have a solid base.
Step-Through Position
This is the final position you will use after hitting an aggressive volley. This is the position you’ll end up on after making contact with the ball and stepping your leg through. From that point on, you will need to level both legs and recover fast for the next volley.
Once again, when shots are coming at you too fast and you have no time for the step-through, you should stick to the neutral position mentioned above.
Tennis Volley – Backswing Technique
The backswing portion of the volley is a tricky one. A lot of times, if our opponent hits a slower shot, we’ll have more time to prepare and we’ll end up using a big backswing so we can “hit the ball harder”. By doing so, a lot of times we end up missing those shots – either long, wide, or at the net.
A volley backswing should always be as compact as it can possibly be. If you are wondering whether your backswing is too big, chances are it probably is.
I’ve worked on my volley technique a lot throughout my career, and I’ll share some of the tips that have helped me out the most over the years.
When preparing for a volley, always keep the racket in front of you and ready to go. Both of your hands should be on the racket and the head of the racket should be higher than your hands.
Keep your elbows slightly extended when getting ready for a volley. You can save a lot of time if you don’t have to waste time extending your elbows.
The rotation happens through the shoulders, not through the arms. This will help keep your movement compact.
You’re supposed to keep your non-dominant hand on the racket for longer than you’d think. This non-dominant hand is not nearly as important as it is for groundstrokes. By keeping it on the racket for longer, you’ll be making sure your arms, shoulders, hips, and racket are moving together.
Your racket should never go back further than your shoulder line. If that happens, it means you’re going too far.
You should never lose your racket out of sight when hitting a volley. If you do so, it means you’re probably making contact with the ball too late.
Tennis Volley Tips
If you’ve made it to this point, you basically know everything you need to know in order to hit effective tennis volleys. Now all you need to do is go to the court and practice.
Below we have added some additional tips that might make your journey easier:
Focus On The Right Volley, Not The Prettiest Volley: A lot of times you won’t have enough time to do a full volley, with the perfect technique and a great step through. In these cases, you need to know that it’s ok to do a very basic volley with a neutral stance, and just focusing on getting the ball to the other side.
It’s All About Placement: My dad always said: if tennis was about who can hit the hardest, MMA fighters would win all Grand Slams. This holds true to every shot on the tennis court, but it is especially true about volleys. Since you’re already taking a lot of time away from your opponent, you don’t need to hit it hard – just place it well.
Ain’t Nothing Like A Good Setup: The easiest way to get an easy volley is to hit good approach shots, so make sure you also work on that.
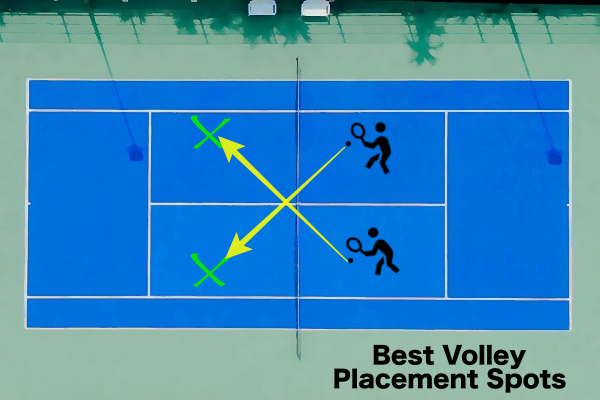
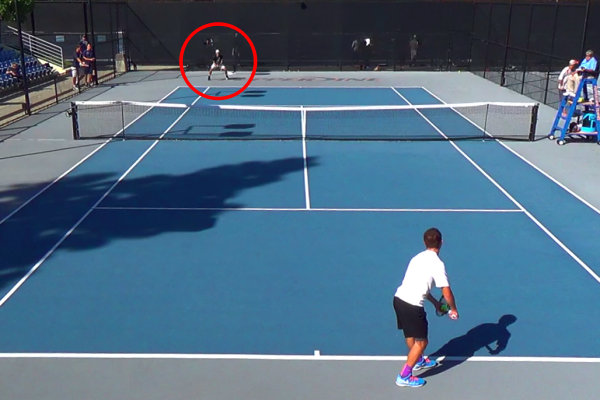
Find The Secret Spot: You should normally attempt to hit short cross-court volleys – not necessarily drop shots, just short ones. If you look at the image below, you’ll see what we mean.
The Sooner The Better: Make sure you always make contact with the ball in front of you. The earlier you hit it, the more time you will take away from your opponent.
Best Tennis Volley Drills
We are constantly adding new drill ideas for every area of your tennis game, volleys included. We have previously written an article on the 7 Drills To Improve Your Volleys, which has some of our favorite volley drills. Below, we’ve listed some of our favorite drills that will help you improve different aspects of your volleys, including direction, consistency, reflexes, and footwork.
For Volley Direction – The Bryan Brothers Drill
https://youtu.be/tmLVcBNSPHk
This drill will have you working with a partner in order to improve your volley direction. It might be a little challenging at first, but once you get a feel for it, you should be able to get a nice flow going. This drill will help you not only improve direction, but consistency and reflexes as well.
Points to remember when working on this drill:
Stay low even though you are moving laterally. It is easy to let yourself pop up.
Keep the hips as square as possible to the net as you move. This is a lateral movement, not a forward movement.
Don’t crowd the ball. Give yourself space. If the space isn’t there, create it.
Don’t assume the ball will be where you want it to be. Remember, this is a reaction drill. Make it realistic and don’t expect it to come in the perfect place.
Work together to keep the ball going as long as possible. It won’t be perfect, just strive to get better.
For Volley Consistency – The Wall Ball Drill
https://youtu.be/-Edo6MavEhQ
What we love about this drill is that it removes every distraction possible. When it’s just you and the wall, you can reach a focus level that is not possible when hitting with a tennis partner. The cool thing about it as well is that the more your volley technique improves and the more consistent you are, the easier the drill becomes.
Points to remember when working on this drill:
Keep your wrist firm. We are training strength in this drill, it is counterproductive to do this with a broken wrist.
Keep your weight on your front leg.
Move your feet. You will have to make small adjustments as you go.
Stay low. Feel a burn in your legs and don’t pop up as the drill goes on.
Keep your swing compact. If you can’t keep the ball going and it feels rushed, it is likely because your swing is too big.
Keep your head still, but keep your eyes locked on the ball the entire time.
For Volley Reflexes – The On Top Of The Net Drill
https://youtu.be/-yXP7WWeVBw
This is a great quick drill that can be extremely helpful, especially for doubles. You may get hit once or twice, but you will most certainly develop better reflexes.
Points to remember when working on this drill:
Keep your hands up. If you drop your hands, you won’t have time to get them back up.
Keep the swing compact.
Meet the ball out front as much as possible.
Don’t let the ball move you. Be a wall and resist against the power of the baseliner’s shot.
Depth doesn’t matter. All that matters is you are sticking the volley back and you are making the ball with force behind it.
For Volley Footwork – The Get Low, Stay Low Drill
https://youtu.be/mhe23wPRCtg
Finally, this drill is one of our favorites when it comes down to improving volley footwork. What makes it great is that it forces you to work on your legs while keeping the right technique. Trust me, you will get tired when doing this drill. But hey, the more tired you get now, the less tired you will be during the matches.
Points to remember when working on this drill:
After you touch the ground, still stay low. This should not look like you are doing a burpee.
Keep your chest up throughout.
Bend with your knees, not your back.
Final Thoughts
We hope you enjoyed this read and that you can go ahead and begin working on improving your volleys. If you do have any questions, comments, or concerns, let us know in the comments section below and we’ll get back to you as soon as we possibly can!
Even though tennis is not a contact sport, tennis players do not fall behind other athletes when it comes to injuries. Wrist, back, shoulder, hip, knee, ankle, and abdominal lesions are among the most common injuries for tennis players, in many cases forcing them to step away from the courts for several months. Even the best players in the world are subject to them – Roger Federer sat out for 6 months in 2016 due to a back injury, Nadal sat out for 7 months in 2012 due to a knee issue, and Andy Murray even retired from tennis for a while due to a hip injury.
There are two reasons why tennis players have injuries so frequently. First, lower body injuries usually happen due to the frequency of sprinting, stopping, and direction-changing that happens during a tennis match. Second, upper body injuries happen due to the large number of times players need to hit the same shot over and over.
While all the injuries mentioned above are fairly common, there is one injury that happens a lot more frequently than all others – tennis elbow.
Tennis elbow is a painful condition that affects not only athletes who play racket sports, but even other athletes and non-athletes as well. Affecting over 200,000 people in the US per year (2 to 3%), tennis elbow can be a very debilitating injury that can affect several areas of your life.
As a tennis player, you should have a good understanding of what tennis elbow is in order to avoid it and stay injury-free. In this article, we will cover exactly what tennis elbow is, how to treat it, and – most importantly – how to prevent it.
The information below is outlined in the following way:
What Is Tennis Elbow?
Tennis Elbow Causes
Tennis Elbow Symptoms
Is Tennis Elbow Painful?
Can You Play Tennis With Tennis Elbow?
Tennis Elbow Treatments
How Long To Heal Tennis Elbow?
Tennis Elbow Stretches
Tennis Elbow Exercises
What Is Tennis Elbow?
Tennis elbow, also known as lateral epicondylitis, is a common injury among tennis players (and players of other racket sports) caused by an inflammation of the tendons in the outside of the elbow and forearm. What usually causes tennis elbow is a large and frequent number of repetitions of the same movement, inflaming the tendons and causing a lot of pain.
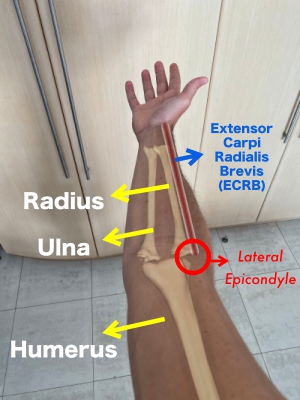
Your elbow is where your upper arm bone (humerus) joins your forearm bones (ulna and radius). Surrounding these bones are several different ligaments, tendons, and muscles. The purpose of your forearms muscles is to move your hand and fingers, while the purpose of your ligaments and tendons is to connect your muscles to your bones.
The tendons that join your forearm muscles to your humerus are called extensors, and tennis elbow is usually caused by an inflammation of the tendon called Extensor Carpi Radialis Brevis (ECRB). The humerus has a few bumps on its bottom, which are called either lateral (outside of elbow) or medial epicondyles (inside of elbow), and the ECRB is connected to the lateral epicondyle. This is why the scientific term for tennis elbow is lateral epicondylitis.
Tennis Elbow Causes
The causes of tennis elbow are usually exercises that put a strain on the person’s forearm muscles and that are extremely repetitive. The constant repetition causes muscles and tendons to inflame, which eventually leads to pain. Tennis elbow can also be caused by hitting your elbow somewhere.
Despite its name, the majority of tennis elbow injuries are caused by activities other than tennis. Other racket sports like squash and badminton can easily lead to such injury. In addition, other activities that can cause tennis elbow include gardening, painting, brushing, plumbing, woodworking, typing, knitting, lifting weights, playing the violin, or using scissors.
In tennis, tennis elbow injuries happen most of the times when players are hitting shots on their backhand side. By hitting a large number of shots using the wrong technique, these players end up causing inflammation in their elbows. This is mostly witnessed in beginners, who end up bending their elbows too much when hitting their backhands.
Tennis Elbow Symptoms
The main symptoms from tennis elbow are: 1) pain in the outside portion of your elbow that can extend to your upper arm, forearm, and hand; and 2) a lack of strength on your grip, which can make playing tennis very difficult. These symptoms can affect several activities in your life, as they will usually feel worse any time you use your hand or forearm – which can involve activities like turning a doorknob or even just holding a pen.
These symptoms will start slowly and will aggravate as you continue to use your arm. Since you use your forearm in so many day-to-day activities, it is likely that you will end up aggravating the inflammation.
Once the pain and weakness get to a certain point, it will be very difficult to continue playing tennis. Not only you will require more time to recover from this injury, but your body will most likely try to compensate for the pain by changing your technique – which can lead to other different injuries.
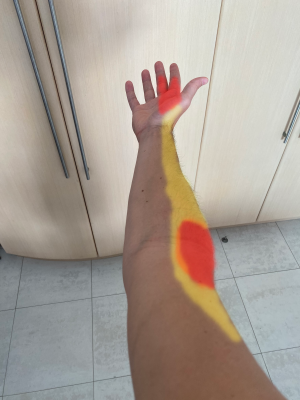
As you can see in the photo above, the red areas are the ones that are normally affected by tennis elbow injuries. The yellow areas are not as common, but can also be affected if the injury becomes more extreme.
Is Tennis Elbow Painful?
Tennis elbow can be quite painful. Since your elbow is inflamed, any movement with your hand or forearm can cause further inflammation, which will generally be painful. In addition, hitting or knocking your elbow will also usually hurt if you suffer from tennis elbow.
Can You Play Tennis With Tennis Elbow?
This is a tough question, and there is no definite answer. If you can, you should stop playing tennis as soon as you realize you might be suffering from tennis elbow. If you continue playing, you might increase the damage to your elbow – which will make the recovery process slower and more difficult.
However, we understand that sometimes you might not be able to quit tennis completely for months or even a year. If that’s your case, you should make sure that you work as much as you can on treating your injury and that you follow these tips when playing tennis:
If your elbow starts hurting, stop playing immediately;
Know what your priorities are – continue playing or recover 100% as quickly as possible. You can’t do both at the same time, so you need to figure out what is more important to you;
Correct any technique that might be aggravating your injury;
Strategize your match or practice according to your injury and avoid hitting shots that hurt your elbow;
Take days off and don’t play for too long at once;
Take off-court recovery VERY seriously – stretching, exercising, and icing might help you to continue playing tennis while healing your tennis elbow injury.
Tennis Elbow Treatment
Even though tennis elbow can be quite debilitating, the good news is that it shouldn’t require you to end your tennis career. In the majority of cases, tennis elbow will heal on its own, provided you take the necessary measures. In essence, tennis elbow pain is caused by inflammation and the pain will go away as soon as the inflammation does so as well.
There are several things you can do to help your tennis elbow get better, most of which we will cover below.
Icing The Injured Area
One of the first steps you should take once you start feeling pain in your elbow is to ice the injured area. Notice that you should never ice an injury before exercising the injured area, as that could make the injury worse. Icing your elbow should help to reduce both pain and inflammation, which makes it one of the most effective measures for a fast healing.
In order to ice your tennis elbow injury properly, you should follow the following tips:
If you played tennis and your elbow started hurting, ice it immediately;
Keep your icing sections between 15 to 20 minutes long, and never longer as that can make the injury worse;
Give yourself at least one-hour breaks between icing sections, giving the injured area enough time to recover;
Try to move the ice around the injury instead of just keeping it in one place;
If your pain is too intense, you can consider taking a painkiller with anti-inflammatory properties, like paracetamol or ibuprofen. If you choose to do so, you may also purchase these items in a cream version, which you can apply directly to the affected area. These creams may help to reduce pain and inflammation, especially when combined with icing.
Massages
Another very useful treatment method is to massage your elbow. An effective massage will make more blood circulate to your tendons, which normally don’t get a lot of blood when they are injured. A deep-tissue massage will help your tennis elbow heal faster than it would by otherwise just letting it rest. You can choose to see a physical therapist to get a massage, but you can also choose to do it yourself. The following video contains a nice overview of what a tennis elbow massage should be like.
If you choose to take your self-massage a step further, I recommend that you buy a massage gun like this one. These tools will get really deep into your tissue and you can do it all while watching tv. They come with adjustable heads and speeds so you can figure out which one works better for you.
Shockwave Therapy
Another non-invasive method to heal tennis elbow is using shockwave therapy. When doing so, you connect small electrodes to the injured area and these electrodes keep sending electric stimuli to activate your muscles and tendons. This can be effective when combined with the other methods to increase circulation in the area and speed up the recovery process. While you can purchase your own shockwave therapy machines online, I suggest that you see a physical therapist if you are looking to use this method.
Using Tennis Elbow Accessories
If your pain is not too severe and you’re considering playing through the pain while waiting for your elbow to heal itself, you may want to consider using a tennis elbow accessory. The most commonly used accessory is the compression sleeve, which keeps your elbow compressed and reduces pain. These sleeves are worn during workouts and tennis matches, so they are only treating the symptoms and not the cause. If you decide to use them, you should still work on some of the other treatments mentioned on this page.
Exercises & Stretches
Exercises and stretches can be one of the most effective ways to heal your tennis elbow and keep it from coming back. These methods will strengthen the injured area, make it more flexible, and increase circulation – all good things to fight tennis elbow. We will cover these methods in more detail below, but for now, you should just know that exercising and stretching may be your best friends.
Adjusting Your Technique
Even if you are very disciplined with your tennis elbow treatments, nothing will keep it from coming back if you have a poor tennis technique. If your backhand is not properly executed, the elbow inflammation will continue to happen and so will the pain. You can be as strong and flexible as you want, but you can’t fight physics. Adjusting your technique is incredibly important in order to prevent further recurrences. If you want to learn a little more about the proper backhand technique, we have written a great step-by-step guide, and you can check it here: Tennis Backhand – Grips, Tips, Steps – (With Photos & Video).
Steroid Injections & Surgery
Finally, you also have the option of pursuing more invasive treatments like steroid injections and surgery. Personally, I highly advise you against those, as there is no need to take such extreme measures. A more holistic treatment will have a much better effect, and it will be a lot better for your body in the long-run.
How Long To Heal Tennis Elbow?
Depending on the severity of your tennis elbow injury and on how disciplined you are with your treatment, you should expect to heal your elbow in a period that can range from 1 to 18 months. On average, however, most tennis elbow injuries heal in 6 to 12 months.
Tennis Elbow Stretches
While some people prefer to hire a physical therapist when treating a tennis elbow injury, you can recover just as fast by doing stretches and exercises at home by yourself. Working on the exercises and stretches mentioned below will be the most important aspect of your treatment – not only for pain relief but for full and fast healing.
If your injury is very painful and you are struggling to even move your elbow, we highly recommend that you start with the stretches. If your pain is not too bad, however, you may choose to start with a mix of stretches and exercises. We will give you a list of the best active recovery exercises for tennis elbow we know of, but it’s up to you to figure out which exercises work best for you. It is normal to feel a little discomfort in some exercises, but if you feel any pain, you should stop the exercise immediately.
Stretch #1 – Wrist Activation – Closed Fist
Even though tennis elbow injuries are caused by an inflammation in your elbow, the majority of stretches and exercises involve loosening up your wrist and forearm muscles. By doing so, the relaxation of the muscles will allow for the inflammation and pain to decrease.
The first stretch will be a great starting point if your pain is quite intense. Well, it’s not really a stretch but some kind of movement. You should follow these steps:
Sit down on a chair comfortably
Bend your elbows at a 90-degree angle, but keep it a few inches away from your leg
Make a fist with your hand, with the back of your hand facing the ceiling
Keep it fairly loose – you’re not stretching yet, just activating it
Move your fist in an up-and-down motion, keeping your elbow in place
Complete 2 sets of 10 reps each
Stretch #2 – Wrist Activation – Hammer Grip
This activation movement works similarly to the one mentioned above, but with a slightly different grip. This movement will activate different areas of your forearm, so you can do it immediately after the movement above.
Rotate your fist 90 degrees to the right, as if you were holding a hammer
Move your fist in an up-and-down motion (it will be a little awkward), keeping your elbow in place
Complete 2 sets of 10 reps each
Stretch #3 – Wrist Rotation
The third exercise in this progression might be a little more difficult, but it is just as important. You should remain in the same position, and you can do it immediately after the previous two movements.
Extend your fingers, while still keeping them close together
Begin with the back of your hand facing the ceiling
Rotate your hand so the palm of your hand faces the ceiling
Repeat that movement while keeping your elbow in place
Complete 2 sets of 10 reps each
Stretch #4 – Wrist Extension Stretch
The next stretch in this list is the wrist extension, and it will stretch your forearm. This stretch will usually not get the exact spot where your pain is located, but you should do it nonetheless. By starting off with this one, you will make it easier to move on to the next stretches. Follow these steps for this stretch:
You can either stand up or sit down for this exercise, just make sure you have a straight back
Extend your elbow, but make sure you keep at least a slight bend. If you’re in a lot of pain, you can give it a good bend
Extend your fingers, with the back of your hand facing you (as if you were telling someone to “stop”)
Use your other hand to pull your fingers back – which will stretch your forearm
Hold it for 15 seconds, completing a total of 5 reps
Stretch #5 – Wrist Flexion Stretch
This stretch is the opposite of the wrist extension, and it will generally hit right where your pain is.
This time extend your fingers down, with the palm of your hand facing you
Using your other hand, push the back of your hand towards yourself until you feel a stretch on the outside of your arm
Hold it for 15 seconds, completing a total of 5 reps
Stretch #6 – Wall Squeeze Stretch
The last stretch is a little different, but it can give you a great deal of relief.
Find a wall that has a corner in it
While standing up, bend your elbow at a 45-degree angle and touch the outside of your arm (right above the elbow) against the corner of the wall
With your non-injured hand, form an “L” shape with your index finger and your thumb
Using the L shape, push the forearm of your injured arm against the wall
Keep squeezing the hand of your injured arm into a fist
Squeeze it 10 times, and do 3 sets of it
Tennis Elbow Exercises
If you’re feeling comfortable with the stretches listed above, you may want to move on to some exercises. By strengthening your forearm, you will not only initiate more blood circulation in the injured area but you will strengthen the muscles around it. By strengthening the muscles, you will minimize the chances of injuring your elbow again. Once again, if you feel any pain during these exercises, you should stop them immediately.
Exercise #1 – Wrist Extension Strengthening
This exercise is essentially the exercise version of the stretch mentioned earlier. You should follow these steps:
Lay your forearm against a flat surface, with your hand just barely hanging off the table
With the back of your hand facing the ceiling, engage in an up-and-down motion while keeping your arm still
With no weight, repeat that movement 30 times once a day. If you were able to finish it without pain, you can move on to adding weight to your hand.
Start with no weight, then use either small dumbbells (1, 2, 3 lbs) or canned foods if you don’t have any dumbbells
Exercise #2 – Flexion Strengthening
Follow the same steps as the exercise mentioned above, but in the other direction.
Exercise #3 – Hammer Swing
For this exercise, you should remain in the same position as the exercises mentioned above.
Use the “hammer” grip we mentioned earlier for the Wrist Activation – Hammer Grip stretch
You can either choose to use a dumbbell here or a hammer. A hammer may even be better, as it has most of its weight on the tip.
Move your wrist from one side to the other – as if you were simulating a windshield wiper
Repeat this movement 10 times, and complete 2 sets of it
If you want to flex your wrist (move it downwards), you can start by holding the Flexbar as you would in a regular hammer grip. If you want to extend your wrist (move it upwards), you should bend your wrist down before holding the FlexBar (see pictures below).
Grab the Flexbar with your other hand and extend your elbows, keeping a slight bend
Rotate your wrist according to the exercise you’re going for – there should always be resistance against the movement
Complete 3 sets of 10 reps each
Final Thoughts
While tennis elbow can be a pretty debilitating injury, there’s no need to panic about it. As long as you’re responsible and take your treatment and recovery pretty seriously, you will be back on the tennis court in no time. Remember that you should use a combination of the treatments mentioned above in order to fully heal your injury, and that your best choice might be to correct your tennis technique in order to avoid future tennis elbow occurrences!
Weekly Digest #2 – 01/06 to 01/12 – New Tournament, Old Champion
It’s only the 2nd week of the year and tennis fans have already had enough excitement for the year. We have seen the conclusion of the ATP Cup (which, in my opinion, was a success) with Djokovic’s Serbia defeating Nadal’s Spain. Once again, these 2 players have shown how good they are and how they can (and will) defeat other countries basically by themselves.
We’ve seen really exciting moments from NextGen players, which included Daniil Medvedev and Denis Shapovalov almost taking their matches against Novak. Alex de Minaur had a great tournament, showing an unmatched energy level, professionalism, passion, and great tennis. An honorable mention also goes to Hubert Hurcakz, who defeated Diego Schwartzmann, Borna Coric, and Dominic Thiem. By the way, I’ve seen this guy plan and I believe he will be a top 15 player by the end of 2020. Even Nick Kyrgios showed a more mature attitude and professionalism, but that could all change next week.
If we’ve seen glimpses of hope, we’ve also watched some disappointing moments. Tsitsipas, during an angry outburst, hit his dad while smashing a tennis racket. Zverev, besides hitting several double faults during his matches, was seen yelling at his own dad. And Daniil Medvedev (not surprisingly) was fighting with everything and everyone during his match against Schwartzmann. While they are still young (Federer used to break everything when he was young), they’ll need to get their stuff together if they want to stay at the top.
On the women’s side, we saw some great matches in Brisbane. Karolina Pliskova took home the title, leaving behind several of #1 contenders, including Naomi Osaka, Ashleigh Barty, Elina Svitolina, and Petra Kvitova. In Auckland, Serena Williams took home her first title since her daughter was born, which could give her the necessary confidence to win the Australian Open. Finally, in Shenzhen, Ekaterina Alexandrova won her first-ever WTA, showing signs that she could have her best season yet.
The bad news this week came from Bianca Andreescu, who is always one of the most entertaining players to watch. She continued with her history of injuries, and will need to miss the Australian Open due to a knee injury.
Winners Of The Week
ATP/WTA
Novak Djokovic: Novak proved once again how good he is and that he should definitely be put into the same category as Federer and Nadal. He managed to win every match he played in the ATP Cup, leading Serbia to an unlikely title over Spain.
Andrey Rublev: One of the NextGen players who developed the most in 2019, Rublev took home the Doha title – defeating Corentin Moutet in the final by 6/2 7/6(3).
Serena Williams – Serena won the title in Auckland after defeating Jessica Pegula by 6/3 6/4, marking her first title in 3 years and the first one since her daughter was born.
Karolína Plíšková – The #2 player in the world won the toughest tournament of the week, showing that she is a contender at the Australian Open. She defeated Madison Keys in the finals by 6/4 4/6 7/6.
Ekaterina Alexandrova – Alexandrova won her first-ever WTA title this week, defeating Elena Rybakina by 6/2 6/2 in Shenzhen.
Challengers
Philipp Kohlschreiber: Canberra Challenger Champion
Ulises Blanch: Ann Arbor Challenger Champion
Futures
Francisco Cerundolo: M25 Los Angeles, CA, USA
Javier Barranco Cosano: M15 Antalya, TUR
Yuta Shimizo: M15 Hong Kong, HKG
Carlos Alcaraz Garfia: M15 Manacor, ESP
Lucas Catarina: M15 Monastir, TUN
Magdalena Frech: W25 Canberra (Bendigo), AUS
Anastasiya Komardina: W25 Hong Kong, HKG
Zeynep Sonmez: W15 Antalya, TUR
Sabina Sharipova: W15 Monastir, TUN
Top 5 Biggest Upsets
David Goffin def. Rafael Nadal: 6/4 7/6(3)
Jennifer Brady def. Ashleigh Barty: 6/4 7/6(4)
Dan Evans def. Alex de Minaur: 7/6(4) 4/6 7/6(2)
Corentin Moutet def. Stan Wawrinka: 3/6 7/5 6/3
Anna Blinkova def. Belinda Bencic: 3/6 6/3 6/3
Injuries
Bianca Andreescu – Knee, will miss Australian Open
Venus Williams – Hip, will miss Auckland International
Match of The Week
Nick Kyrgios def Stefanos Tsitsipas: 7/6(7) 6/7(3) 7/6(5)
Nothing major happening this week, as most of the big players are getting ready for the Australian Open. It will be interesting to watch the Adelaide ATP, as Alex de Minaur will be the 1st seed and Andrey Rublev will be the 3rd. They are on separate sides of the draw, so it will be interesting to see if they will be able to extend the solid campaigns from this week.
In Auckland, we’ll keep our eyes on some other NextGen players, including Shapovalov, Khachanov, Ruud, and Hurkacz. However, what I’m most excited to see is how Jannik Sinner (the winner of the 2019 NextGen Cup) will start his season. He will play against Benoit Paire in the first round, so it will be a tough test.
On the women’s side, the main focus will be on the Adelaide Premier. Lots of big names playing in there, and we’ll see if Ash Barty will be able to bounce back from her campaign this past week.
What We’re Up To
Karue will be helping Naomi Osaka to prepare for the defense of her Aussie Open title. Gui is working on getting some more content, and we may be adding another team member soon. Stay tuned for some more cool content coming out this week!
Tennis is considered to be the 4th most popular sport in the world. Standing behind only soccer, basketball, and cricket, tennis has an estimated fan base of over 1 billion fans and is considered one of the most global sports of all. While cricket is very popular in India and basketball is very popular in the US, tennis fans are spread out everywhere across the world. In addition, the 4 Grand Slams are some of the most-watched sporting events in the world, and these numbers are growing year after year.
Tennis is also one of the sports with the largest number of players across the world. In 2019, the ITF (International Tennis Federation) published a study that claims that there are currently about 87 million active tennis players in the world.
There are several reasons behind tennis’ popularity, which include: 1) It can be played from a young age until a very advanced age; 2) It is a great workout to stay in shape; 3) It has a great social aspect to it, which allows players to make friends and network; and 4) It only requires 2 players and very little equipment.
If you are considering learning tennis but you don’t know where to start, you have come to the right place. While we understand that learning this new sport can be intimidating, we will do our very best to make it easy and exciting for you. We will break everything down in a way that even the absolute beginner can understand. And at the end of the day, if you still have any questions, feel free to let us know and we guarantee we will try to help you out.
The important thing to remember is that tennis is not as difficult as it seems and that you can (and will) learn how to play quickly. So don’t get discouraged and stick through with it, and most importantly – have fun!
The content below is structured in the following way:
Equipment You’ll Need
The Basics
The Nice-To-Haves
Finding A Tennis Court Near You
Understanding The Tennis Court
The Court Lines
The Court Areas
Understanding Tennis Shots
Serve
Return
Forehand
Backhand
Slice
Forehand Volley
Backhand Volley
Overhead
Understand The Basic Rules
Understand How The Scoring System Works
Tennis Etiquette 101
Equipment You Will Need
While sometimes tennis may be considered a sport reserved for the wealthy, the reality is very different. While playing tennis competitively is, in fact, expensive, playing it recreationally requires few players and very little equipment.
Below, we have come up with two different lists: the first one outlines the absolute basic equipment you will need, while the second one mentions some equipment that is nice to have. If this is one of your first few times playing, we highly recommend that you stick to the basics until you decide if this is a sport you want to pursue. If you know for a fact that you like to play tennis, you might want to go ahead and invest in some of the nice-to-have equipment.
Tennis Equipment List – The Basics
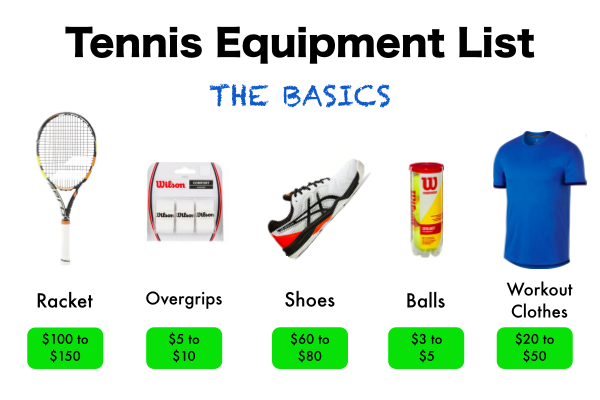
Tennis Racket: Choosing a tennis racket can be very overwhelming since there are so many options out there. As a general guideline, you should stick to rackets from these 7 brands. If you’re willing to invest some more, I would recommend sticking to Babolat, Head, or Wilson rackets. You can visit a tennis shop near you to get some custom guidance, but in general, when looking for a good tennis racquet brand, you should look for racquets that are known to last for a long time, that will give you control and power, that will be gentle on your body, and that will not become outdated. You can get a pretty decent racket for somewhere between $100 and $150.
Tennis Balls: You will also find a multitude of tennis ball options in stores, but we recommend that you stick to one of 3 types: Penn Championship Tennis Balls, Wilson US Open Extra Duty Tennis Balls, and Wilson Championship Extra Duty Balls. These 3 balls are the best and most popular among tennis players, and they can be purchased through the Amazon links above, at Walmart, Dick’s Sporting Goods, or your local tennis shop. Tennis balls get old after a few playing sessions, so you will need to purchase new ones as they become old. You should not pay more than $5 for a can of balls.
Tennis Overgrip: When you buy a new racket, most of the time it will not come with an overgrip on it. Overgrips are used to absorb sweat, give a better grip, and add comfort when holding the racket. Playing without an overgrip will not be optimal, so you should buy one (they are very cheap). One of my favorite grips is the White Wilson Pro Comfort Overgrip, and you can usually find it at most tennis stores. While they are cheaper if bought in bigger quantities, you can usually find individual ones for sale as well. You should pay about $5 to $10 dollars for 3 overgrips.
Tennis Shoes: You should avoid going on a tennis court while wearing regular workout shoes since they are usually not stable enough and can easily lead to injuries. Tennis shoes are specially designed to provide the right level of comfort and protection. My favorite tennis shoe brand is Asics, but Nike, Adidas, and New Balance have great options as well. While the best tennis shoes are priced in the $150 range, you can get decent starting pairs for about $70.
Workout Clothes: Finally, you will also need workout clothes to play tennis. You don’t need to spend money on getting new clothes at first, so just pick any clothes that are breathable, flexible, and comfortable. Seriously, any shorts, leggings, and t-shirts will do. Also, make sure you always wear socks if you don’t want to end up with blisters all over your feet.
With the equipment mentioned above, you should be ready to get to the court and start playing. While it is not necessarily cheap, you could get a pretty decent starting kit for $225. And remember that you will be able to reuse this equipment multiple times, which ends up being a good investment.
Tennis Equipment List – The Nice-To-Haves
The equipment listed below is not necessary for the beginner tennis player, but it is quite useful for the more advanced ones. So, if you’ve decided that you want to continue developing your tennis game, you might want to consider investing in the items below.
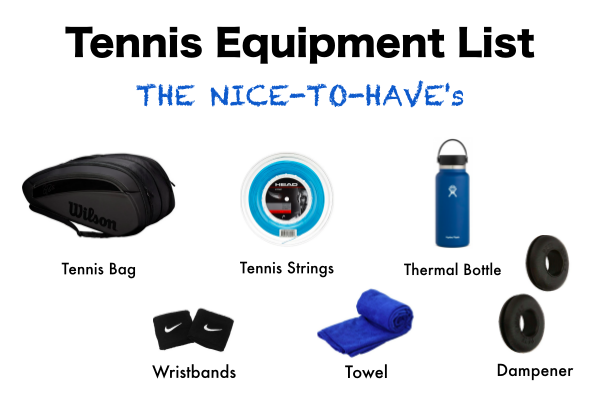
Tennis Bag: As you start accumulating more and more tennis equipment, it will become quite inconvenient to carry all of your stuff around. That is when you might want to consider investing in a tennis bag. A tennis bag will have enough room for several rackets, balls, and everything else you might want to bring on the court. You can either buy a tennis backpack or a bag for 3 or 6 rackets, depending on how much equipment you have. Most tennis players usually buy a tennis bag of the same brand as their racket’s, but it’s completely fine to buy from a different brand.
Tennis Strings: The more you play (and the more topspin you hit shots with), the more worn out your strings will become. As strings become used, they begin losing tension, and eventually, the friction between the horizontal and vertical strings will break the strings. Once the strings break, you will need to replace them as you have little control when playing with broken strings. This is when it comes in handy to have a set of tennis strings in your bag, so you can immediately have your racket restrung. The string you choose will have a big impact on your game, but when you’re just starting out it won’t matter too much.
Dampener: Using or not using a dampener is a matter of preference. A dampener will reduce the vibration of the racket when you strike the ball, and some players prefer it like that. It is a common myth that a dampener will reduce the risk of tennis elbow, but that is not correct.
Wristband: Some players enjoy wearing wristbands, as they can help your hands to stay dry during the points. If you normally play in extremely hot or humid weather, you should plan on having some wristbands in your tennis bag. It can be very difficult to play tennis if you’re sweating so much that you can barely hold your racket. I always had sweatbands I’m my bag in case of emergency.
Water Bottle: Buying a thermal water bottle is completely optional, as you can easily just keep buying new plastic bottles all the time. However, if you do decide to buy one, you end up saving some money in the long-run and you can keep your water cold for long periods of time.
Towel: Lastly, it’s pretty important to always have a towel with you when playing tennis. Unless you’re playing in cold and dry weather, you will eventually start sweating. The sweat will then get to your hands, and it will be quite hard to hold your racket. In some cases, you might even let the racket slip during a serve and breaking it (been there, done that). Having a cheap towel can help you avoid that.
Finding A Tennis Court Near You
Once you have the tennis equipment you need, you should find a tennis court near you. In some cases, you will need to join a country club or a gym with tennis courts. If you need to do so, you will have to pay but you will most likely also have access to a tennis league (which is pretty nice). If you’re trying to learn tennis by yourself, however, I recommend that you wait to join a club and instead try to look for free and public courts nearby. Some countries don’t have public courts everywhere, but the US has many of them. You may have a park nearby or even a high school with tennis courts, and you can usually use those for free.
There are a few websites which you can use to locate tennis courts near you, including:
Once you have your equipment and you have found a court to play, it is time to move on to the actual tennis game. Before you can learn the rules and how to hit specific shots, it is necessary that you understand the layout of the tennis court and what each basic shot means. By understanding those, it will be much easier to learn the rules.
Tennis Court Lines
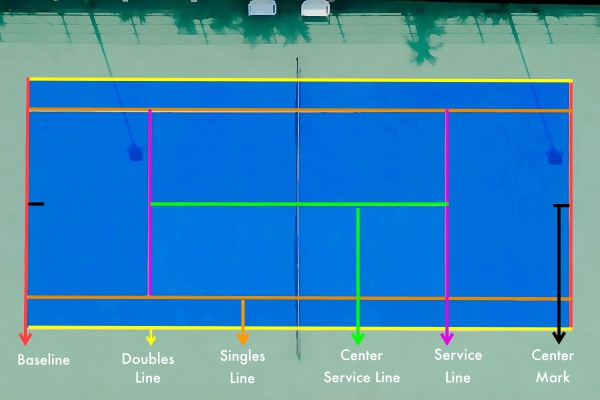
The picture above contains the name of every line on a tennis court. This is the purpose of each line:
Baseline: The baseline indicates the boundary of the court lengthwise. It serves two purposes: 1) When a player is serving, he or she must stand behind the baseline; and 2) If a player hits a shot that lands past the baseline, the shot is considered out and the player will lose the point.
Doubles Line: As the name indicates, the doubles line is only relevant during doubles matches. During a doubles match, it indicates the boundary of the court widthwise. During singles matches, it is irrelevant.
Singles Line: It is the equivalent of the doubles line, but for singles matches. Indicates the widthwise boundaries of the court in a one-vs-one match. Any shot that bounces outside these lines is considered out, which results in the player losing a point.
Center Service Line: This line is aligned with the center mark, and it divides the court into a left and a right half. As with the center mark and the service line, it is only relevant during a player’s serve. Depending on the score, a player needs to serve either to the right or to the left of this line. If the player misses the target, the serve is considered a miss.
Service Line: When combined with the center service line, the service line forms the area known as the service box (see below). The service line indicates the lengthwise limit of the area where a player’s serve must land. If a serve lands beyond the service line, it is considered a miss.
Center Mark: This line’s sole purpose is to indicate where the player who is serving must stand before the serve. A server will start serving a game serving on the right side of the center mark, and will alternate between left and right every point after.
Tennis Court Areas
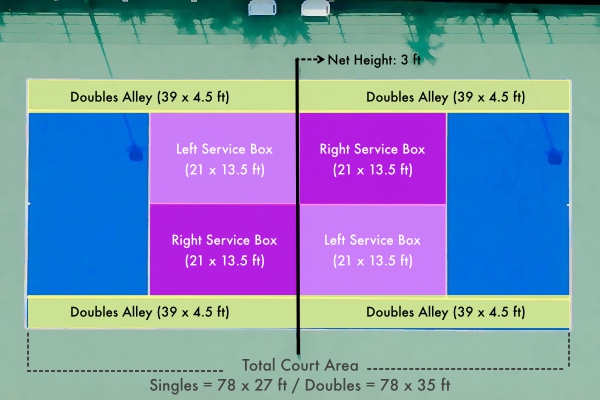
When the lines above are combined, they end up forming different areas on the tennis court, as you can see below.
Left and Right Service Boxes: The most important area you should understand now. These are the areas where players need to hit their serves. For now, you just need to understand that a player will have to alternate each point, hitting the right service box in one point and the left one on the next. We’ll explain with more details below.
Doubles Alley: These areas are only relevant during doubles matches. Think of them as an “extension” to the singles court. Since there are 4 players in a doubles match instead of 2, the court becomes a little bigger.
Total Court Area: As mentioned above, the doubles court area is bigger than the singles one. A total court area is where every player’s shot (except serves) must land on.
Net Height: While the net height is not technically an area, it is worth mentioning. Each shot a player hits must clear the net. Otherwise, it is considered an error and results in a lost point.
Understand Tennis Shots
Before moving on to the actual rules of the tennis game, you should become familiar with the 8 basic tennis shots. These are shots that you will need to hit during pretty much every match you play. For now, you just need to know what each shot means. These are the shots:
Serve
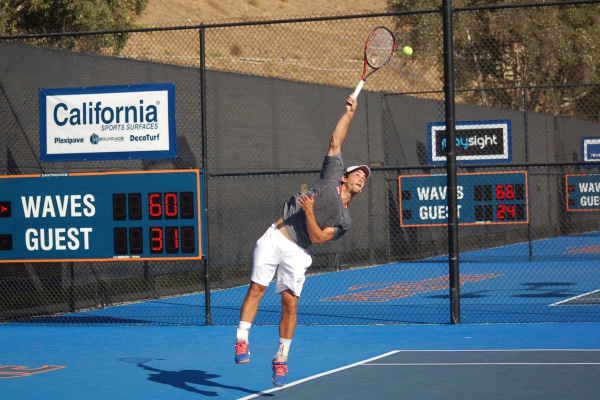
The serve is the stroke that begins every single point in a tennis match. While one player is serving, the other is receiving, and they take turns after the end of every game. Serves can take different shapes and forms, but they are generally characterized by a movement where the player swings the racket above his head, while still standing behind the baseline.
We have a great resource if you wish to learn how to serve step-by-step, where you will find everything you need. If you’re interested, you can check out our Serving Guide here.
Return
A return is a shot where one player waits to see where the other player’s serve lands and then attempts to hit the ball back to the other side. A return can be executed in several different ways, with a forehand, backhand, slice, block, or chip. The most important aspect of a return is just getting the ball back to the other side, no matter how.
Forehand
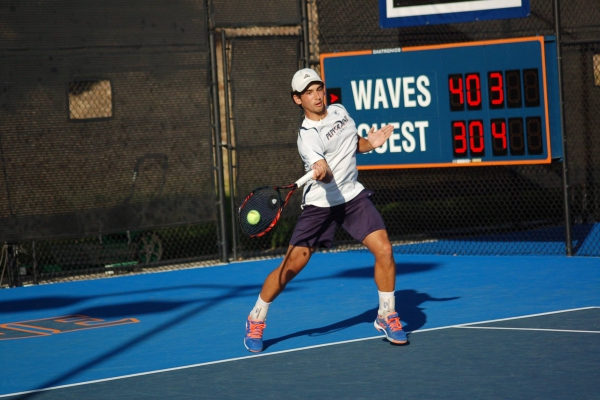
A player hits a forehand when he allows the ball to bounce once on his court before hitting it, and hits it with his dominant side. With very few exceptions, players hit forehands using only one arm. The reason why forehands are called forehands is because normally, the front (fore) of your hand holding the racquet will be facing your opponent.
The backhand is the equivalent of the forehand but executed on the player’s non-dominant side. For instance, if a player is right-handed, the backhand will be executed on the left side. If a player is left-handed, the backhand will be executed on the right side. The reason why backhands are called that is that the back of the player’s dominant hand is facing the opponent.
We have a great resource for players looking to learn how to hit backhands better. You can check it out here.
Slice
A slice is essentially a variation of the backhand shot. Instead of hitting the ball on the top, your racquet swings through the bottom of the ball. That adds underspin to the shot, so after the ball bounces on the other side, it stays low and close to the ground.
Forehand Volley
The forehand volley is a fairly simple movement, in which you use only one arm to hit a ball by your dominant side, without letting the ball touch the ground. It requires firm hands and fast reflexes.
Backhand Volley
The backhand volley looks a lot like a backhand slice, but without letting the ball touch the ground. Once again, a volley usually occurs when you are standing close to the net. A backhand volley always happens on your non-dominant side.
Overhead
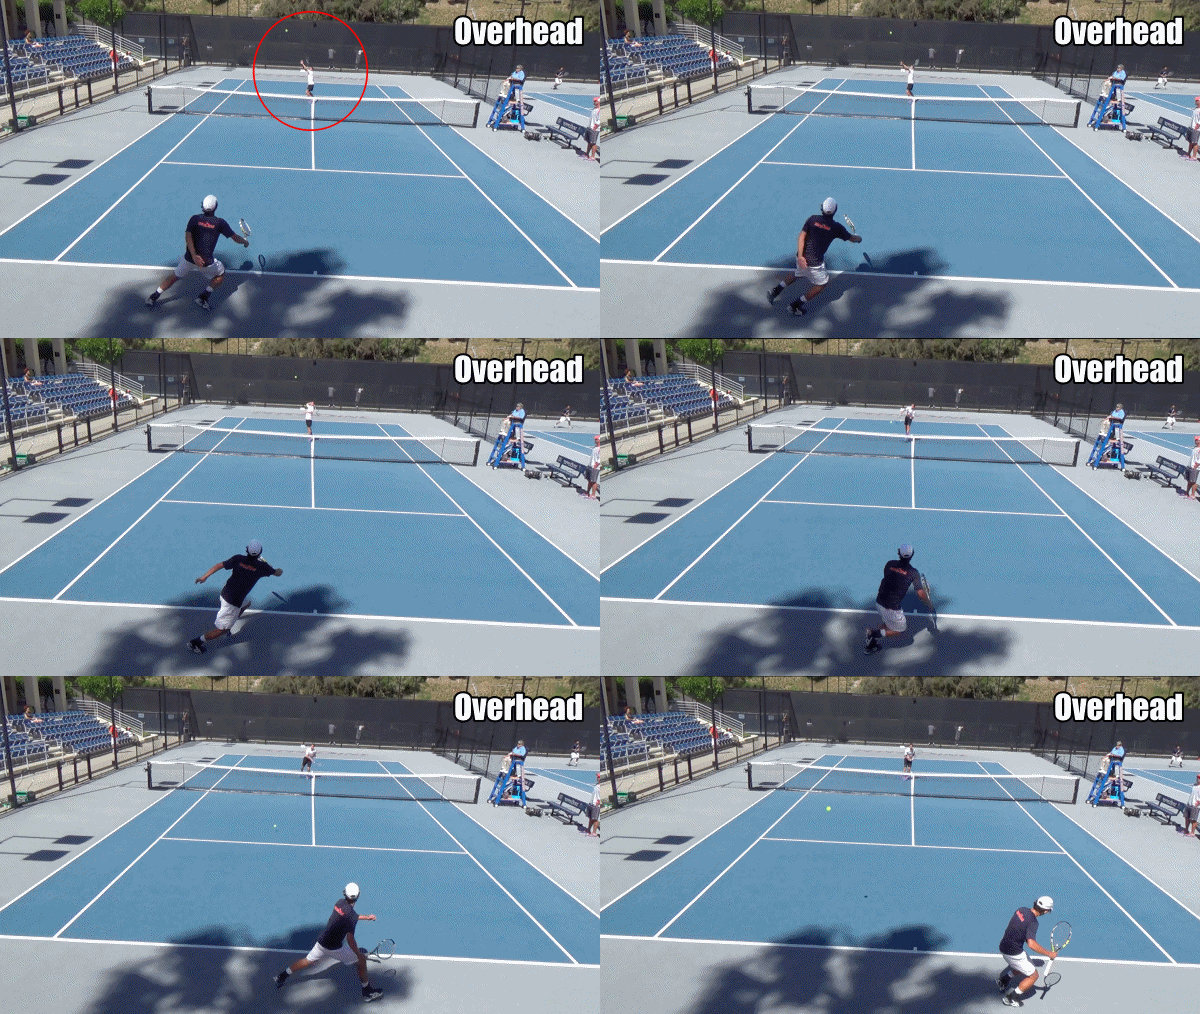
The last basic shot you should become comfortable with is the overhead (also called smash in some countries). You must be standing close to the net and hit the ball without bouncing. You need to hit the ball over your head (similarly to a serve), and that is why this shot is named the way it is.
Understand The Basic Rules
Tennis rules are quite complex, so if you’re looking to get a good understanding of them, I suggest you go through our Ultimate Tennis Rules Guide. There, you’ll find detailed explanations on every rule there is to know.
For the purpose of this article, we’ll keep things shorter and sweeter, giving you a basic understanding – but enough so that you can go out there and start playing.
In essence, the main rule you need to understand is how to play a tennis point. Once you understand that, it is just a matter of understanding how the scoring system works.
In order to start a tennis match, the players need to decide which one of the players will start the match on serve (hitting serve shots). This is usually done by a coin toss, with the winner getting to choose who starts serving. The player who is serving is called the server, and the player not serving is called the receiver. After that step is done, players will start playing the first point.
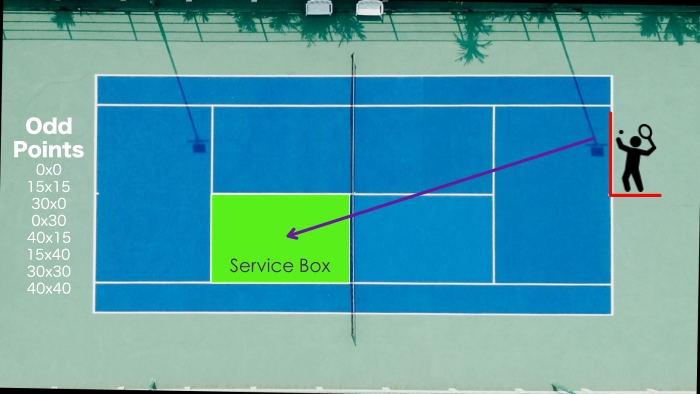
In order to do so, the player who starts serving must go to his side of the court and stand behind the baseline. On the first point, he will start on the right side of the center mark. On the second, he will start on the left side, and will alternate every point after. In order to successfully start a point, the player who is serving must hit his serve on the service box located over the net and diagonally from him. So if a player is standing on the right side of the court, he needs to hit his serve on the right service box across the net, and vice versa.
A player has the right to two serves on each point. If he misses his first serve, he has another attempt to hit the service box on his second serve. If the player misses both serves (either at the net or outside the service box), he has hit a double fault and consequently lost the point.
If the player was able to hit the serve inside the service box, the point will have officially started. From then on, each player’s goal is to hit the ball over the net and inside the court area, until one of them wins the point. After the ball has bounced on the service box for the first time, players can either hit the ball directly in the air or let it bounce once on their court. This is when the player will hit the shots mentioned earlier (forehand, backhand, slice, forehand volley, backhand volley, and overhead). There are 5 ways a player can win a point:
If the opponent misses two serves in a row (double fault)
If the opponent misses a shot at the net
If the opponent hits a shot over the net, but outside the court area – either long or wide
If the player hits a shot that goes past her opponent
If the player hits a shot that bounces twice on the opponent’s court before the opponent can hit it
Understand How Tennis Scoring Works
If you’re looking to learn all the nooks and crannies of the tennis scoring system, we suggest you go through our Tennis Scoring System guide. There, you’ll find all there is to know, in an easily digestible way. In this post, we’ll stick to the basics.
The first part of the scoring system is to understand that tennis follows a pretty unique counting system. When a player wins points, his points will accumulate until he wins a game. Once the player wins enough games, he will win a set. When a player wins multiple sets, he will have finally won the match.
As we have mentioned above, players can win points in 5 different ways. Once they win points, they get on the scoreboard. Instead of counting points like 1, 2, 3, 4, tennis points are counted as 0, 15, 30, and 40. So if the player who is serving wins the first point of the match, the score goes to 15 x 0. If he loses the first point, the score is 0 x 15 (you always count the score of the server first).
Once a player has a point score of 40 and wins another point, he will have won a game. If both players are tied at 40 x 40 (also called deuce), the first player to obtain a margin of two points wins the game. So if the score is 40 x 40, the counting sequence is 40 → Ad → Game. If the score is Ad x 40 and the player with Ad loses the point, the score goes back to 40 x 40.
After a player wins a game, the point score goes back to 0 x 0 and the server and receiver switch roles. Players keep accumulating games until one of them wins 6 games. Whenever a player wins 6 games, he will have won a set. If players are tied at 5 games to 5, the first one to win 7 wins the set. If the players tie again at 6 games to 6, they need to play a tiebreak.
A tiebreak is a special type of game, designed to break a tie between two players (hence the name). The point scoring system in a tiebreak works differently than other games (0, 15, 30, 40), and you should count the points using the regular numerical system (0, 1, 2, 3, …). The first player to reach a total of 7 points wins the tiebreak, and consequently the set. If players are tied at 6 points to 6 in the tiebreak, the first player to obtain a 2-point margin wins the tiebreak.
The serving turns also work differently during a tiebreak. The player who begins serving serves for one point, and then the players switch roles. From then on, each player will serve for two points until the tiebreak is over. The player who started the tiebreak as the receiver begins the new set as the server.
In most tournaments, the first player to win 2 sets wins the match. During Grand Slam tournaments (Australian Open, Roland Garros, Wimbledon, and US Open), a player needs to win 3 sets in order to win a match.
Below is a video tutorial we made on how the tennis scoring system works.
https://youtu.be/MziMoHgh7mo?t=78
Tennis Etiquette 101
If you’ve made it to this point, I can tell you you’re officially ready to start playing tennis! Before we wrap up, we wanted to touch on a few last points that you should know. These points are part of what tennis players consider as tennis etiquette, or unspoken code of ethics that every tennis player is expected to follow. If you’re expecting to continue your tennis learning journey, you should keep the following points in mind.
Don’t yell, scream, or curse on a tennis court
Wear outfits and gear that are appropriate to tennis
Silence your phone and don’t talk on it during a match
Do not yell or speak when your opponent is about to hit a shot
While you’re responsible for the line calls (in or out) on your side of the court, you should always rule it in favor of your opponent when in doubt. If you’re not 100% sure your opponent’s shot was out, you should call it in
Even though it’s ok to question your opponent’s call every now and then, don’t keep questioning it after every point
If there’s an extra ball on the court, you should stop the point and remove the ball. You will both have to repeat the point, but that will keep everybody away from injuries
Don’t try to distract your opponent when he or she is serving by making noises or sudden movements
Play according to your opponent’s rhythm when he or she is serving
When you’re serving, wait until your opponent is ready to receive
Don’t celebrate your points in your opponent’s face
Shake your opponent’s hand at the end of the match. Don’t be a sore loser!
Final Thoughts
You made it! You now have all the knowledge you need in order to become a tennis player. Now, all you need to do is get out on the court and start practicing. And most importantly, have fun! Tennis is a wonderful sport that has given me some amazing experiences and opportunities in life that I would have never had otherwise, so I will forever be an advocate for this sport.
If you have decided that you want to continue learning about tennis, you are always welcome to come back to My Tennis HQ as we’re always releasing new content for all levels of tennis players. Our mission is to make you a better tennis player, so we hope we can help you. Also, if you have any questions, let us know in the comments section below.
Let’s be honest, there is nothing like watching a good backhand down the line winner. Guys like Wawrinka, Federer, Nalbandian, Djokovic, Agassi and Guga (plenty more) have given us countless hours of highlights with their backhands. It is a “WOW” shot. But for most people, the backhand is a difficult shot, especially at the club level, and for most players it is considered to be their weaker side. As a guy who pretty much made a career from having a good backhand, I decided to share my knowledge with you.
In this article we will cover everything you need to know in order to have a proper backhand. For beginners, you will learn what a backhand is and how you can hit one step-by-step. For you more advanced readers, pay attention to the fundamentals. No matter what your level is, you can always gain by developing a better base on your groundstrokes.
This article is structured in the following way:
What is a backhand in tennis?
Two Handed Backhand
Step 1 – Grip
Step 2 – Feet Positioning
Step 3 – The Takeaway
Step 4 – Forward Swing
Step 5 – The Contact
Step 6 – The Follow Through
One Handed Backhand
Step 1 – Grip
Step 2 – Feet Positioning
Step 3 – The Takeaway
Step 4 – Forward Swing
Step 5 – The Contact
Step 6 – The Follow Through
Different Types of Backhand
Flat
Topspin
Slice
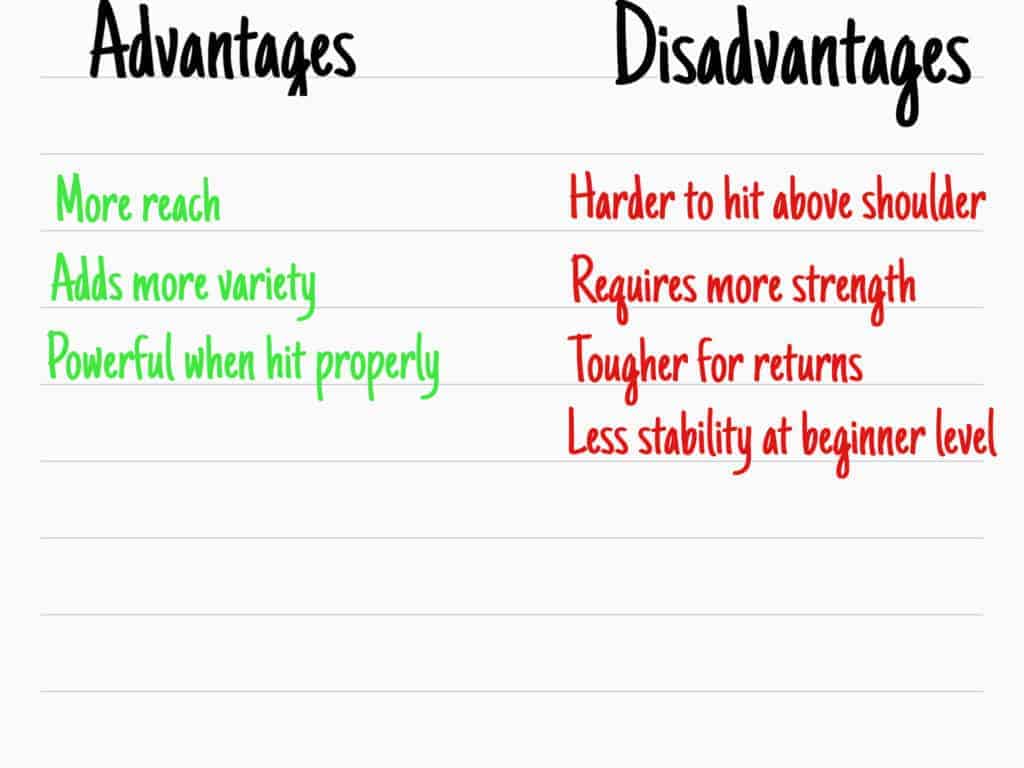
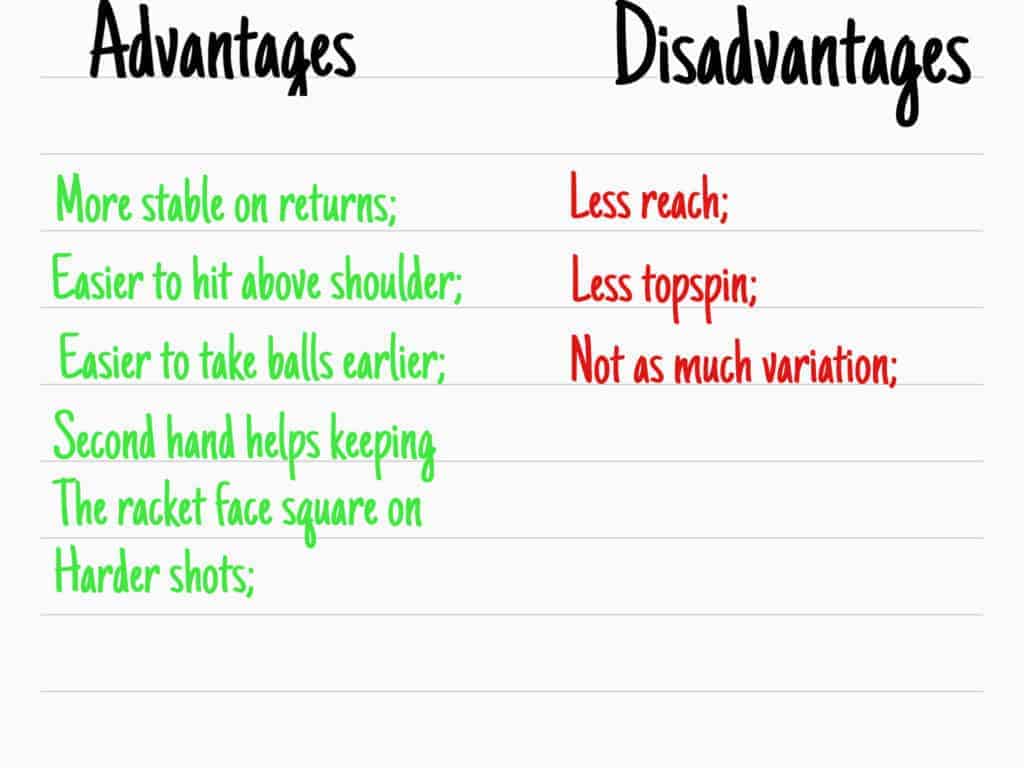
Advantages and Disadvantages of Each
6 Best Tips For A Better Backhand
What Is A Tennis Backhand?
The backhand is the tennis shot where the player swings the racket with the back of the hand moving towards the direction of the stroke. For a right handed player, the backhand swing starts on the left side of the body and it ends on the right side of the body (opposite for lefties). This action can be performed with one arm or both arms; ONE HANDED BACKHAND and TWO HANDED BACKHAND. We will cover both backhands in this article. In the past, backhands have been known as the weaker shot because it is typically harder to generate as much power as on the forehand side, but in modern tennis this is far from the truth. Today, it is imperative that players have solid backhands in order to succeed on the professional tour.
The Two Handed Backhand
While the two handed backhand has been around for a long time, it became increasingly popular during the Bjorn Borg era in the 1980s. His unorthodox style of making contact with the ball using both hands on the racket and then continuing the follow through with one hand helped popularize the topspin two handed backhand. Today, most players play with two handed backhands as children have an easier timing learning it because it requires less strength from them.
As is with every tennis stroke, it is important to develop a good foundation in order to have a solid backhand. I have broken it down into 6 steps:
The Grip
The Feet Postioning
Downswing
The Takeaway
The Impact
The Follow through
Step 1 – The Grip
On the two handed backhand we need to have both hands properly gripping the racket; the hand that is pulling the racket (the same you hit your forehand with) will be at the bottom of the grip and the hand that is pushing the racket will be at the top. Let’s take a look at both:
Bottom Hand:
The bottom hand is the players most dominant hand. With this hand you need to grip the racket using a Continental Grip (If you don’t know much about grips, check our ultimate guide here).
The index finger knuckle should be placed somewhere between bevel #1 and #2. While you can make small adjustments to find what is most comfortable for you, the continental is the rule. Gripping the racket differently will increase the difficulty of hitting a two handed backhand.
Top Hand:
The top hand is the players least dominant hand. It has the job of pushing the racket (much like a forehand) through the shot and controlling the face of the racket. On the two handed backhand, the top hand gripping the racket has the most important job; it is in charge of accelerating the racket head through the ball which will translate into more power and control. Improving your ability to use your non-dominant hand is imperative in order for you to have a proper two handed backhand. There are a couple of grips you can use with your non dominant hand.
Eastern Grip
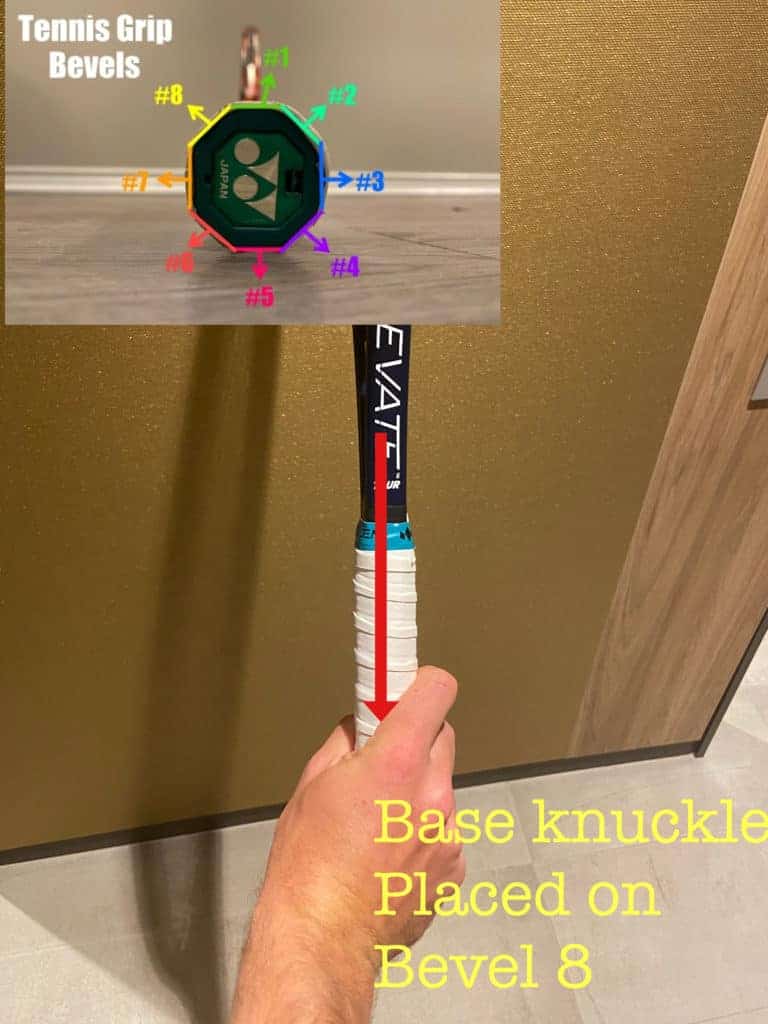
For the eastern grip, the index finger knuckle should somewhere between bevel 7 and 8. The eastern grip is the most commonly used for two handed backhands.
Semi western grip
For the semi westerns grip, your index finger knuckle should be located somewhere between bevel 6 and 7 (find what’s comfortable for you). The semi western grip has increased in popularity because it helps players hit their backhands with more topspin, adding more control.
Regardless of what grip you choose to hit with, remember that the top hand is the one that controls the racket face through contact and adds power to your backhand. You need to get comfortable with it and properly train the non-dominant hand in order to have a solid double handed backhand.
Step 2 – Tennis Double Handed Backhand Stances
Once you choose the grip you feel most comfortable with, you need to learn how to position your legs and feet when hitting a backhand. There are three main positions: Neutral Stance, Open Stance and Semi-Open Stance. The feet positioning on the backhand is reliant on the shot that is hit to you. Once it is settled where the ball will land you can choose between the stances. Let’s take a better look at each one of it:
Neutral Stance Backhand
Neutral Stance Backhand
The neutral stance backhand is the most used leg positioning on the backhand side. In this stance, your front foot is placed directly in front of your back foot. The weight of your body will be centered on the front leg, which allows players to rotate strongly around the ball.
While on the forehand side, players utilize the Open Stance more often because of its quicker preparation, on the backhand side the neutral stance is the most used. It allows players to rotate faster and make contact with the ball more in front of their bodies. The neutral stance is used for both aggressive and neutral backhands, but it is less used defensively on the double handed backhand.
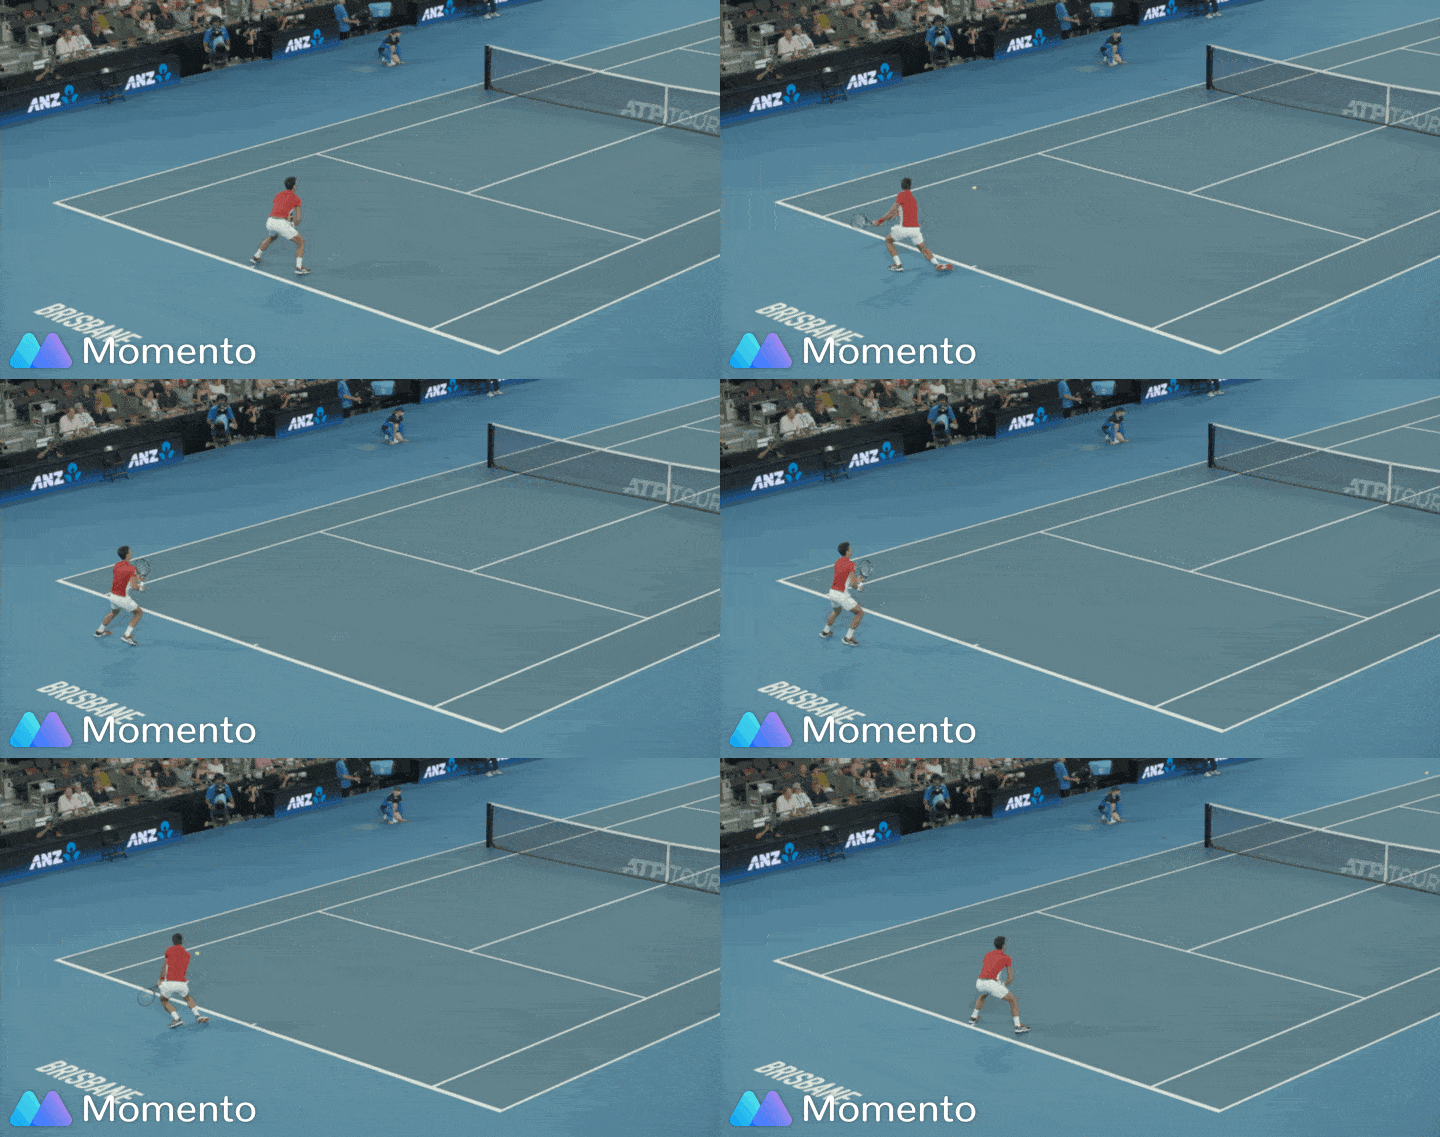
Djokovic’s Closed Stance Backhand
Open Stance Backhand
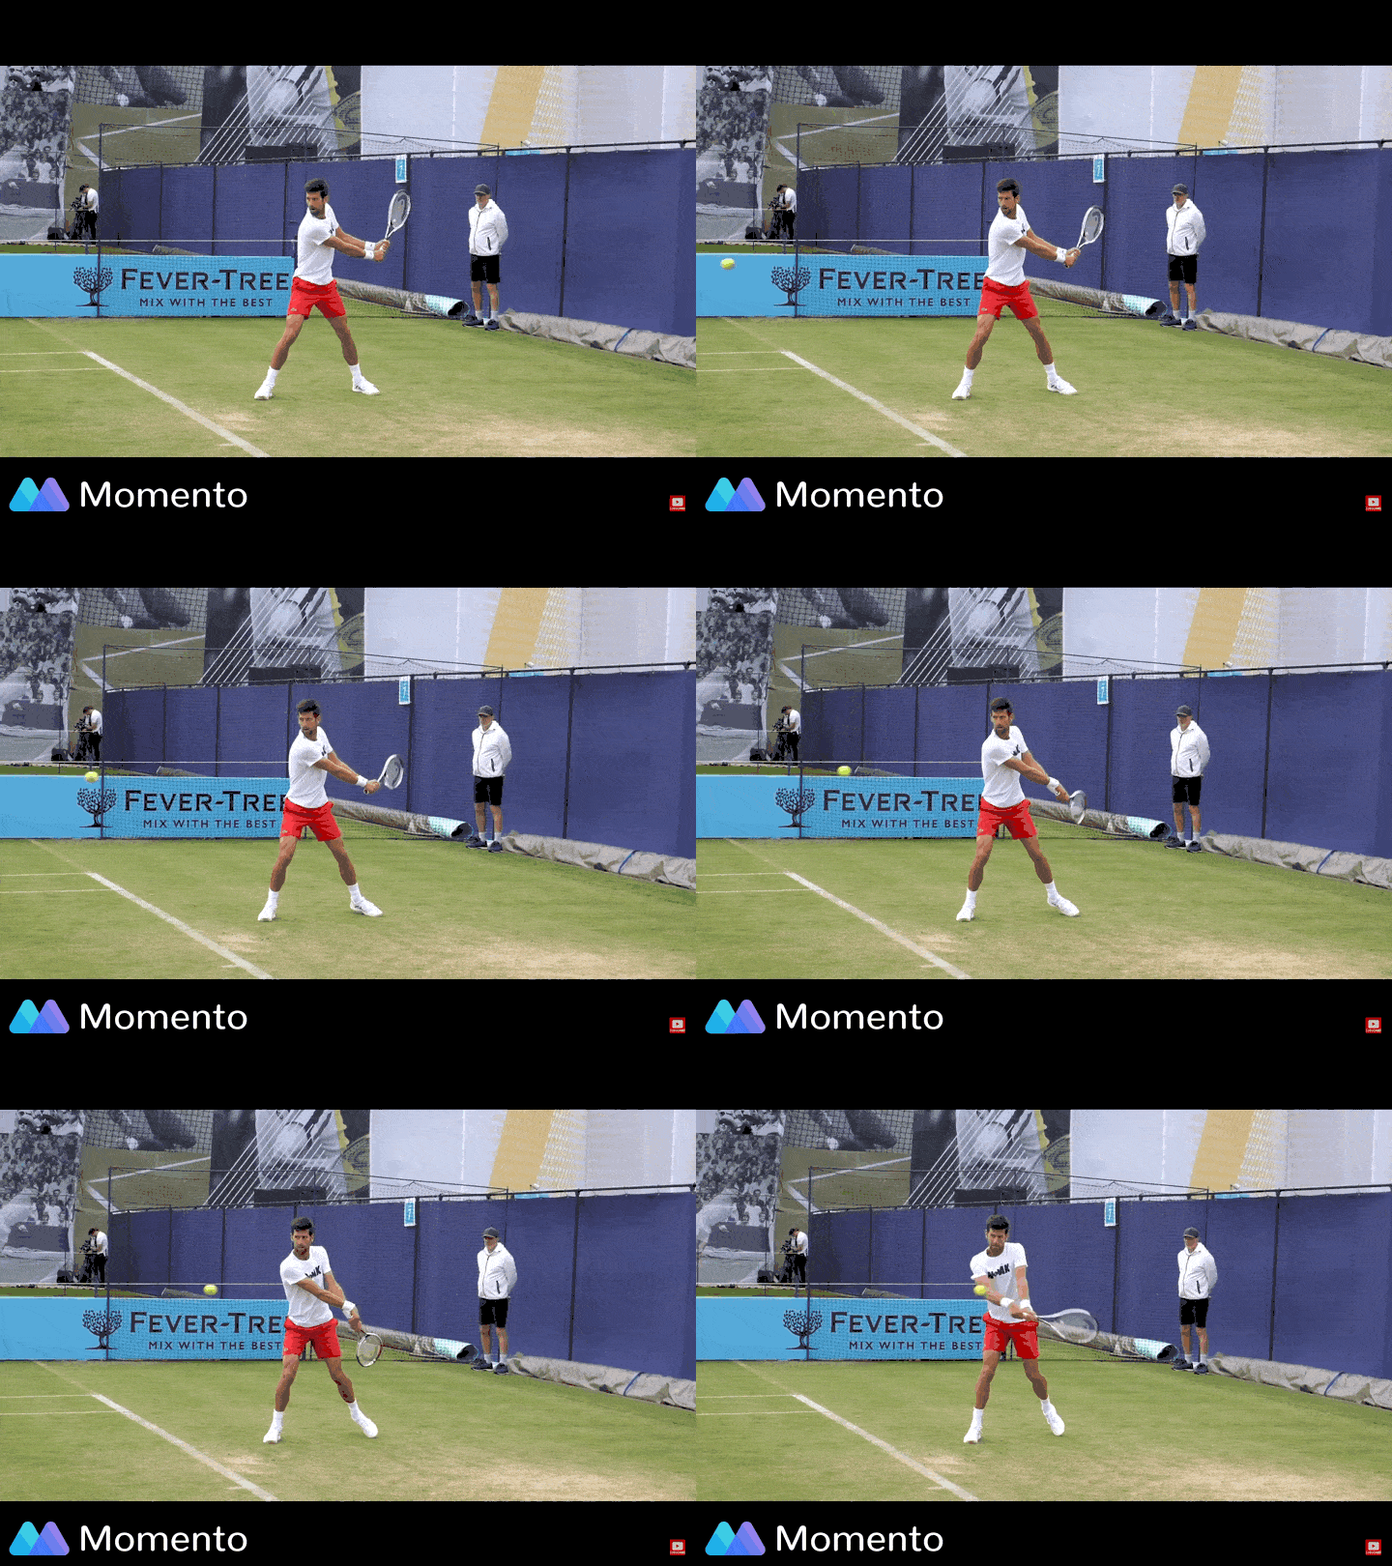
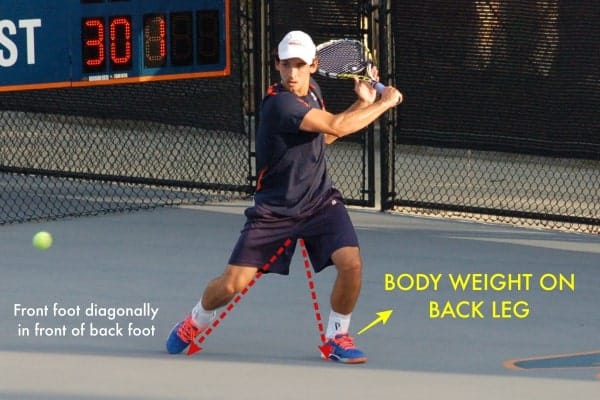
The open stance backhand is typically used on shots where you find yourself in a defensive situation. Your feet should be on a straight line but this time they are parallel to the baseline. Your body weight should be on the outside leg (left leg for right handed players, right leg for left handed players). Novak Djokovic is a master at hitting open stance backhands, showing the world it can be a weapon. You will mostly use this stance when your opponent hits the ball deep and away from you. The advantage of hitting open stance is that it increases the player’s reach on defensive shots. Take a look:
Djokovic’s Open Stance Backhand
Semi – Open Stance
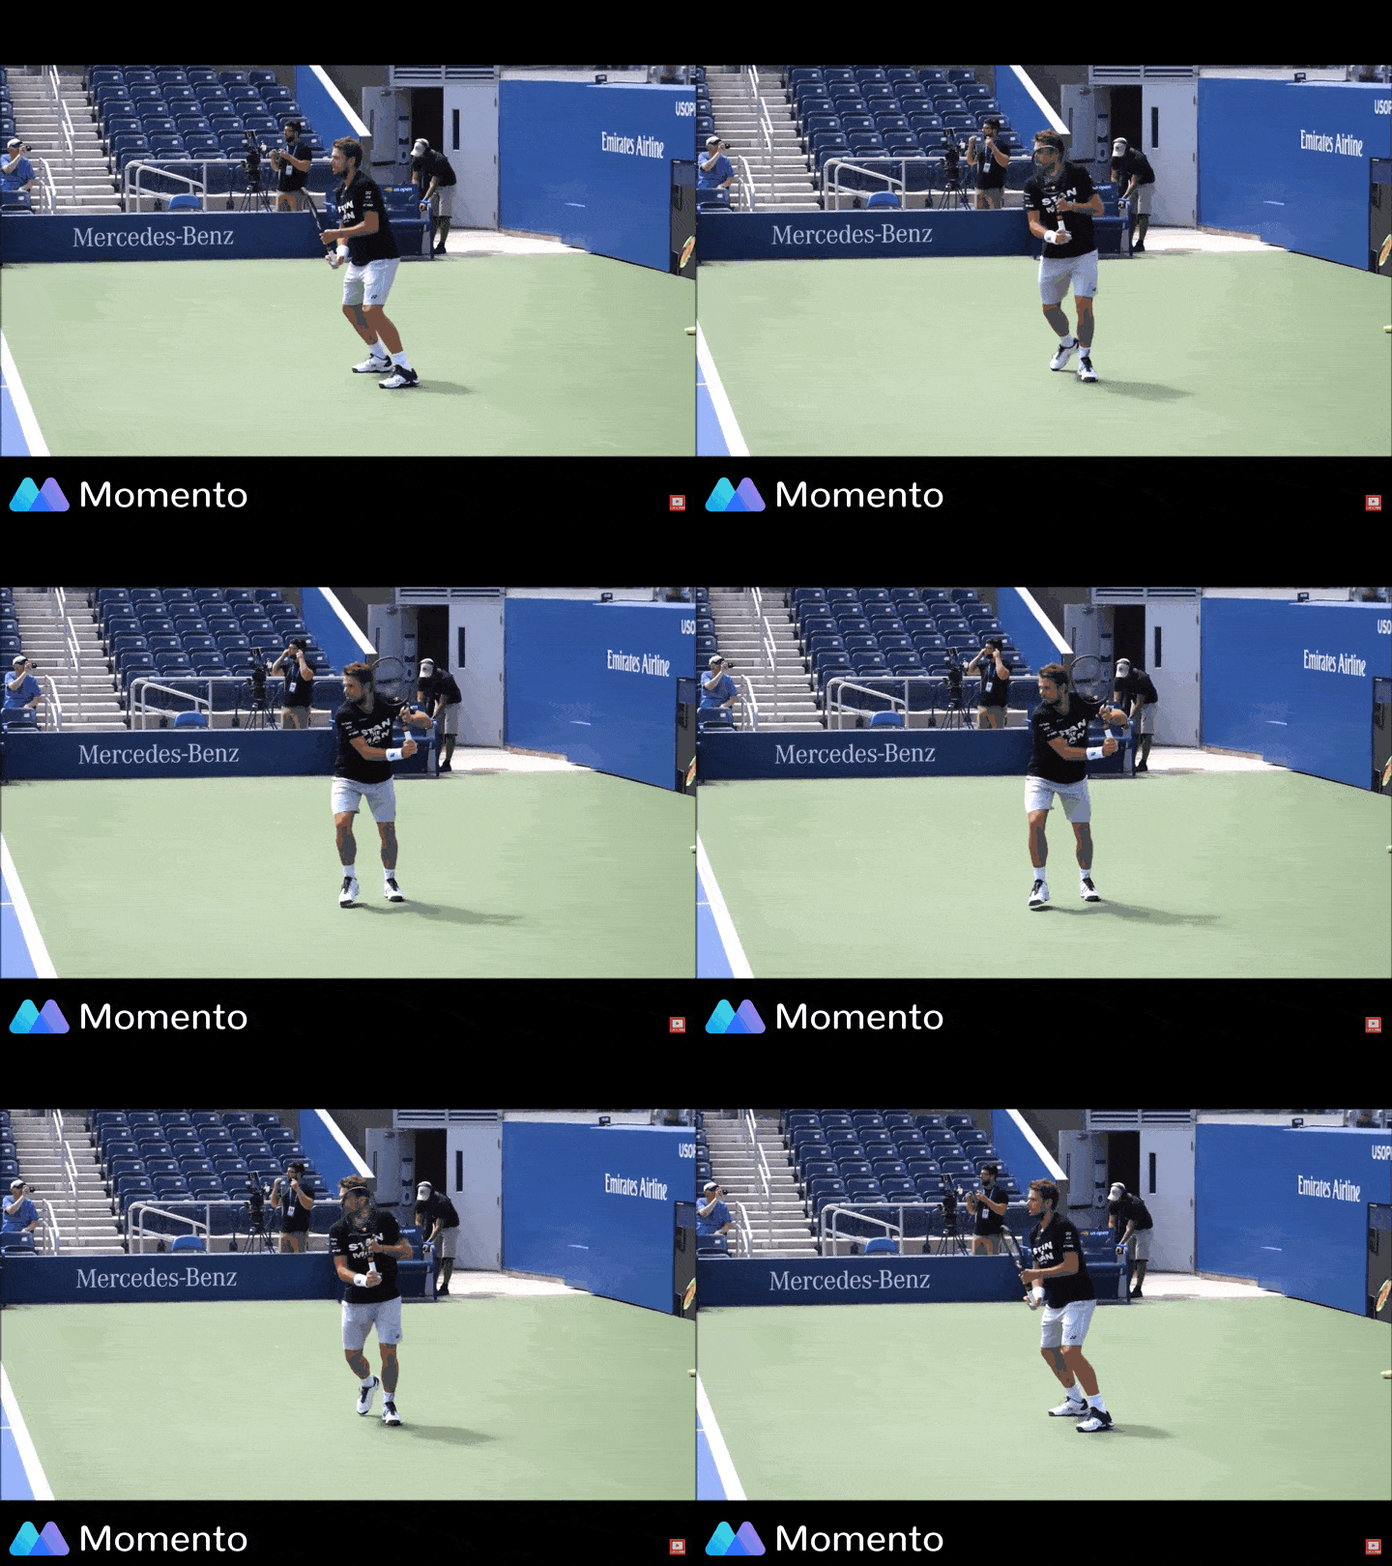
The semi open stance is the least used one but you need to learn how to hit it. It is necessary to use it when your opponent hits a shot that is too fast and deep where you don’t have time to turn to the neutral stance. In this instance, your opponent is pushing you back so you use the semi – open stance to create more space between you and the ball in order to hit a more effective shot to the other side of the net. It is a very effective way to transition from a defensive position to a neutral or aggressive one. Your body weight will transition from the back foot to the front one was you hit the shot.
Step 3 – The Takeaway
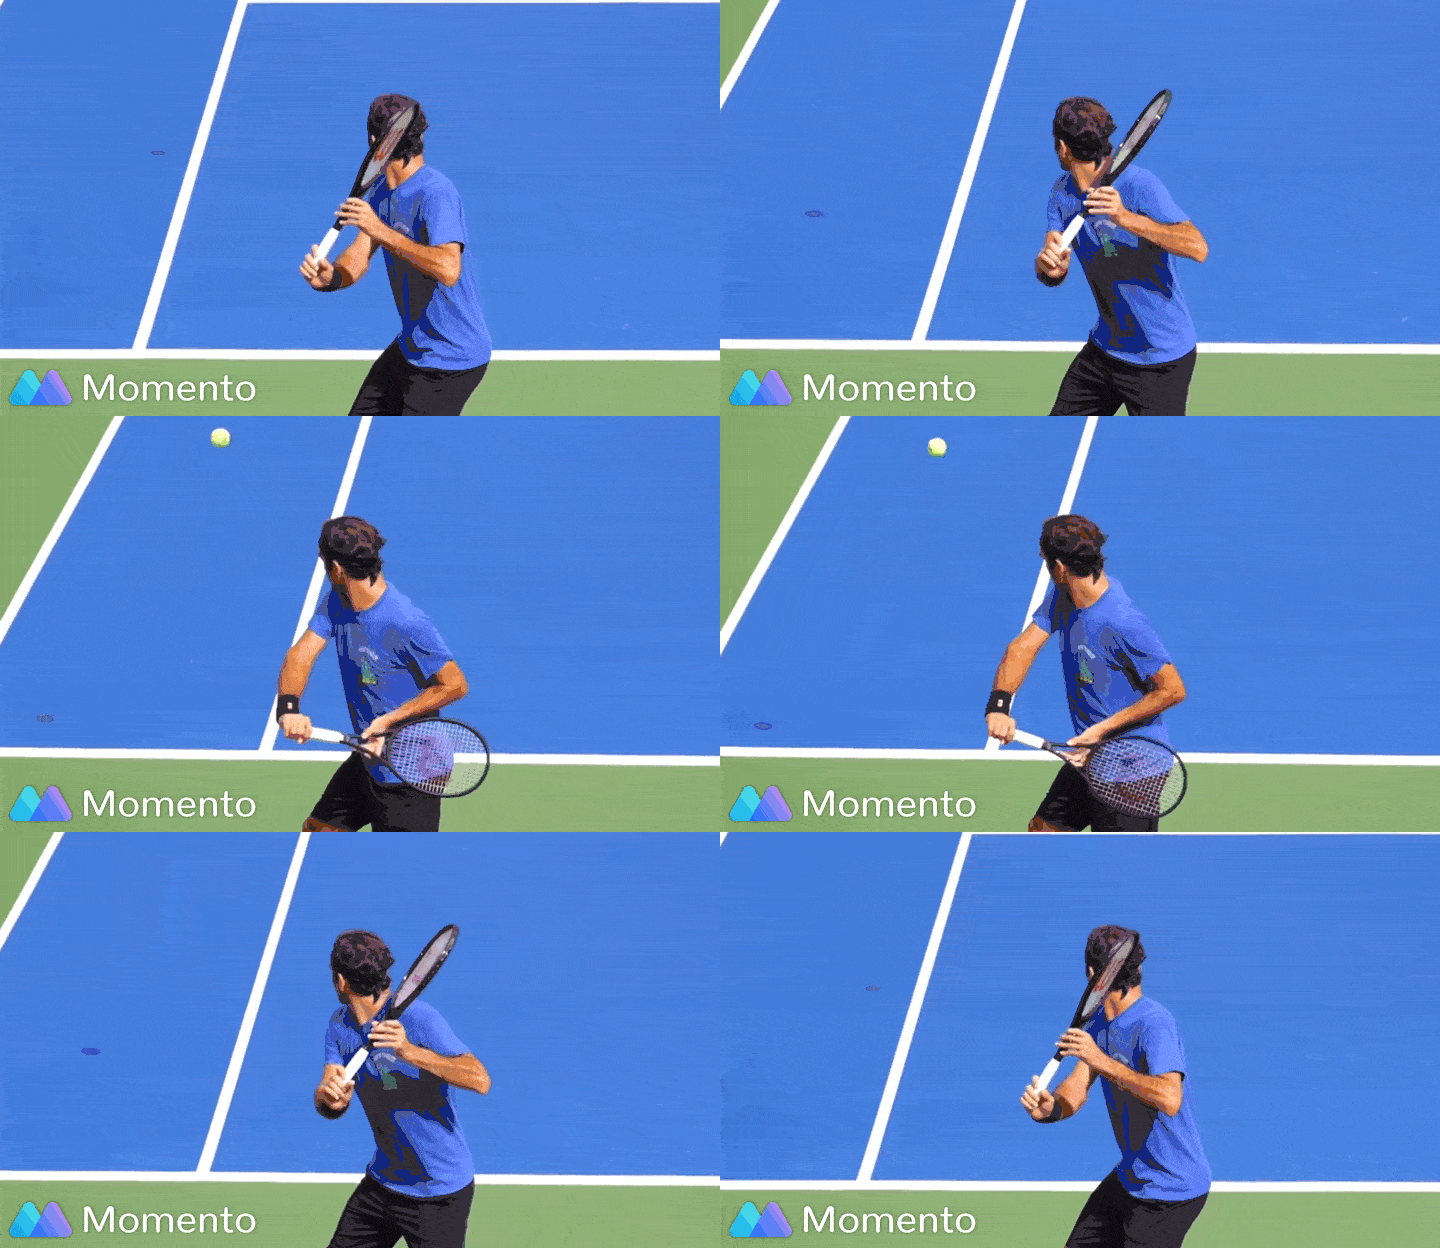
The takeaway on the double handed backhand is actually one of the simplest movements in tennis. The simpler you can make it, the better. From the neutral position, focus on turning your shoulders and hips. Pretend you are wearing a belt with a large belt buckle. At the start of the takeaway, the buckle will be pointing forward (towards your opponent). As you finish the rotation on the takeaway, the belt buckle should be pointed to the side fence, meaning that you fully rotated your torso.
If you pay close attention to the video above, you will see that my arms and hands don’t do much. Besides maintaining the racket tip up, the rotation of my torso and shoulders will place the racket where it needs to be; tip up, away from my body and creating a circular motion.
Step 4 – Downswing
There are two areas you need to focus on: the rotation of the arms and the rotation of the body.
Arms rotation
From the takeaway position, I typically tell my lessons to draw the shape of the letter “C” through the contact (or the shape of the Nike Swoosh). The racket head should drop below the ball as you approach contact so you can make contact from low to high.
Body rotation:
Remember the belt buckle? At this point it is pointed to the side fence, right? As your arms start drawing the “C” shape, the belt buckle should slowly start rotating back around. Now, if you look at the image above, you’ll see that a lot of the force is coming from pushing and pivoting around the front leg. Remember that your backhand’s power starts from the legs and core.
Step 5 – The Contact
As you can see from the image, the contact should be in front of the line of your body. It is imperative that you make contact in front of you in order to have a good backhand. Your eyes should be focusing on the ball (even through mine aren’t). In addition, don’t let your head move up before contact. The racket face should be flat behind the ball as it moves from a low to high position so you can clear the net.
Make sure you feel like you are pushing the racket through the contact with your non dominant hand instead of pulling with your dominant hand. Here, the non dominant hand is the one creating the power, not the other way around.
In addition, make sure your body is strong and continues to rotate in order for you to absorb the weight of the ball better.
Step 6 – The Follow Through
After making contact with the ball, the left arm extends and moves upwards and to the right side of the player (remember we started on the left side for right handed players). Continue the rotation of your belt buckle around as it finally rotates back towards the net. Remember, never swing from high to low unless you are purposely trying to hit into the net.
As everything rotates, the arms will eventually bend and finish over your shoulder. Take a look
The One Handed Backhand
The one handed backhand is one of the most visually appealing shots in tennis. It is hard not to love watching a well struck one hander. While the double handed backhand is more common in modern tennis, particularly because it is easier for beginners to learn, single handed backhand players continue to find success on the pro tour. Younger players like Stefanos Tsitsipas and Denis Shapovalov prove that the one hander still has a lot to give. So let’s break it down!!
Step 1 – The Grip
As the name suggests, the one handed backhand is struck with only one hand gripping the racket. However, for the single handed backhand, there are a few grip variations that players can use.
To use the eastern backhand grip, you need to place your index finger knuckle between bevels 1 and 2. It is very similar to the continental grip. The eastern backhand grip is the first grip that allowed players to hit the ball flat. When tennis first started, most players only hit slices on the backhand side. This grip is mostly common among older recreational players who were taught tennis a long time ago. While it is not prominently used anymore, the eastern backhand grip facilitates changing between flat and slice backhands. However, it is harder to hit topspin backhands using this grip.
Full Eastern Backhand Grip:
Place your index finger knuckle on bevel 1. This grip is the most commonly used in tennis today. It allows players to create more topspin without sacrificing variety. With players adding more and more topspin to their strokes, the full eastern grip allows players to not only generate more topspin, but also handle shots with a lot of forward rotation that are hit to them.
Western Backhand Grip:
While this grip may look weird in the picture, it is actually a very effective way of gripping the racket. Place your knuckle between (or on) bevel 8 and 1. The western backhand grip gained a lot of popularity among pro players in the past 15 years because it allows players to generate a lot of topspin from the backhand side. Richard Gasquet, Stan Wawrinka, Justine Henin, Carla Suarez Navarro and Roger Federer (at times) are among players who use western grips. While they sacrifice variety for power, there is no denying that they rank at the top when it comes to hitting one handed backhands.
Step 2 – Tennis One Handed Backhand Stances
The feet positioning for the one handed backhand is fairly similar to the 2 handed. Basically, you will you use the same three positions; closed stance, open stance and semi-open stance. However, there are a few adjustments that you will need to keep in mind in order to be properly prepared to hit a good one handed backhand
Neural Stance:
This is where you want to live if you want to consistently hit a good one handed backhands. With your stance neutral, you’ll be able to use the full weight of your body through the shot. Why is this important? Because you are only using one arm; you need the assistance of your body to hit a hard yet controlled backhand.
First, make sure that your body weight is on the front leg. Loading your weight on the front leg will allow you to be more explosive with your body as you rotate around the ball.
Open Stance:
Again, the open stance position will be used mostly in defensive situations. The same rules apply as for the two handed backhand.
However, note that you will use this stance more when balls are hit high and heavy to you, making you move both laterally and backwards. This is important to keep in mind because, basically, it is very difficult to hit a one handed backhand with topspin if the ball is above your shoulder. Therefore, you need to move backwards and give time for the ball to drop to a better position.
Semi Open Stance:
Once more, the semi open stance will be used similarly as we saw with the two handed backhand. You will use this stance more often in shots that come fast and deep where you don’t have time to fully make the turn to neutral stance. Your goal here is to neutralize the offensive shot that was hit to you so use this stance to get yourself back into the point.
Step 3 – Takeway
With the dominant hand on the grip and the non-dominant hand on the V of the racket, start the takeaway with the racket tip up. At the same time, follow the same principles of the two handed backhand, turning the shoulders and pointing the belt buckle to the side fence. The more rotation you can create with your shoulder and upper body the better because it will allow you to rotate faster around the ball.
You should feel like a “coil”, the more you turn the upper body the more energy you accumulate, making your rotation through the ball harder.
Step 4 – Downswing
As your start swinging forward, lean on your front foot and allow the racket to start dropping. Ideally, you want your arm to straighten up during the motion. The shoulders start turning but your belt buckle should continue to point to the side fence. Here is where you start letting go of the non dominant hand. Make sure you are swinging as a unit instead of using the arm solely.
Step 5 – The Contact
As you approach the ball, your arm should be straight and the racket is moving from a low to high trajectory. At this point, your arm and shoulders should be moving as a unit. Make contact with the ball in front of you. It is imperative that you strike the ball in front of the line of your body. Here is where your belt buckle will start rotating. This is very important. I see a lot of amateurs swinging only with their arms which creates a poor swing path.
Step 6 – The Follow Through
After the contact, the racket should move on an upwards, diagonal trajectory to the opposite side of where you started the swing (that’s how you’ll create topspin). As your shoulders rotate, continue lifting your arm and turning your body. Pay attention to the belt buckle. You don’t want to restrict your shoulder turn with your body. Move as a unit and you’ll get great results. Watch the video below!
In addition, allow your non-dominant arm to straighten behind you. It will give you more stability.
Types Of Backhand
Flat Backhand
To hit a flat backhand you need to strike the ball at a neutral level and drive the racket through contact without brushing the ball too much. It is mostly used by players who have two handed backhand because the second hand helps controlling the ball. Giving that the ball doesn’t generate too much spin, controlling a flat backhand can be difficult. However, players like Kyrgios, De Minaur and Norrie have amazing flat backhands (we have a tutorial about hitting flat backhands, check it out here). Single handed players usually use the flat backhand if they take the ball early but in general, they will hit their backhands with more topspin.
Topspin Backhand
This is the most common type of backhand in modern tennis. The amount of topspin generated by each player is unique to each individual but most players will add forward rotation to the shot. In order to hit a topspin backhand, the racket needs to come from low to high, brushing up on the ball during contact. Hitting with topspin allows players to take more aggressive swings. Players with one handed backhands can usually create more spin because of the lag they are able to create before making contact.
Slice Backhand
We will write an entirely different post about the slice backhand but essentially, this is the original backhand. On a slice, the player should use one arm and hit the ball from a high to low manner, as the racket face stays open through the shot. This action generates backspin and this shot is used to break the rhythm of the point. A good slice won’t necessarily be a fast shot but it will keep the ball low, demanding your opponent to hit up.
Advantages and Disadvantages Of Each Backhand
One Handed Backhand:
Two Handed Backhand:
6 Tips That Will Help You Improve Your Backhand
Figure out which backhand you are more comfortable with: If you are a beginner, work on both backhands at first in order to find out which is more natural for you.
Keep it simple: don’t try to reinvent the wheel. Focus on a good body turn and creating a nice loop with the racket.
Swing as a unit: amateurs tend to focus too much on their arms and hands instead of using their entire body. Make sure you use your legs and upper body turn to hit the ball.
Firm hands at impact: a lot of coaches tend to teach players to have loose hands. Forget that. At impact, feel like you are squeezing the racket grip firmly. This will make the racket head stay in place through contact, improving your control.
The belt buckle trick: remember I told you about it earlier? Well sometimes having the right swing thought can help you improve your shots. Start the swing by turning your body and pointing “belt buckle” to the side fence. Finish the backhand with the belt buckle pointing to the net.
Find your shot style: do you feel more comfortable hitting flat or with spin? Figure that out and go with it. We all feel comfortable with different styles of hitting the ball, find out what is right for you. In tennis, it is important to know yourself so be analytical of your own game.