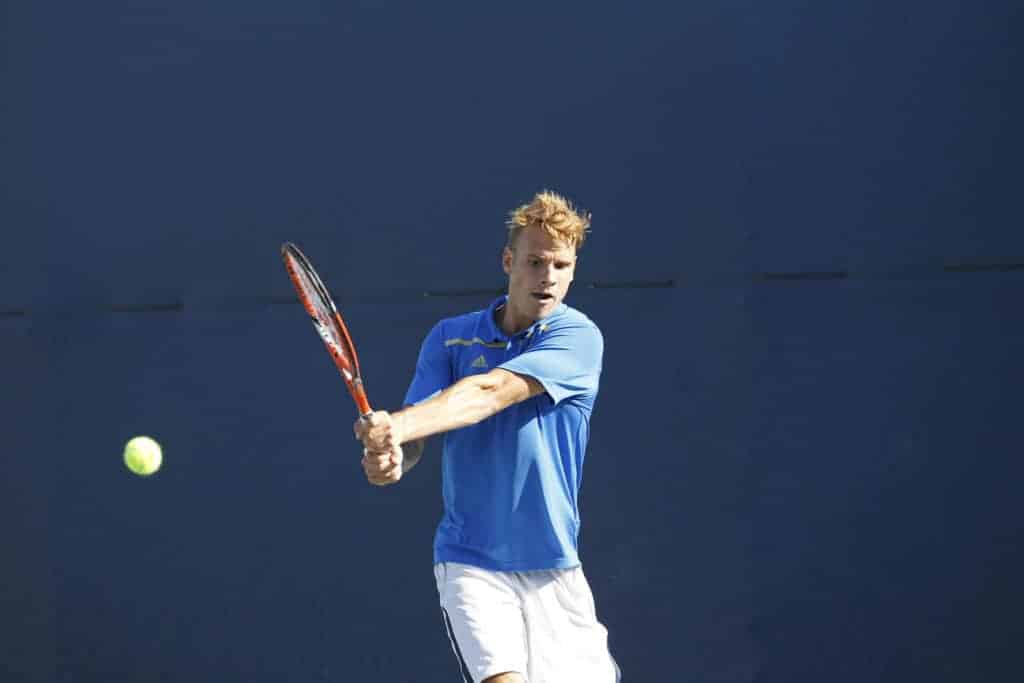
Let’s be honest, there is nothing like watching a good backhand down the line winner. Guys like Wawrinka, Federer, Nalbandian, Djokovic, Agassi and Guga (plenty more) have given us countless hours of highlights with their backhands. It is a “WOW” shot. But for most people, the backhand is a difficult shot, especially at the club level, and for most players it is considered to be their weaker side. As a guy who pretty much made a career from having a good backhand, I decided to share my knowledge with you.
In this article we will cover everything you need to know in order to have a proper backhand. For beginners, you will learn what a backhand is and how you can hit one step-by-step. For you more advanced readers, pay attention to the fundamentals. No matter what your level is, you can always gain by developing a better base on your groundstrokes.
This article is structured in the following way:
- What is a backhand in tennis?
- Two Handed Backhand
- Step 1 – Grip
- Step 2 – Feet Positioning
- Step 3 – The Takeaway
- Step 4 – Forward Swing
- Step 5 – The Contact
- Step 6 – The Follow Through
- One Handed Backhand
- Step 1 – Grip
- Step 2 – Feet Positioning
- Step 3 – The Takeaway
- Step 4 – Forward Swing
- Step 5 – The Contact
- Step 6 – The Follow Through
- Different Types of Backhand
- Flat
- Topspin
- Slice
- Advantages and Disadvantages of Each
- 6 Best Tips For A Better Backhand
What Is A Tennis Backhand?
The backhand is the tennis shot where the player swings the racket with the back of the hand moving towards the direction of the stroke. For a right handed player, the backhand swing starts on the left side of the body and it ends on the right side of the body (opposite for lefties). This action can be performed with one arm or both arms; ONE HANDED BACKHAND and TWO HANDED BACKHAND. We will cover both backhands in this article. In the past, backhands have been known as the weaker shot because it is typically harder to generate as much power as on the forehand side, but in modern tennis this is far from the truth. Today, it is imperative that players have solid backhands in order to succeed on the professional tour.
The Two Handed Backhand
While the two handed backhand has been around for a long time, it became increasingly popular during the Bjorn Borg era in the 1980s. His unorthodox style of making contact with the ball using both hands on the racket and then continuing the follow through with one hand helped popularize the topspin two handed backhand. Today, most players play with two handed backhands as children have an easier timing learning it because it requires less strength from them.
As is with every tennis stroke, it is important to develop a good foundation in order to have a solid backhand. I have broken it down into 6 steps:
- The Grip
- The Feet Postioning
- Downswing
- The Takeaway
- The Impact
- The Follow through
Step 1 – The Grip
On the two handed backhand we need to have both hands properly gripping the racket; the hand that is pulling the racket (the same you hit your forehand with) will be at the bottom of the grip and the hand that is pushing the racket will be at the top. Let’s take a look at both:
Bottom Hand:
The bottom hand is the players most dominant hand. With this hand you need to grip the racket using a Continental Grip (If you don’t know much about grips, check our ultimate guide here).
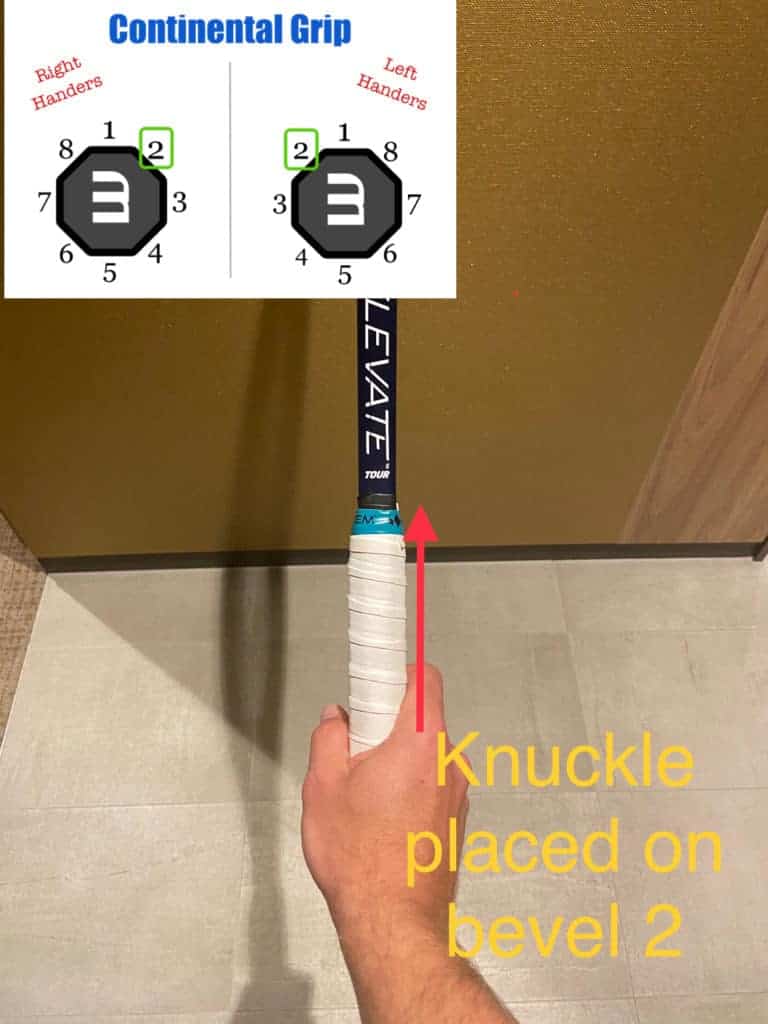
The index finger knuckle should be placed somewhere between bevel #1 and #2. While you can make small adjustments to find what is most comfortable for you, the continental is the rule. Gripping the racket differently will increase the difficulty of hitting a two handed backhand.
Top Hand:
The top hand is the players least dominant hand. It has the job of pushing the racket (much like a forehand) through the shot and controlling the face of the racket. On the two handed backhand, the top hand gripping the racket has the most important job; it is in charge of accelerating the racket head through the ball which will translate into more power and control. Improving your ability to use your non-dominant hand is imperative in order for you to have a proper two handed backhand. There are a couple of grips you can use with your non dominant hand.
Eastern Grip
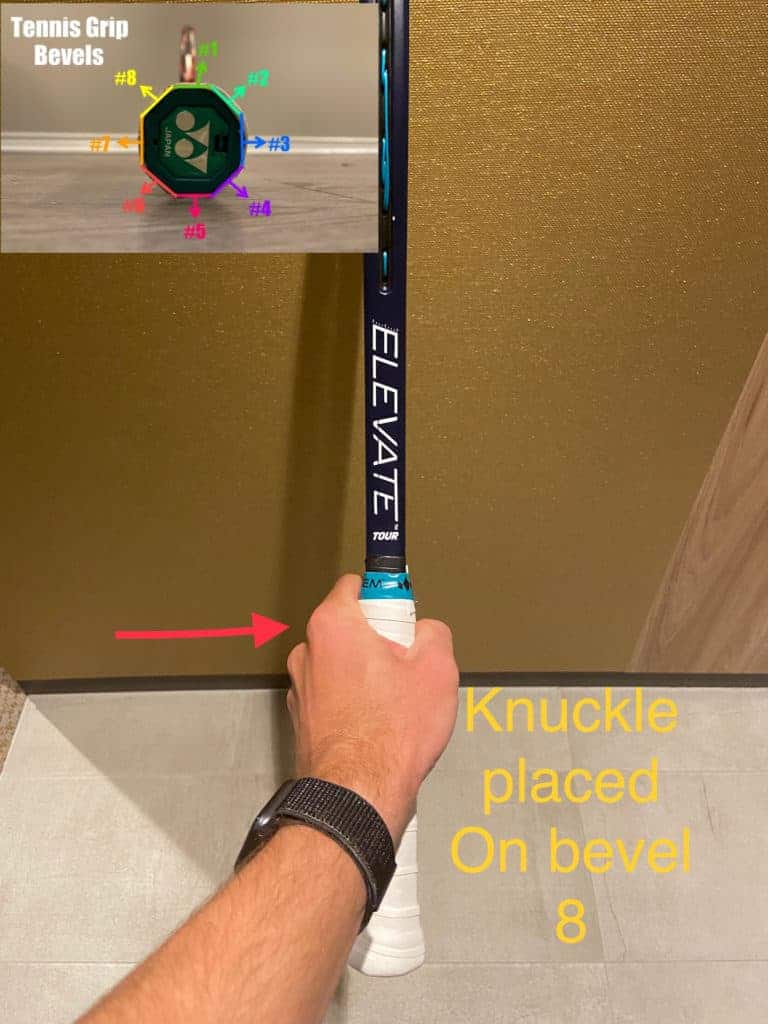
For the eastern grip, the index finger knuckle should somewhere between bevel 7 and 8. The eastern grip is the most commonly used for two handed backhands.
Semi western grip
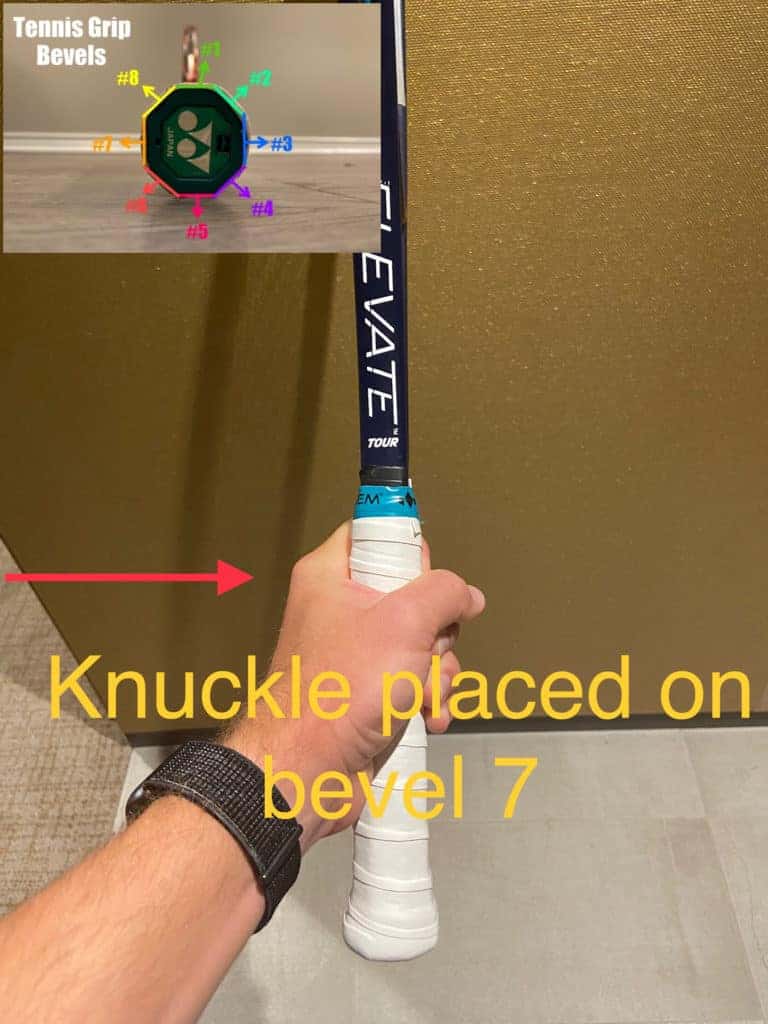
For the semi westerns grip, your index finger knuckle should be located somewhere between bevel 6 and 7 (find what’s comfortable for you). The semi western grip has increased in popularity because it helps players hit their backhands with more topspin, adding more control.
Regardless of what grip you choose to hit with, remember that the top hand is the one that controls the racket face through contact and adds power to your backhand. You need to get comfortable with it and properly train the non-dominant hand in order to have a solid double handed backhand.
Step 2 – Tennis Double Handed Backhand Stances
Once you choose the grip you feel most comfortable with, you need to learn how to position your legs and feet when hitting a backhand. There are three main positions: Neutral Stance, Open Stance and Semi-Open Stance. The feet positioning on the backhand is reliant on the shot that is hit to you. Once it is settled where the ball will land you can choose between the stances. Let’s take a better look at each one of it:
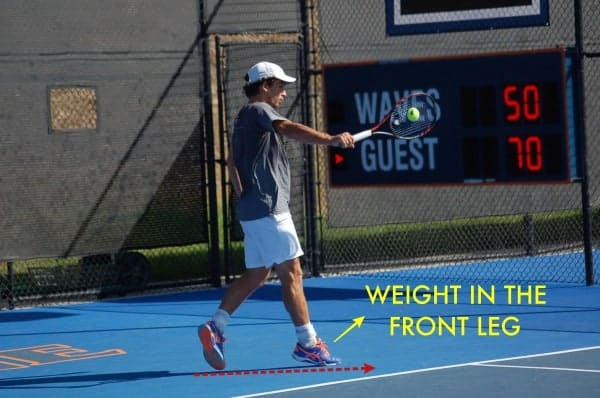
Neutral Stance Backhand
The neutral stance backhand is the most used leg positioning on the backhand side. In this stance, your front foot is placed directly in front of your back foot. The weight of your body will be centered on the front leg, which allows players to rotate strongly around the ball.
While on the forehand side, players utilize the Open Stance more often because of its quicker preparation, on the backhand side the neutral stance is the most used. It allows players to rotate faster and make contact with the ball more in front of their bodies. The neutral stance is used for both aggressive and neutral backhands, but it is less used defensively on the double handed backhand.
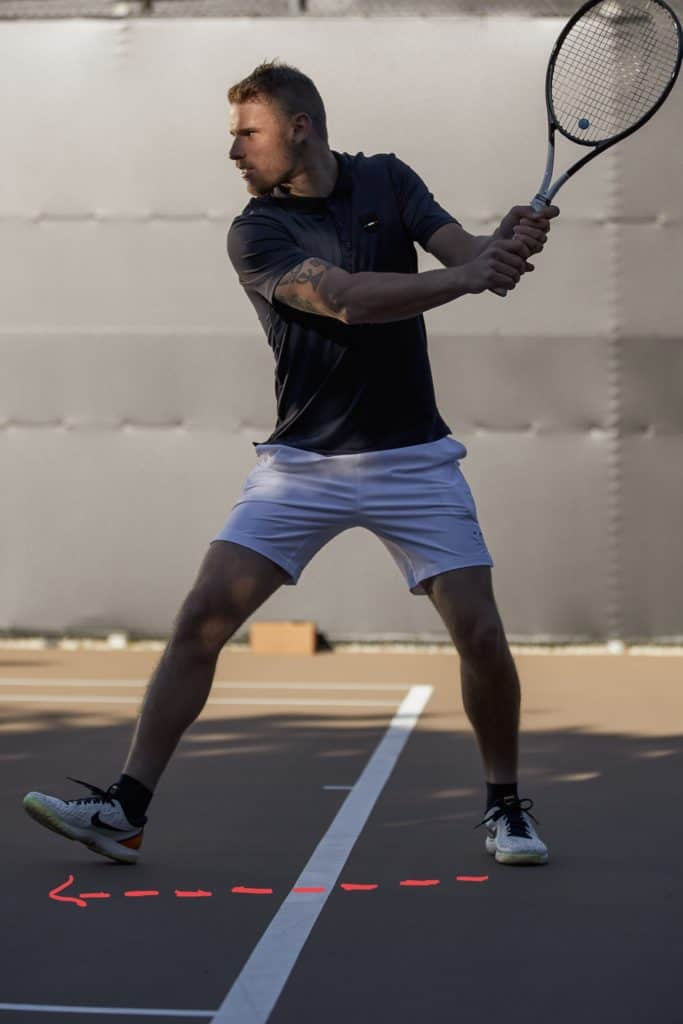
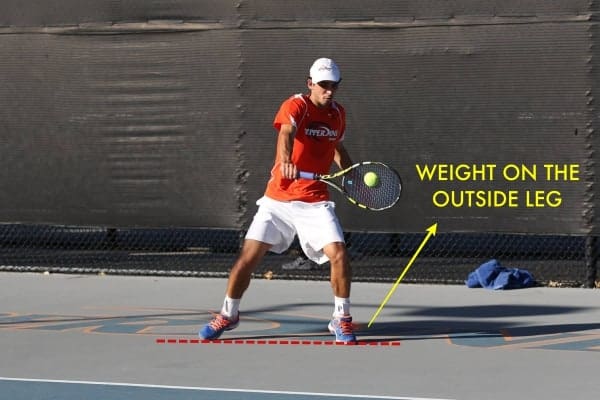
Open Stance Backhand
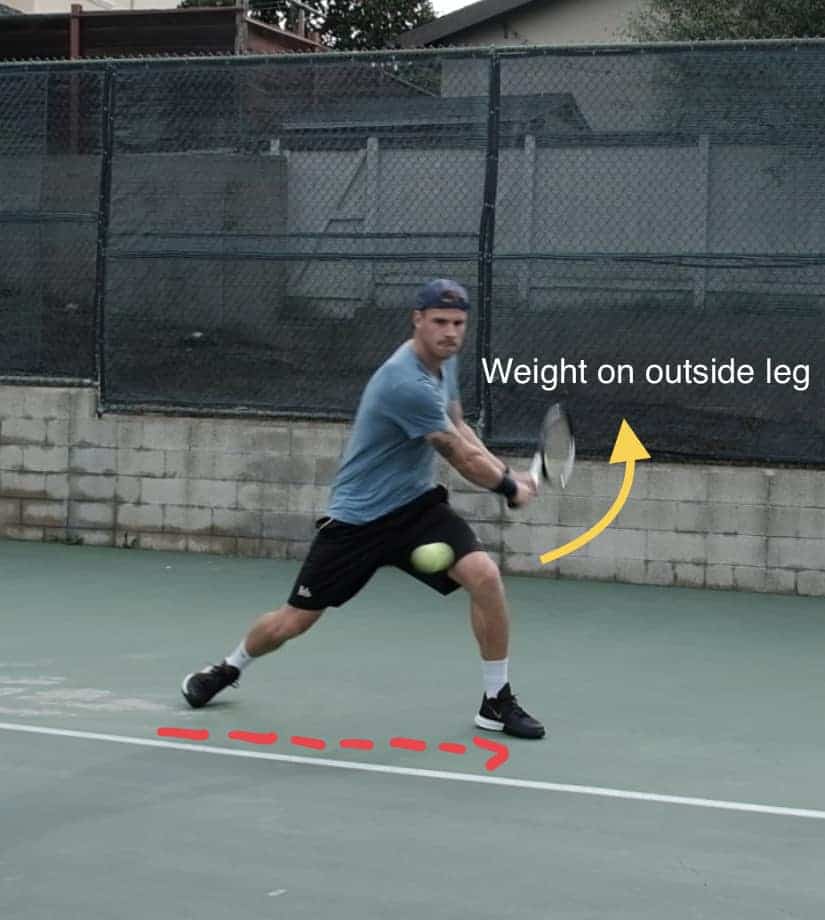
The open stance backhand is typically used on shots where you find yourself in a defensive situation. Your feet should be on a straight line but this time they are parallel to the baseline. Your body weight should be on the outside leg (left leg for right handed players, right leg for left handed players). Novak Djokovic is a master at hitting open stance backhands, showing the world it can be a weapon. You will mostly use this stance when your opponent hits the ball deep and away from you. The advantage of hitting open stance is that it increases the player’s reach on defensive shots. Take a look:
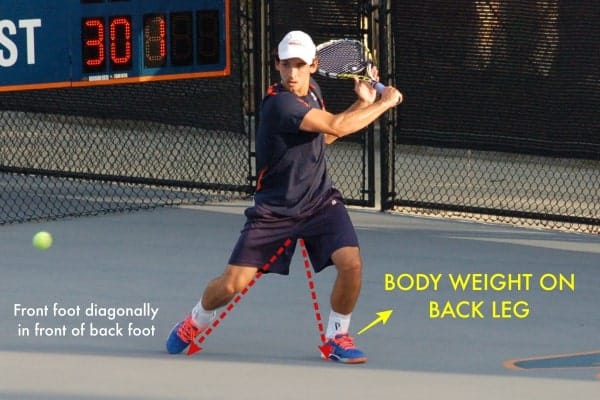
Semi – Open Stance

The semi open stance is the least used one but you need to learn how to hit it. It is necessary to use it when your opponent hits a shot that is too fast and deep where you don’t have time to turn to the neutral stance. In this instance, your opponent is pushing you back so you use the semi – open stance to create more space between you and the ball in order to hit a more effective shot to the other side of the net. It is a very effective way to transition from a defensive position to a neutral or aggressive one. Your body weight will transition from the back foot to the front one was you hit the shot.
Step 3 – The Takeaway
The takeaway on the double handed backhand is actually one of the simplest movements in tennis. The simpler you can make it, the better. From the neutral position, focus on turning your shoulders and hips. Pretend you are wearing a belt with a large belt buckle. At the start of the takeaway, the buckle will be pointing forward (towards your opponent). As you finish the rotation on the takeaway, the belt buckle should be pointed to the side fence, meaning that you fully rotated your torso.
If you pay close attention to the video above, you will see that my arms and hands don’t do much. Besides maintaining the racket tip up, the rotation of my torso and shoulders will place the racket where it needs to be; tip up, away from my body and creating a circular motion.
Step 4 – Downswing
There are two areas you need to focus on: the rotation of the arms and the rotation of the body.
Arms rotation
From the takeaway position, I typically tell my lessons to draw the shape of the letter “C” through the contact (or the shape of the Nike Swoosh). The racket head should drop below the ball as you approach contact so you can make contact from low to high.
Body rotation:
Remember the belt buckle? At this point it is pointed to the side fence, right? As your arms start drawing the “C” shape, the belt buckle should slowly start rotating back around. Now, if you look at the image above, you’ll see that a lot of the force is coming from pushing and pivoting around the front leg. Remember that your backhand’s power starts from the legs and core.
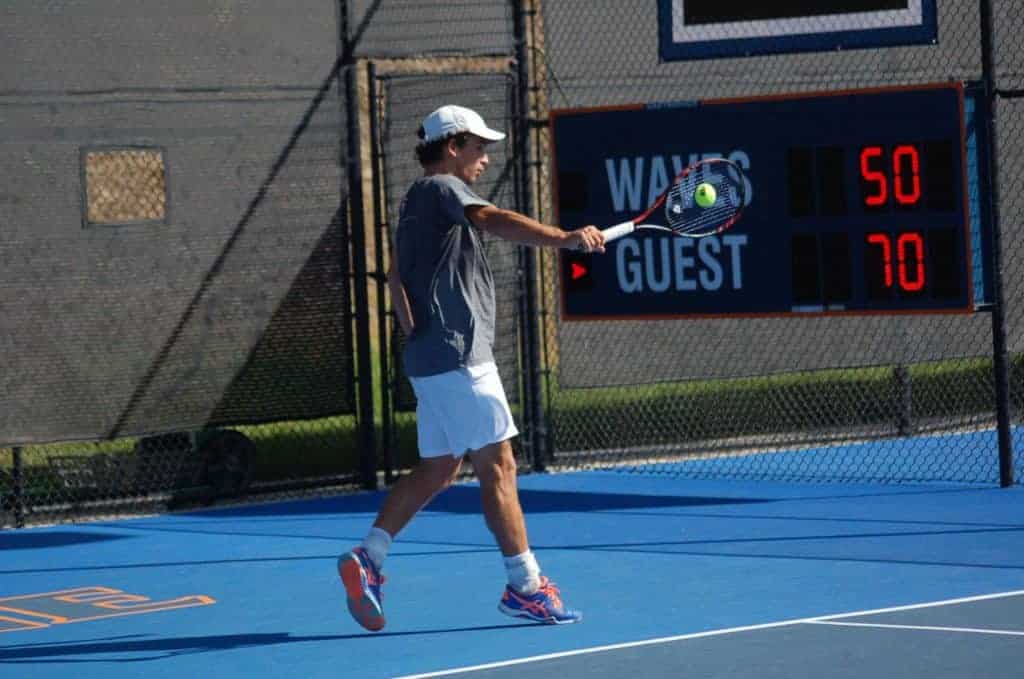
Step 5 – The Contact

As you can see from the image, the contact should be in front of the line of your body. It is imperative that you make contact in front of you in order to have a good backhand. Your eyes should be focusing on the ball (even through mine aren’t). In addition, don’t let your head move up before contact. The racket face should be flat behind the ball as it moves from a low to high position so you can clear the net.
Make sure you feel like you are pushing the racket through the contact with your non dominant hand instead of pulling with your dominant hand. Here, the non dominant hand is the one creating the power, not the other way around.
In addition, make sure your body is strong and continues to rotate in order for you to absorb the weight of the ball better.
Step 6 – The Follow Through
After making contact with the ball, the left arm extends and moves upwards and to the right side of the player (remember we started on the left side for right handed players). Continue the rotation of your belt buckle around as it finally rotates back towards the net. Remember, never swing from high to low unless you are purposely trying to hit into the net.
As everything rotates, the arms will eventually bend and finish over your shoulder. Take a look
The One Handed Backhand
The one handed backhand is one of the most visually appealing shots in tennis. It is hard not to love watching a well struck one hander. While the double handed backhand is more common in modern tennis, particularly because it is easier for beginners to learn, single handed backhand players continue to find success on the pro tour. Younger players like Stefanos Tsitsipas and Denis Shapovalov prove that the one hander still has a lot to give. So let’s break it down!!
Step 1 – The Grip
As the name suggests, the one handed backhand is struck with only one hand gripping the racket. However, for the single handed backhand, there are a few grip variations that players can use.
Eastern Backhand Grip:
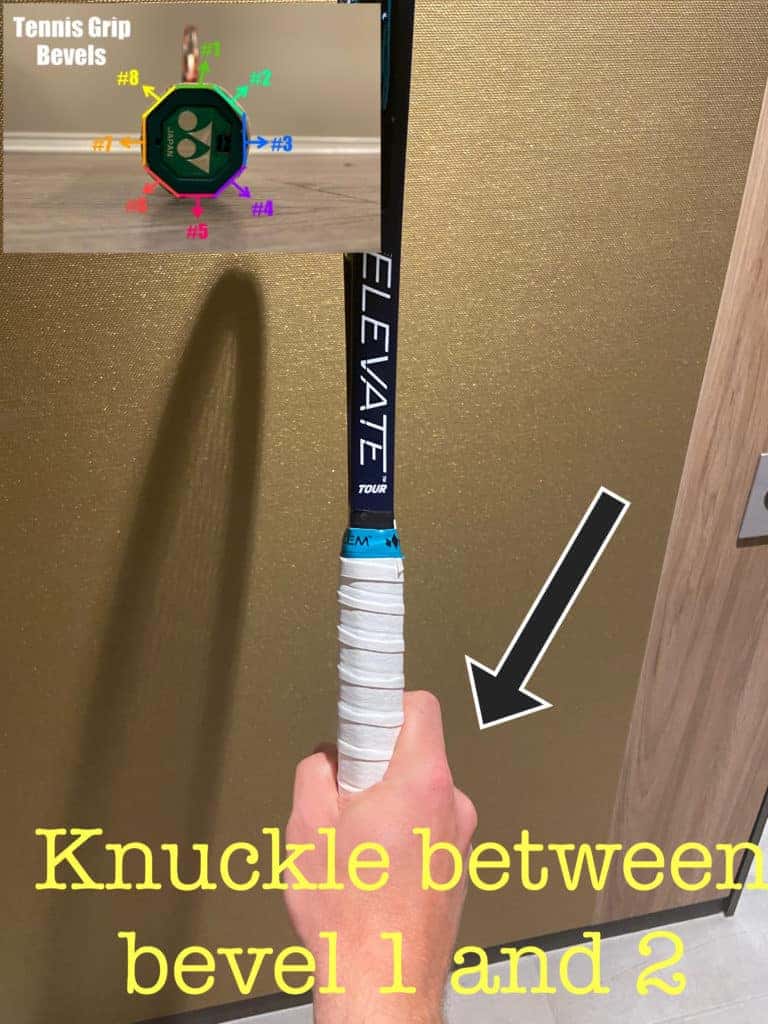
To use the eastern backhand grip, you need to place your index finger knuckle between bevels 1 and 2. It is very similar to the continental grip. The eastern backhand grip is the first grip that allowed players to hit the ball flat. When tennis first started, most players only hit slices on the backhand side. This grip is mostly common among older recreational players who were taught tennis a long time ago. While it is not prominently used anymore, the eastern backhand grip facilitates changing between flat and slice backhands. However, it is harder to hit topspin backhands using this grip.
Full Eastern Backhand Grip:
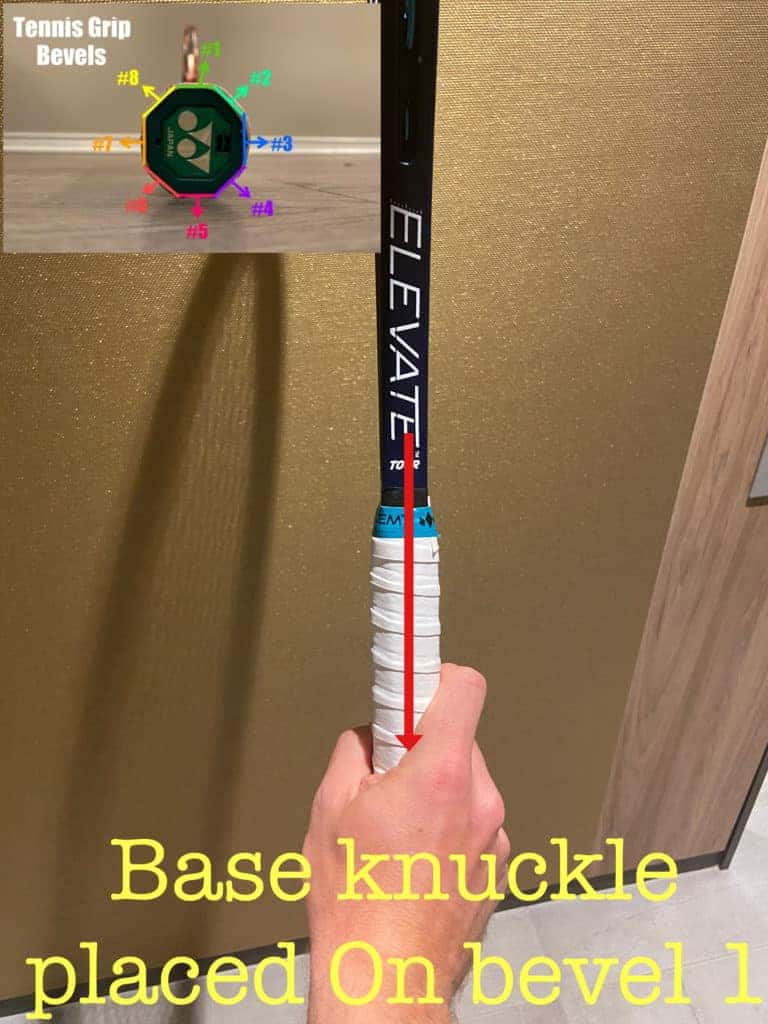
Place your index finger knuckle on bevel 1. This grip is the most commonly used in tennis today. It allows players to create more topspin without sacrificing variety. With players adding more and more topspin to their strokes, the full eastern grip allows players to not only generate more topspin, but also handle shots with a lot of forward rotation that are hit to them.
Western Backhand Grip:
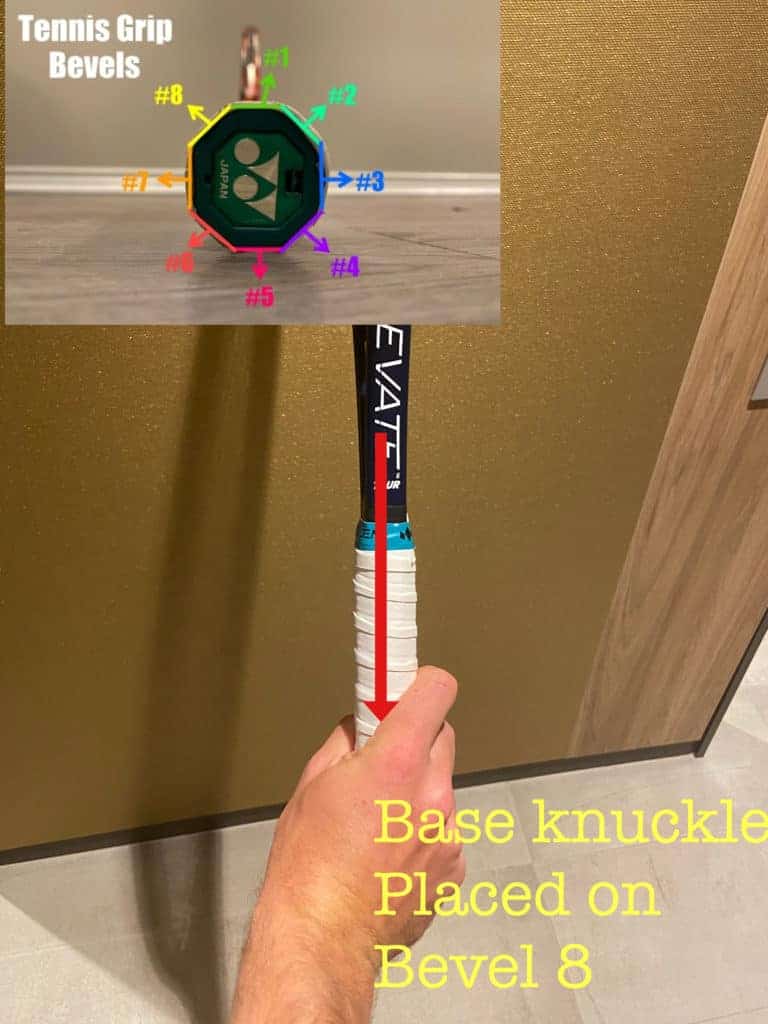
While this grip may look weird in the picture, it is actually a very effective way of gripping the racket. Place your knuckle between (or on) bevel 8 and 1. The western backhand grip gained a lot of popularity among pro players in the past 15 years because it allows players to generate a lot of topspin from the backhand side. Richard Gasquet, Stan Wawrinka, Justine Henin, Carla Suarez Navarro and Roger Federer (at times) are among players who use western grips. While they sacrifice variety for power, there is no denying that they rank at the top when it comes to hitting one handed backhands.
Step 2 – Tennis One Handed Backhand Stances
The feet positioning for the one handed backhand is fairly similar to the 2 handed. Basically, you will you use the same three positions; closed stance, open stance and semi-open stance. However, there are a few adjustments that you will need to keep in mind in order to be properly prepared to hit a good one handed backhand
Neural Stance:
This is where you want to live if you want to consistently hit a good one handed backhands. With your stance neutral, you’ll be able to use the full weight of your body through the shot. Why is this important? Because you are only using one arm; you need the assistance of your body to hit a hard yet controlled backhand.
First, make sure that your body weight is on the front leg. Loading your weight on the front leg will allow you to be more explosive with your body as you rotate around the ball.
Open Stance:
Again, the open stance position will be used mostly in defensive situations. The same rules apply as for the two handed backhand.
However, note that you will use this stance more when balls are hit high and heavy to you, making you move both laterally and backwards. This is important to keep in mind because, basically, it is very difficult to hit a one handed backhand with topspin if the ball is above your shoulder. Therefore, you need to move backwards and give time for the ball to drop to a better position.
Semi Open Stance:
Once more, the semi open stance will be used similarly as we saw with the two handed backhand. You will use this stance more often in shots that come fast and deep where you don’t have time to fully make the turn to neutral stance. Your goal here is to neutralize the offensive shot that was hit to you so use this stance to get yourself back into the point.
Step 3 – Takeway

With the dominant hand on the grip and the non-dominant hand on the V of the racket, start the takeaway with the racket tip up. At the same time, follow the same principles of the two handed backhand, turning the shoulders and pointing the belt buckle to the side fence. The more rotation you can create with your shoulder and upper body the better because it will allow you to rotate faster around the ball.
You should feel like a “coil”, the more you turn the upper body the more energy you accumulate, making your rotation through the ball harder.
Step 4 – Downswing
As your start swinging forward, lean on your front foot and allow the racket to start dropping. Ideally, you want your arm to straighten up during the motion. The shoulders start turning but your belt buckle should continue to point to the side fence. Here is where you start letting go of the non dominant hand. Make sure you are swinging as a unit instead of using the arm solely.
Step 5 – The Contact
As you approach the ball, your arm should be straight and the racket is moving from a low to high trajectory. At this point, your arm and shoulders should be moving as a unit. Make contact with the ball in front of you. It is imperative that you strike the ball in front of the line of your body. Here is where your belt buckle will start rotating. This is very important. I see a lot of amateurs swinging only with their arms which creates a poor swing path.
Step 6 – The Follow Through
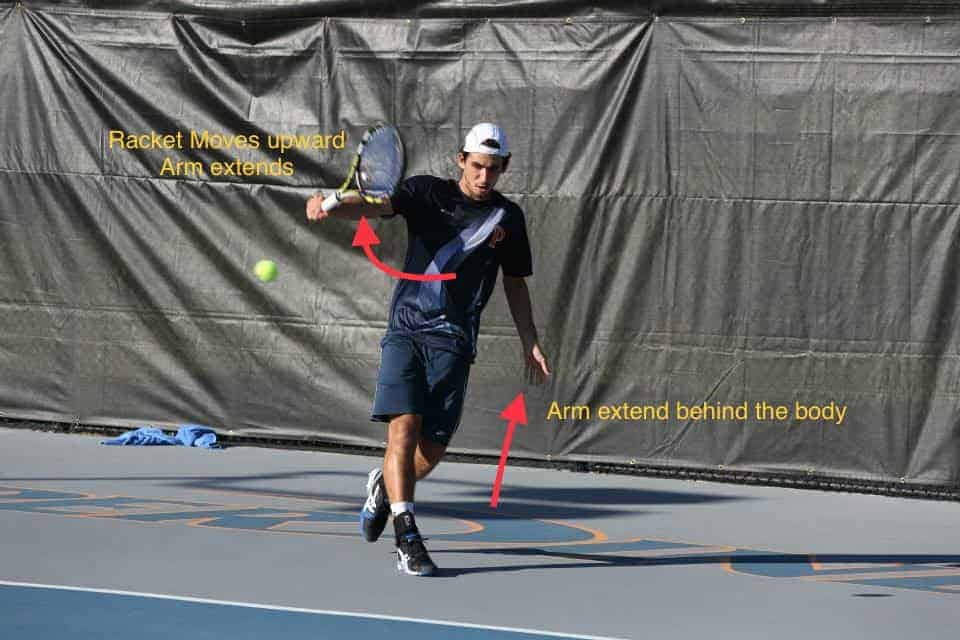
After the contact, the racket should move on an upwards, diagonal trajectory to the opposite side of where you started the swing (that’s how you’ll create topspin). As your shoulders rotate, continue lifting your arm and turning your body. Pay attention to the belt buckle. You don’t want to restrict your shoulder turn with your body. Move as a unit and you’ll get great results. Watch the video below!
In addition, allow your non-dominant arm to straighten behind you. It will give you more stability.
Types Of Backhand
Flat Backhand
To hit a flat backhand you need to strike the ball at a neutral level and drive the racket through contact without brushing the ball too much. It is mostly used by players who have two handed backhand because the second hand helps controlling the ball. Giving that the ball doesn’t generate too much spin, controlling a flat backhand can be difficult. However, players like Kyrgios, De Minaur and Norrie have amazing flat backhands (we have a tutorial about hitting flat backhands, check it out here). Single handed players usually use the flat backhand if they take the ball early but in general, they will hit their backhands with more topspin.
Topspin Backhand
This is the most common type of backhand in modern tennis. The amount of topspin generated by each player is unique to each individual but most players will add forward rotation to the shot. In order to hit a topspin backhand, the racket needs to come from low to high, brushing up on the ball during contact. Hitting with topspin allows players to take more aggressive swings. Players with one handed backhands can usually create more spin because of the lag they are able to create before making contact.
Slice Backhand
We will write an entirely different post about the slice backhand but essentially, this is the original backhand. On a slice, the player should use one arm and hit the ball from a high to low manner, as the racket face stays open through the shot. This action generates backspin and this shot is used to break the rhythm of the point. A good slice won’t necessarily be a fast shot but it will keep the ball low, demanding your opponent to hit up.
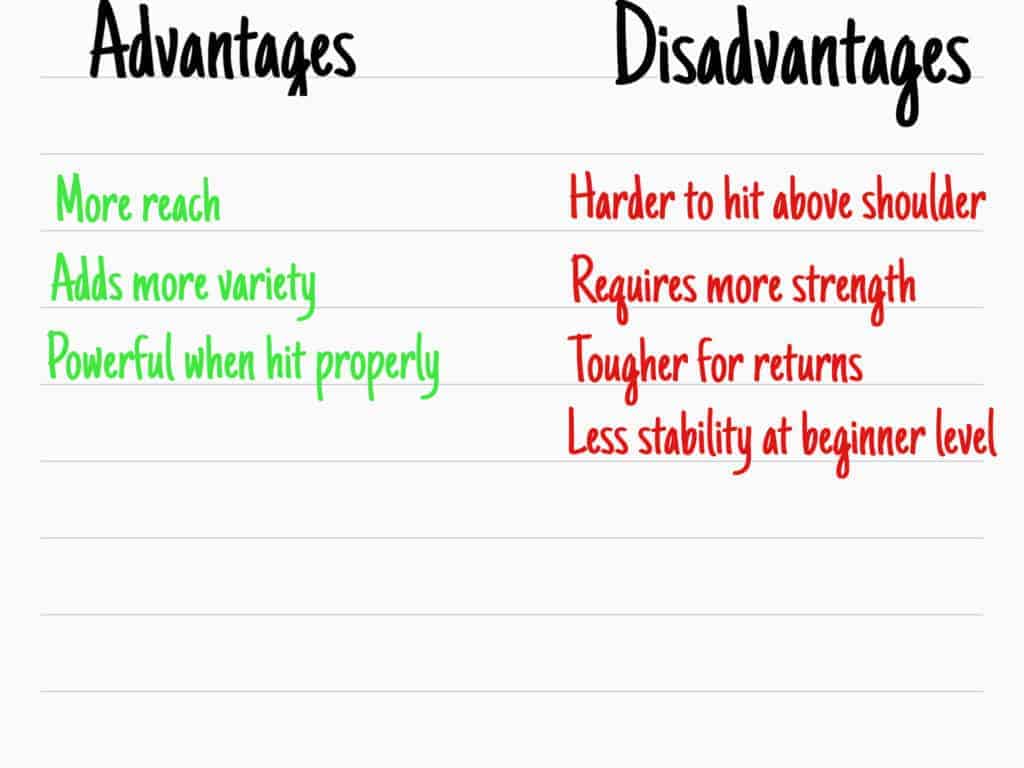
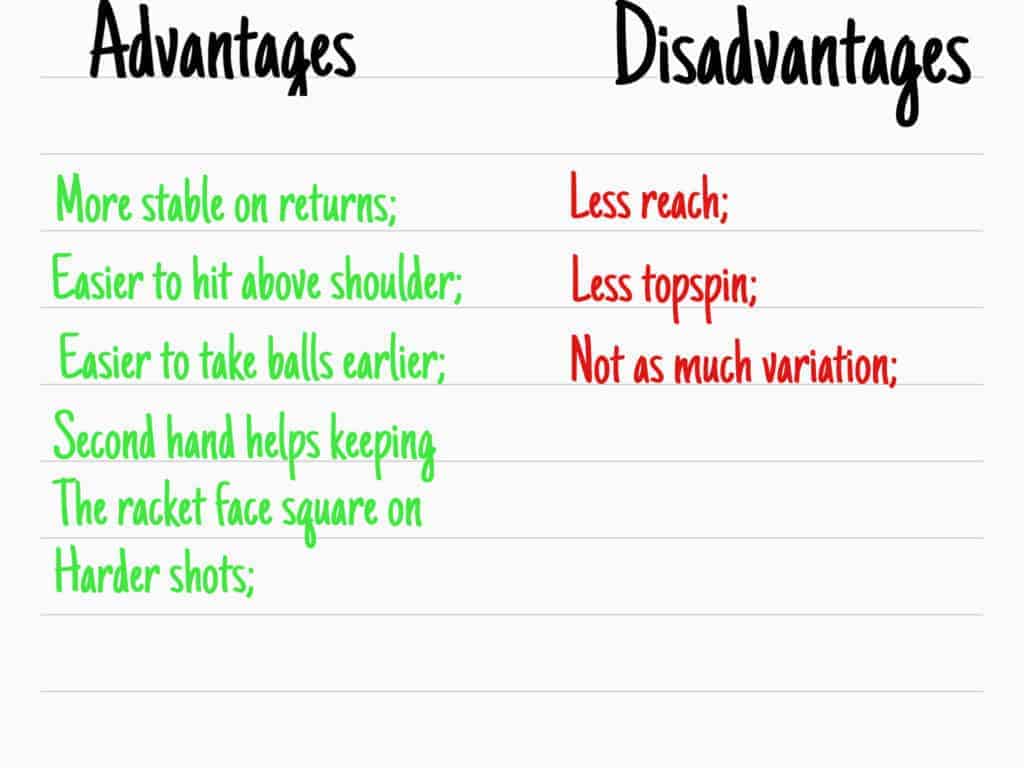
Advantages and Disadvantages Of Each Backhand
One Handed Backhand:
Two Handed Backhand:
6 Tips That Will Help You Improve Your Backhand
- Figure out which backhand you are more comfortable with: If you are a beginner, work on both backhands at first in order to find out which is more natural for you.
- Keep it simple: don’t try to reinvent the wheel. Focus on a good body turn and creating a nice loop with the racket.
- Swing as a unit: amateurs tend to focus too much on their arms and hands instead of using their entire body. Make sure you use your legs and upper body turn to hit the ball.
- Firm hands at impact: a lot of coaches tend to teach players to have loose hands. Forget that. At impact, feel like you are squeezing the racket grip firmly. This will make the racket head stay in place through contact, improving your control.
- The belt buckle trick: remember I told you about it earlier? Well sometimes having the right swing thought can help you improve your shots. Start the swing by turning your body and pointing “belt buckle” to the side fence. Finish the backhand with the belt buckle pointing to the net.
- Find your shot style: do you feel more comfortable hitting flat or with spin? Figure that out and go with it. We all feel comfortable with different styles of hitting the ball, find out what is right for you. In tennis, it is important to know yourself so be analytical of your own game.