The sport of tennis has gone through some dramatic changes through time. If you watch tennis videos from the 1950s and compare them to recent videos, they will look like very different sports. From clothes to rackets to rules, all the major aspects of tennis have evolved with time. And among all these aspects, one that changed significantly was the need for good tennis volleys.
In the past, the majority of tennis points were played with one of the players (or both) at the net hitting volleys. Because the courts were very fast and the rackets were smaller, good players used to try to get to the net as soon as possible. Needless to say, they needed to have good volleys. As time went on, both courts and tennis balls became slower, rackets became bigger but lighter, and players became stronger and faster. These changes made the overall tennis game slower, which means that players are not rewarded as much for going to the net – since their opponents have more time to react. As a consequence, players began focusing more on their groundstrokes than on their volleys, and nowadays even some of the best tennis players in the world will admit they have a pretty pathetic net game.
Volleys are one of the trickiest shots in tennis. When watching professionals play, volleys seem very easy and automatic. On the other hand, when you’re playing tennis and you suddenly have a tennis ball rushing towards your face, volleys don’t look that easy anymore.
Tennis volleys require touch, speed, skill, fast reflexes, a steady hand, and precision – which makes them one of the most admirable shots in tennis.
While players and coaches tend to not spend as much time working on volleys anymore, having a solid game can give you an edge on the tennis court. Volleys are great not only for singles, but for doubles as well. By having a good net game, you’ll be able to be more aggressive, shorten points, run less, and win more.
Pretty good deal if you ask me.
In this article, we will cover the basics of volleys, including what a volley is and how you can hit one. We’ll also cover some of our best tips and strategies to take your tennis volleys to the next level. Whether you are a beginner or a more experienced player, you will be able to get something out of this read.
If you wish, you can skip to the specific section that interests you. The information below is outlined in the following way:
- Tennis Volley Definition
- Forehand Volley
- Backhand Volley
- Tennis Volley Grip
- Tennis Volley Step By Step
- Tennis Volley Footwork
- Tennis Volley Position
- Tennis Volley Backswing Technique
- Tennis Volley Tips
- Bes Tennis Volley Drills
Tennis Volley Definition
In essence, volleys are part of your net game, which means that you will hit these shots without letting the ball touch the ground before you hit it. These shots are mainly used to finish the point, after you were able to move your opponent around by hitting successful groundstrokes. They are also used a lot more frequently during doubles matches. Depending on how you hit your volley, it will be qualified as either a forehand volley or a backhand volley.
Forehand Volley
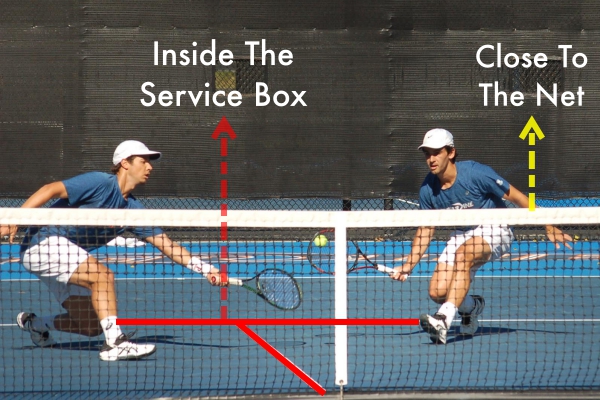
The forehand volley is a fairly simple movement, in which you use only one arm to hit a ball by your dominant side, without letting the ball touch the ground. A player usually hits volleys when standing close to the net and inside the service box. It requires firm hands and fast reflexes.
Backhand Volley
The backhand volley looks a lot like a backhand slice, but without letting the ball touch the ground. Once again, a volley usually occurs when you are standing close to the net. A backhand volley always happens on your non-dominant side. While backhand volleys are normally taught as a one-handed shot, it is not uncommon to see players hitting backhand volleys using both hands.
Backhand volleys are an important part of your net game since they will allow you to shorten the points and take time away from your opponent.
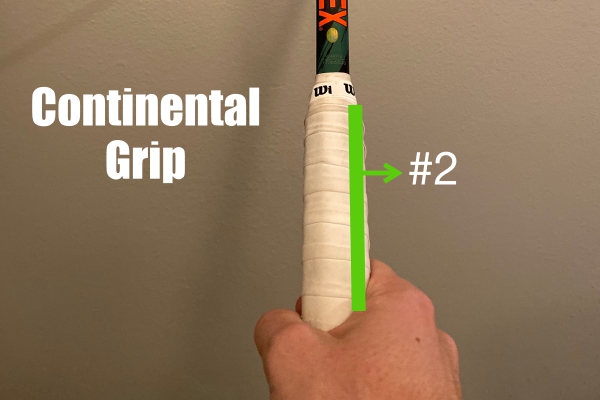
Tennis Volley – Grip
When you’re hitting tennis volleys, it all comes down to speed and control – which is why you should hit your volleys using a Continental grip. The benefits of using this grip for your volleys is that it is very quick to set up, and you won’t need to change it between your serve, forehand volley, backhand volley, and overhead. While the Continental grip doesn’t allow the player to add a lot of spin to the shot, that is not a problem since volleys do not require spin.
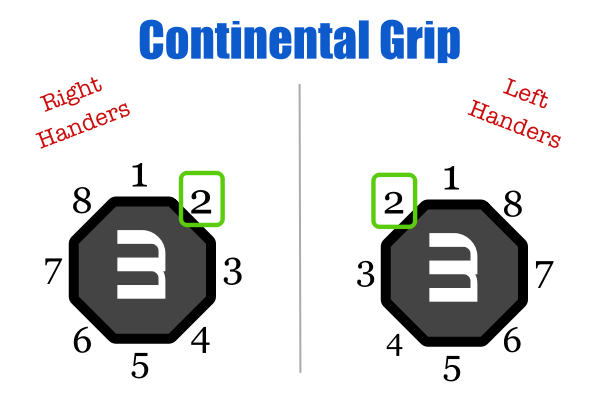
In order to use a Continental grip, you should hold your racket as if you were “giving it a handshake”. The knuckle of your index finger should be right on bevel #2. The Continental grip is excellent for hitting shots that do not require much topspin, like serves, volleys, slices, and overheads.
Tennis Volley – Step By Step
While tennis volleys look very simple, there are actually a lot of things going on at the same time. As you become comfortable with this shot, these things will become automatic and you won’t have to really think about them. However, when you’re first learning how to volley, you should understand the biomechanics of a well-executed volley. We’ve broken down the volley into 9 different steps (as you can see in the image below) so you can have a good idea of what you should be doing. You can follow these steps for both forehand and backhand volleys.

Remember, though, that once you become comfortable with volleying, your stroke should be one smooth movement and not a series of small movements.
- Balanced Base: Keeping your knees slightly bent and your body weight in the front of your feet, the first step to a good volley is to have a solid base with your legs – ready to move in any direction. Your legs should be spread at your shoulders’ width.
- Split Step: The second step will be the jump that will get you ready to change directions (better known as a split step). The most important aspect of the split step is to time it well, and you should begin jumping as your opponent hits his shot. Your jump should be both forwards and up.
- Wide Landing: The landing after the split step should be done with your legs opening wider than the width of your shoulders. This will allow you to cover a bigger share of the court.
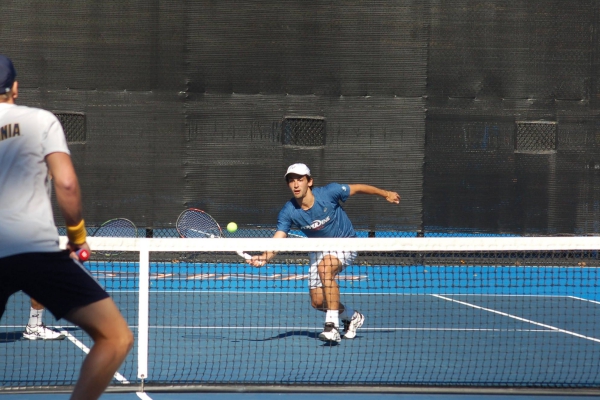
- Side Identification: This is the step where quick reflexes will make a huge difference. Once you realize whether the ball is coming to your forehand or backhand side, you can start turning your body that way. Notice in the image how the outside foot starts turning to the forehand side. You’ll begin your shoulder rotation with both of your hands holding the racket, and you will eventually release one of them and use it to point to the ball.
- Weight Shift: Now that you know where you will be hitting the volley, you should begin shifting the weight of your body that way. You should try to put most of the weight on the outside leg. Keep your elbow slightly bent and the head of the racket higher than your hands.
- Elbow Extension: Keeping your eyes on the ball, you’ll gradually extend your elbow. You always want to make contact with the ball in front of you.
- Clean Contact: As you can see in the image, the contact point happens in front of you, and since your body should be moving forward, you shouldn’t have to hit the ball hard. You’re essentially just using the pace your opponent hit the shot with.
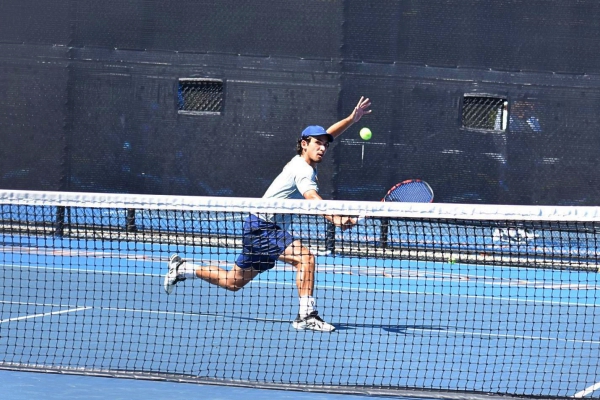
- Leg Step-Through: At this point, your back leg should be landing in front of your outside leg. This will ensure that you have an aggressive stance in your volleys – and it’s the step we refer below as the “Big Step”.
- Follow Through: Finally, you should do a short follow-through after you hit your volley. This won’t be nearly as long as a groundstroke follow-through; it is just enough so you can catch the racket with the other hand and move on to the next volley.
Tennis Volley – Footwork
A player’s volleys are only as good as his footwork. Since volleys happen so quickly and there is not much room to compensate with a full swing, having efficient footwork is paramount. Just like a lot of other things in tennis, simpler volleys are better volleys. Below we’ll cover a few tips to have a good volley footwork.
- Keep Your Knees Bent: You should keep a slight bend in your knees at all times when you’re at the net, as this will allow you to change directions better and jump more explosively.
- Keep Your Weight In The Front Of Your Feet: If you are able to, you can even keep your heels off the ground. By doing so, you will easily keep your knees bent and you will inevitably keep your whole body leaning forward – a great aggressive stance.
- All About Quick Feet: When you’re at the net, it all comes down to how quick you can be. Your feet should stay light, but able to explode at all times. You should think of it as if you were trying to “float”
- The Smaller The Step, The Better: With the exception of the one big step when you hit the ball, you should try to take small steps. By doing so, you’ll be able to change directions faster.
- Listen To Your Big Step: When you’re taking your big step in order to hit the volley, you should try to stomp your foot, even to the point at which you can hear it. By focusing on that, you’ll have an aggressive footwork, meeting the ball in front of you.
Tennis Volley – Position
When you’re hitting volleys, there are essentially two positions your body should go through. They are the neutral position and the step-through position.
Neutral Position
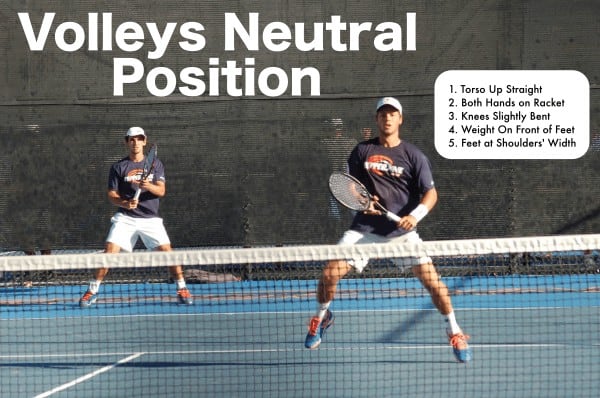
This is the stance you’ll usually use before doing your split step. Your feet will be spread at about shoulders’ width, your knees will be slightly bent, your body weight in the front of your feet, both hands on the racket, and your torso standing up straight.
In defensive volleys, this is the only position you will use. Since the ball is coming at you faster, you don’t have time to step through with the back leg. So in order to hit successful defensive volleys, your neutral position should have a solid base.
Step-Through Position
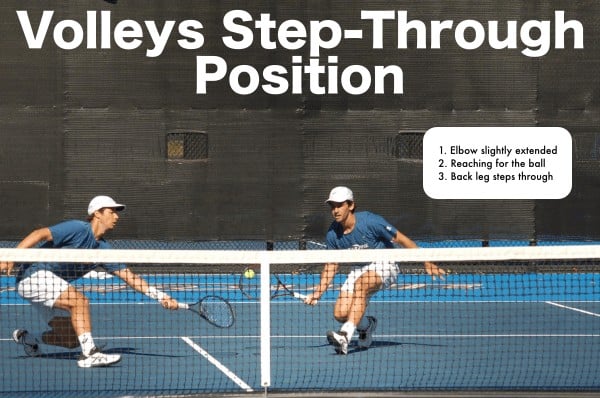
This is the final position you will use after hitting an aggressive volley. This is the position you’ll end up on after making contact with the ball and stepping your leg through. From that point on, you will need to level both legs and recover fast for the next volley.
Once again, when shots are coming at you too fast and you have no time for the step-through, you should stick to the neutral position mentioned above.
Tennis Volley – Backswing Technique
The backswing portion of the volley is a tricky one. A lot of times, if our opponent hits a slower shot, we’ll have more time to prepare and we’ll end up using a big backswing so we can “hit the ball harder”. By doing so, a lot of times we end up missing those shots – either long, wide, or at the net.
A volley backswing should always be as compact as it can possibly be. If you are wondering whether your backswing is too big, chances are it probably is.
I’ve worked on my volley technique a lot throughout my career, and I’ll share some of the tips that have helped me out the most over the years.
- When preparing for a volley, always keep the racket in front of you and ready to go. Both of your hands should be on the racket and the head of the racket should be higher than your hands.
- Keep your elbows slightly extended when getting ready for a volley. You can save a lot of time if you don’t have to waste time extending your elbows.
- The rotation happens through the shoulders, not through the arms. This will help keep your movement compact.
- You’re supposed to keep your non-dominant hand on the racket for longer than you’d think. This non-dominant hand is not nearly as important as it is for groundstrokes. By keeping it on the racket for longer, you’ll be making sure your arms, shoulders, hips, and racket are moving together.
- Your racket should never go back further than your shoulder line. If that happens, it means you’re going too far.
- You should never lose your racket out of sight when hitting a volley. If you do so, it means you’re probably making contact with the ball too late.
Tennis Volley Tips
If you’ve made it to this point, you basically know everything you need to know in order to hit effective tennis volleys. Now all you need to do is go to the court and practice.
Below we have added some additional tips that might make your journey easier:
- Focus On The Right Volley, Not The Prettiest Volley: A lot of times you won’t have enough time to do a full volley, with the perfect technique and a great step through. In these cases, you need to know that it’s ok to do a very basic volley with a neutral stance, and just focusing on getting the ball to the other side.
- It’s All About Placement: My dad always said: if tennis was about who can hit the hardest, MMA fighters would win all Grand Slams. This holds true to every shot on the tennis court, but it is especially true about volleys. Since you’re already taking a lot of time away from your opponent, you don’t need to hit it hard – just place it well.
- Ain’t Nothing Like A Good Setup: The easiest way to get an easy volley is to hit good approach shots, so make sure you also work on that.
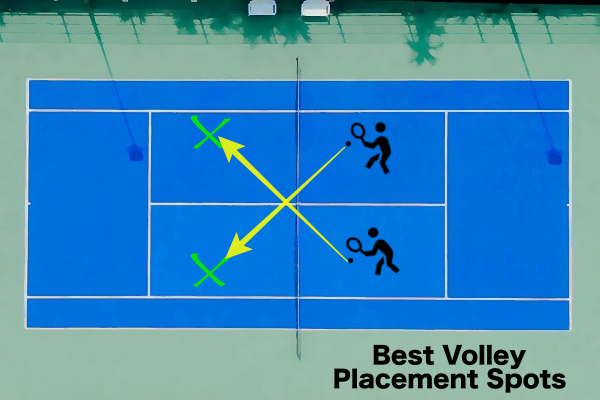
- Find The Secret Spot: You should normally attempt to hit short cross-court volleys – not necessarily drop shots, just short ones. If you look at the image below, you’ll see what we mean.
- The Sooner The Better: Make sure you always make contact with the ball in front of you. The earlier you hit it, the more time you will take away from your opponent.
Best Tennis Volley Drills
We are constantly adding new drill ideas for every area of your tennis game, volleys included. We have previously written an article on the 7 Drills To Improve Your Volleys, which has some of our favorite volley drills. Below, we’ve listed some of our favorite drills that will help you improve different aspects of your volleys, including direction, consistency, reflexes, and footwork.
For Volley Direction – The Bryan Brothers Drill
This drill will have you working with a partner in order to improve your volley direction. It might be a little challenging at first, but once you get a feel for it, you should be able to get a nice flow going. This drill will help you not only improve direction, but consistency and reflexes as well.
Points to remember when working on this drill:
- Stay low even though you are moving laterally. It is easy to let yourself pop up.
- Keep the hips as square as possible to the net as you move. This is a lateral movement, not a forward movement.
- Don’t crowd the ball. Give yourself space. If the space isn’t there, create it.
- Don’t assume the ball will be where you want it to be. Remember, this is a reaction drill. Make it realistic and don’t expect it to come in the perfect place.
- Work together to keep the ball going as long as possible. It won’t be perfect, just strive to get better.
For Volley Consistency – The Wall Ball Drill
What we love about this drill is that it removes every distraction possible. When it’s just you and the wall, you can reach a focus level that is not possible when hitting with a tennis partner. The cool thing about it as well is that the more your volley technique improves and the more consistent you are, the easier the drill becomes.
Points to remember when working on this drill:
- Keep your wrist firm. We are training strength in this drill, it is counterproductive to do this with a broken wrist.
- Keep your weight on your front leg.
- Move your feet. You will have to make small adjustments as you go.
- Stay low. Feel a burn in your legs and don’t pop up as the drill goes on.
- Keep your swing compact. If you can’t keep the ball going and it feels rushed, it is likely because your swing is too big.
- Keep your head still, but keep your eyes locked on the ball the entire time.
For Volley Reflexes – The On Top Of The Net Drill
This is a great quick drill that can be extremely helpful, especially for doubles. You may get hit once or twice, but you will most certainly develop better reflexes.
Points to remember when working on this drill:
- Keep your hands up. If you drop your hands, you won’t have time to get them back up.
- Keep the swing compact.
- Meet the ball out front as much as possible.
- Don’t let the ball move you. Be a wall and resist against the power of the baseliner’s shot.
- Depth doesn’t matter. All that matters is you are sticking the volley back and you are making the ball with force behind it.
For Volley Footwork – The Get Low, Stay Low Drill
Finally, this drill is one of our favorites when it comes down to improving volley footwork. What makes it great is that it forces you to work on your legs while keeping the right technique. Trust me, you will get tired when doing this drill. But hey, the more tired you get now, the less tired you will be during the matches.
Points to remember when working on this drill:
- After you touch the ground, still stay low. This should not look like you are doing a burpee.
- Keep your chest up throughout.
- Bend with your knees, not your back.
Final Thoughts
We hope you enjoyed this read and that you can go ahead and begin working on improving your volleys. If you do have any questions, comments, or concerns, let us know in the comments section below and we’ll get back to you as soon as we possibly can!