The 5 Best Tennis Rackets For Doubles

The 5 Best Tennis Rackets For Doubles

Recent Articles

Tennis Forehand: Best Grips, Tips, & Steps (with Photos)


Tennis Forehand: Best Grips, Tips, & Steps (with Photos)

If you are just starting to work on your tennis game, hitting some shots will seem incredibly complex while hitting others will seem to come naturally. Most beginners find that the forehand is a shot that actually feels very natural and intuitive, and you may be able to hit successful forehands even if it is your first time ever playing tennis. 

If you are a more advanced player, chances are that your forehand is your favorite shot and that you may even consider it your “weapon”. My game was always built around my forehand, as it was the shot I felt the most comfortable and the one I was able to win the most points with. And yet, because I didn’t have a flawless technique, I went through periods of inconsistency and low confidence in my forehand. 

A tennis player’s forehand has the potential to be a game-changing shot. The physics of the forehand allows for both more spin and more power than other baseline shots, so players should take advantage of it. However, in order to do so, you need to have the right forehand technique and to practice it countlessly. 

In this article, we will cover everything you will need to know in order to have a great forehand. If you are a beginner, you will understand what exactly is a forehand and how to hit one step-by-step. If you are a more advanced player, you will also find tips that might give you that extra forehand power and speed you have been looking for. 

Since this is a pretty thorough article, feel free to skip to the parts that are more relevant for you. The information you will find below is structured in the following way:

  • What Is A Forehand In Tennis?
  • How To Hit A Tennis Forehand
    • Step #1 – Tennis Forehand Grip
      • Eastern Forehand Grip
      • Semi-Western Forehand Grip
      • Western Forehand Grip
    • Step #2 – Tennis Forehand Stances
      • Open Stance
      • Semi-Open Stance
      • Closed Stance
    • Step #3 – Tennis Forehand Swing
    • Step #4 – Forehand Topspin
    • Step #5 – Forehand Follow-Through
  • Best Tennis Forehand Tips

What Is A Forehand In Tennis?

For the vast majority of tennis player, their forehand is their best shot. A player hits a forehand when he allows the ball to bounce once on his court before hitting it, and hits it on his dominant side. With very few exceptions, players hit forehands using only one arm. In some rare cases, a player will have both a double-handed forehand and a double-handed backhand. 

Tennis forehands are called forehands because normally, the front (fore) of your dominant hand (the one holding the racquet) will be facing your opponent when your racquet makes contact with the ball. 
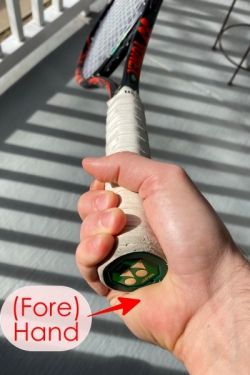
Generally, when people refer to forehands, they mean a forehand with topspin – which means that the player hits the ball on the top, causing it to spin forwards. Technically, a forehand can be hit with slice, but people mostly refer to those shots as slices (brushing the ball from under, which causes a type of backspin). For right-handed players, a forehand is executed on the right side. For left-handed players, it is executed on the left side. 

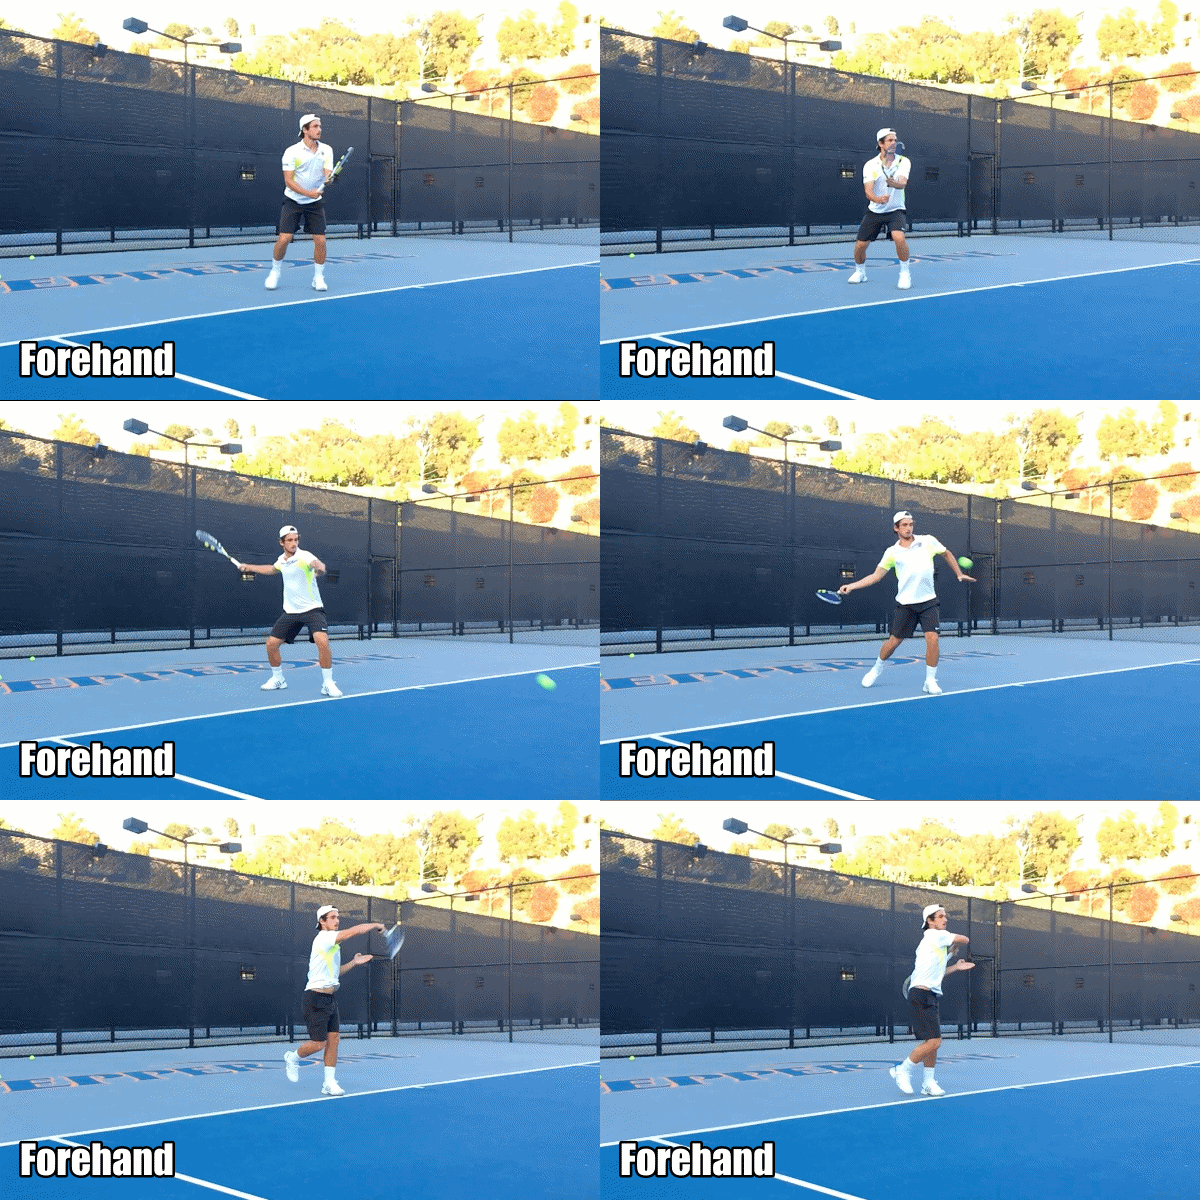
Below is a short video of what a simple forehand looks like.
How To Hit A Tennis Forehand

While the forehand shot seems very intuitive, it is very important that you begin practicing it correctly as soon as possible. If you start hitting forehands with the wrong technique, your brain develops muscle memory with the wrong form and it will be more difficult to change it in the future. 

In order to learn how to hit forehand easily, you should break down the shot into small steps, which include the grip, the stance, the swing, the topspin, and the follow-through. If executed correctly, you should end up with a forehand that is smooth, effortless, and powerful.

We have broken down the steps below. 

Step #1 – Tennis Forehand Grip
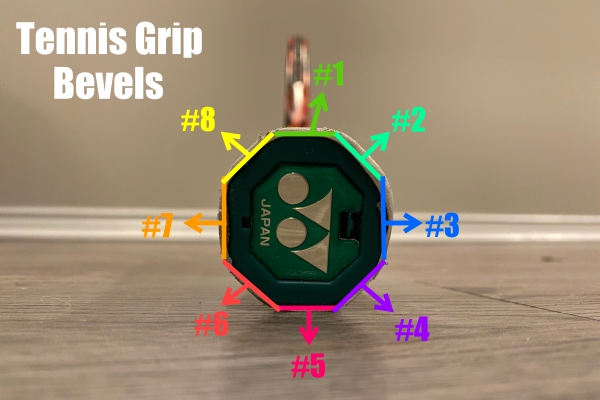
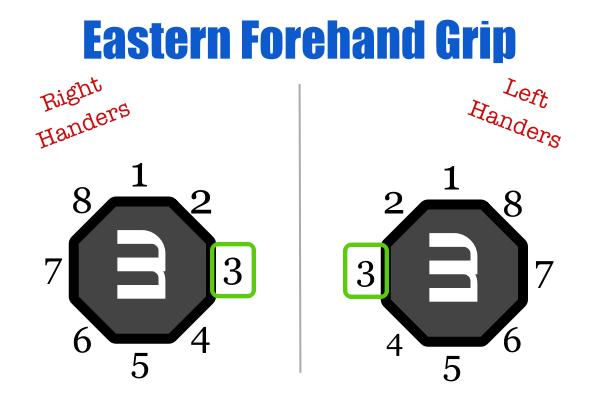
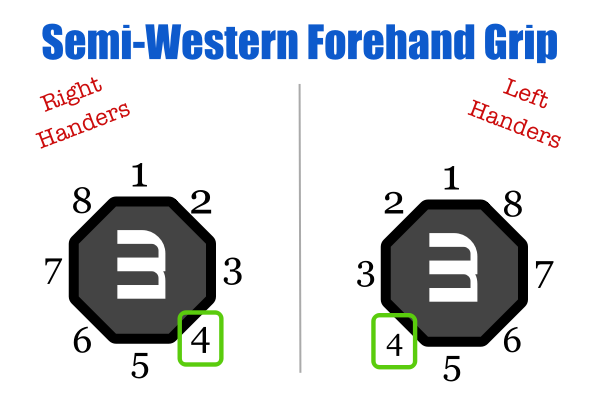
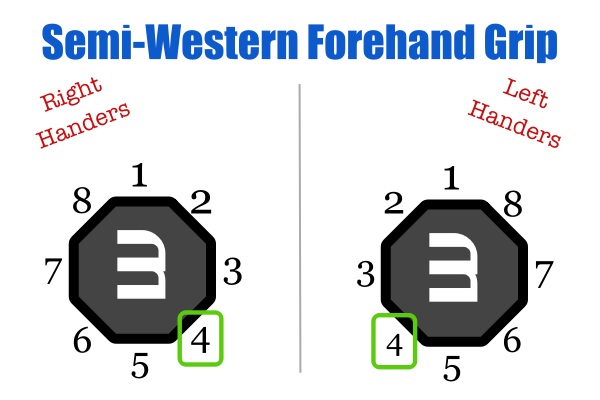
If you are just becoming familiar with tennis terms, a grip is defined as the way you hold the racquet while hitting a tennis shot. A tennis racquet handle has an octagonal shape, and each side (also called bevel) is numbered from 1 to 8. Usually, a specific grip is characterized by which bevel the base of your index finger lays on. Some grips will give you more power while others will give you more spin, so you can choose the one that better fits your game. There are currently 3 main forehand grips: Eastern, Semi-Western, and Western

Eastern Forehand Grip

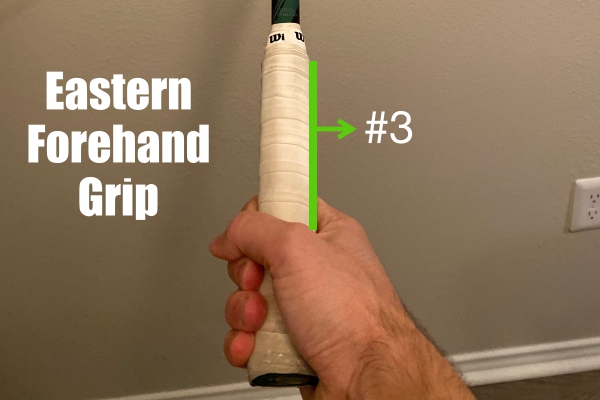
The Eastern grip is identified when the base of the player’s index finger lays on bevel #3. In order to find this grip, you can hold your racket perpendicular to the floor and then hold it like you were giving it a handshake. Then, all you need to do is rotate your hand one bevel to the right if you’re right-handed or one to the left if you’re left-handed. If you do this right, you should end up with the base of your index finger on bevel #3. 
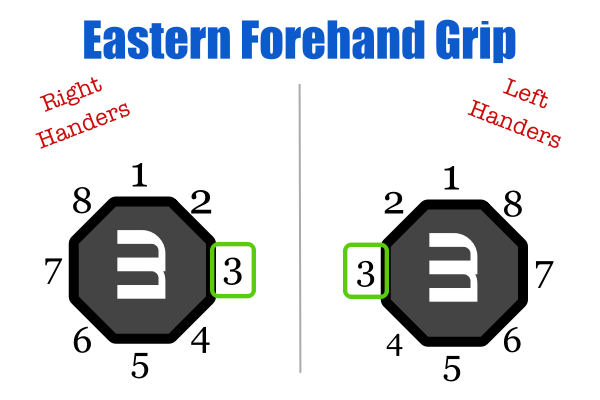
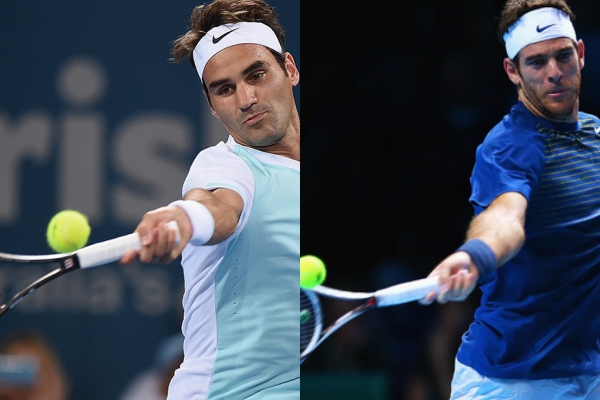
The Eastern forehand grip is great if you play mostly on fast surfaces, since it allows you to hit flat shots and to quickly switch grips between forehand and serves or slices. This grip is not frequently used by professional players, though. The reason behind it is that it can cause a lot of stress on your wrist. Juan Martin del Potro is the only player who hits forehands with a true Eastern grip, and he has had to have several wrist surgeries because of that. Roger Federer hits his forehands with a grip that resembles the Eastern grip, yet it is slightly modified.

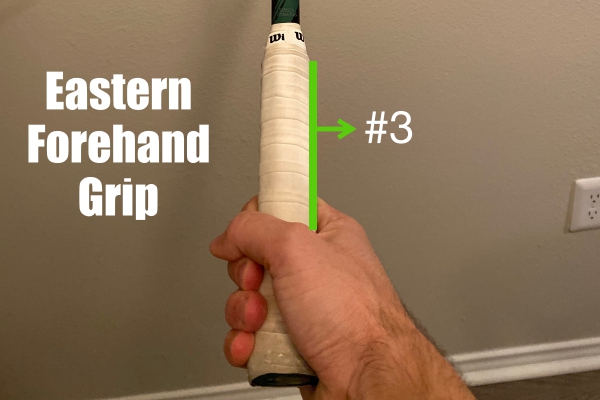
Below is a close-up picture of what a forehand Eastern Grip should look like. 
Semi-Western Forehand Grip
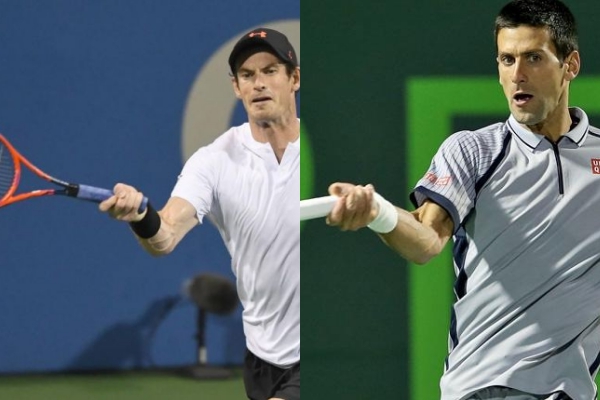
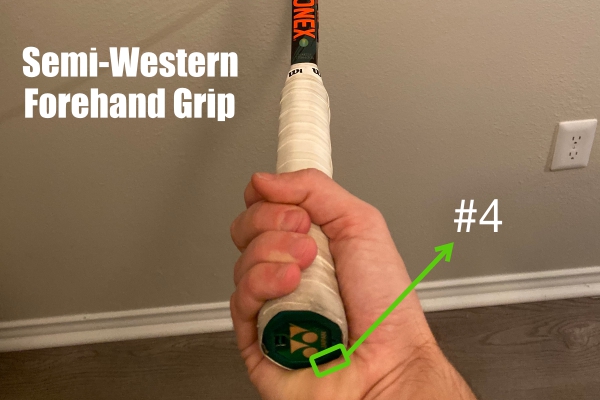
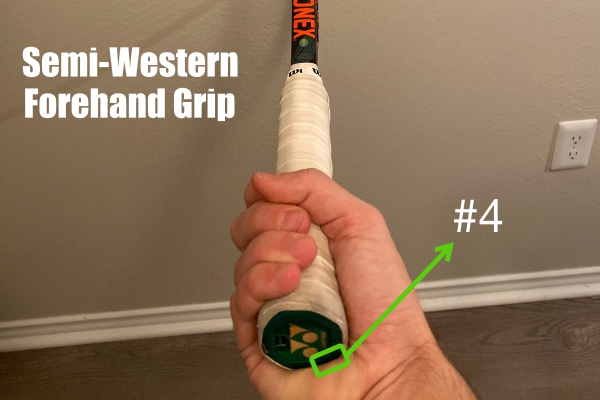
The Semi Western Forehand grip is located one rotation after the Eastern grip, which means that the base of your index finger should be on bevel #4. This grip is probably the most popular forehand grip among professional players, as it is an all-surface grip. In order to hold it correctly, you should hold the racket perpendicular to the floor with your non-dominant hand, grip it with your dominant hand as if giving it a handshake, and rotate your hand 2 bevels (to the right if right-handed, to the left if left-handed).
When compared to the Eastern grip, the Semi-Western grip allows players to add much more topspin, while adding less stress to the player’s wrist. The drawback of using this grip is that it can be slightly challenging to hit shots close to the ground and to change your grip quickly. Players like Novak Djokovic, Andy Murray, and Stan Wawrinka all use either a Semi-Western grip or a slight variation of it.

A Semi-Western grip should look like the photo below. 
Western Forehand Grip
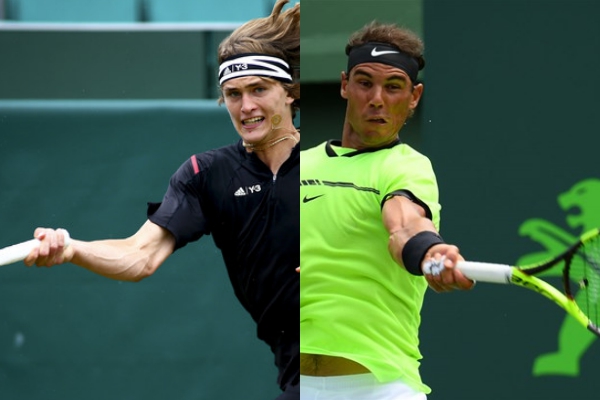
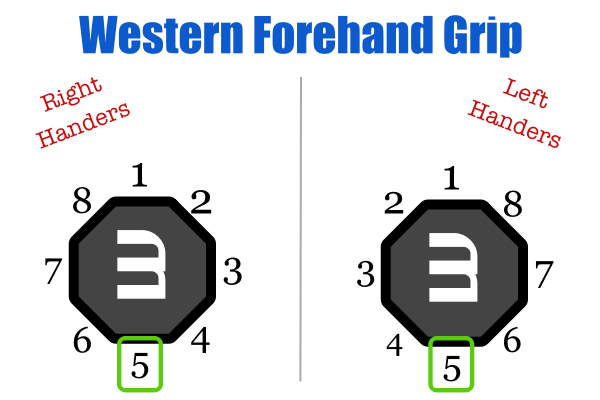
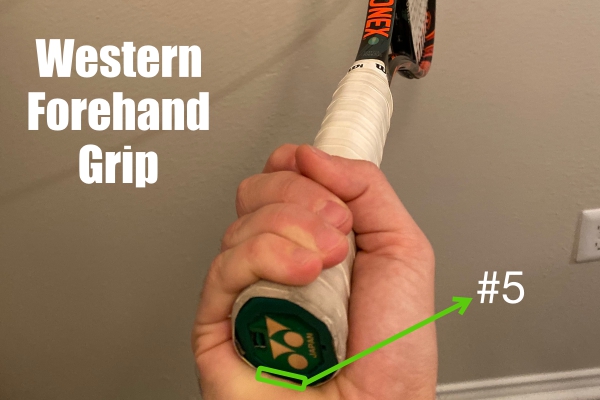
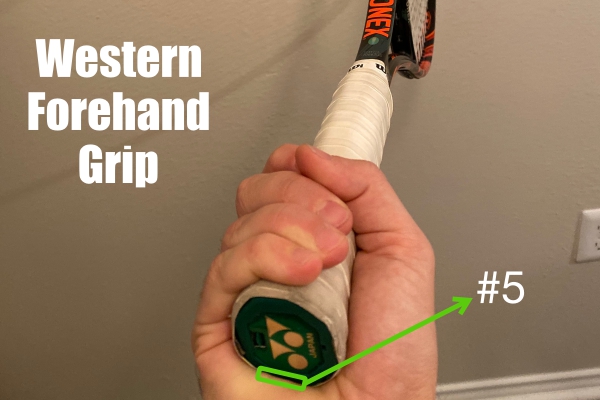
The next and last forehand grip is the Western Grip. In order to hit it, your index finger should be laying on bevel #5. It is on the end of the forehand spectrum, and it may seem weird at first. In order to hold it correctly, you should hold the racket perpendicular to the floor with your non-dominant hand, grip it with your dominant hand as if giving it a handshake, and rotate your hand 3 bevels (to the right if right-handed, to the left if left-handed). When you do that, the base of your index finger should lay on bevel #5. 
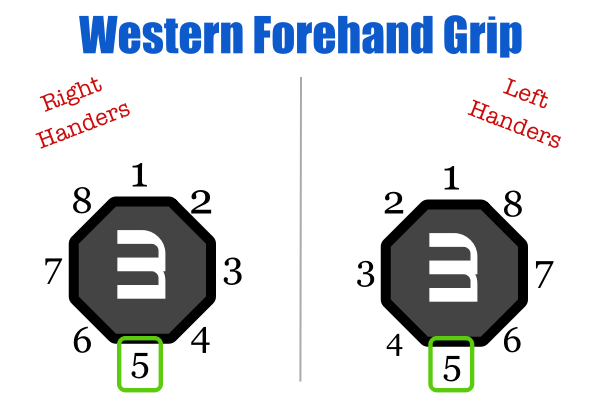
The more you rotate the racket, the easier it is to add topspin to your forehand. As such, this grip is ideal for players who have a solid baseline game and play on slow courts that require a lot of topspin. However, it also becomes even more difficult to change grips and to hit shots close to the ground. This is also a fairly popular grip among tennis players. Rafael Nadal and Alexander Zverev are among the players who use the Western grip.

The picture below shows a standard Western forehand grip. 
Step #2 – Tennis Forehand Stances

Once you have your grip sorted out, it is time to move on to another extremely important step – the way you position your legs when hitting a forehand. These positions are also called stances, and there are 3 main ones: Open Stance, Semi-Open Stance, and Neutral Stance. Differently from a forehand grip (where you should stick to just one), you will be using all 3 forehand stances during a tennis match. We will cover each one below and show you when to use each. 

Forehand Open Stance
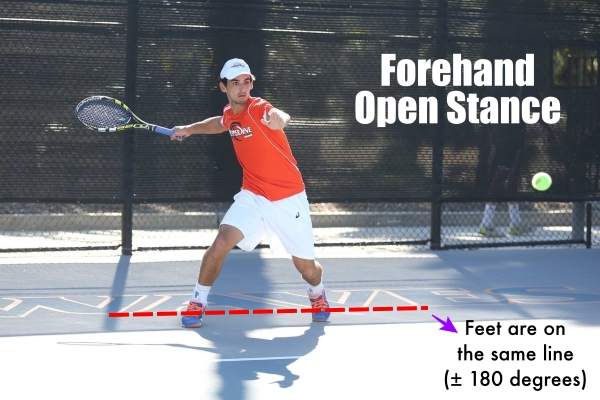
The open stance forehand is the most commonly used stance for defensive shots. The preparation for the open stance is significantly faster than the other two stances, which makes it ideal to return fast shots. In addition to that, this stance allows for a much faster recovery, as all the player needs to do is cross the outside foot in front of the inside foot and head back to the middle. 

As you can see in the picture above, the forehand open stance is executed when both feet are horizontally aligned. If you draw an imaginary circle around your hips, your feet would be positioned at a 180-degree angle. You should notice that most of the player’s weight is on the outside foot (right foot for right-handers, left for left-handers). Your knees should be bent according to the ball, as lower balls will require a greater bend. Once your feet are properly aligned, all you need to do is rotate your hips and shoulders about 90 degrees and swing through the ball. Make sure you keep your non-dominant hand pointing at the ball until the last second so you do not end up rotating your torso too early.

Technically, the open stance does not require the player to swing the outside leg through. However, you may choose to cross the outside leg over the inside one in order to recover faster.

Forehand Semi-Open Stance
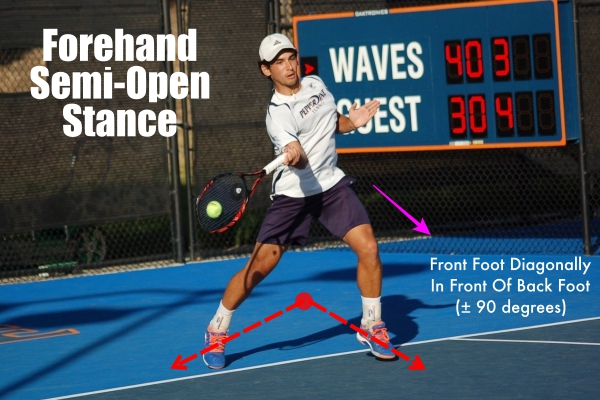
The forehand semi-open stance is similar to the open stance, but it is considered slightly more aggressive. This position is great as it is fairly quick to set up but allows the player to transition from a defensive position to an aggressive one.

This is the best stance for all surfaces, as it’s very dynamic. When preparing for the semi-open stance, your front foot should be positioned diagonally to your back foot. If you draw an imaginary circle around your hips, your back foot would be on the “3 o’clock” position, and your front foot would be on the “12 o’clock” one (forming a 90-degree angle).

Your bodyweight should be between both feet, transitioning from back to front as you hit the shot. This way you will be able to use your body weight for the forehand, which will translate into a more powerful and aggressive shot. 

Forehand Neutral Stance
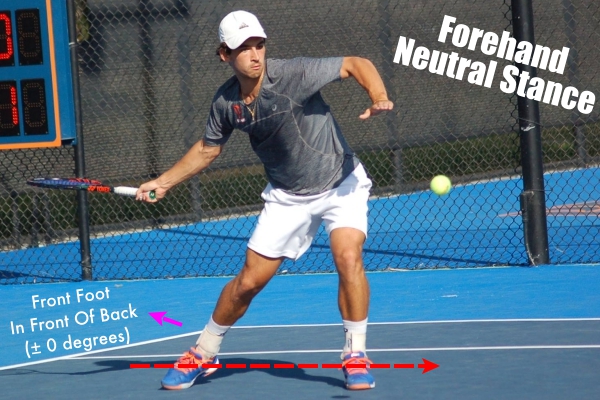
The forehand neutral stance is probably the most aggressive of all stances. In this stance, your front foot is positioned directly in front of your back foot, forming an angle close to 0 degrees. 

As you can see in the picture above, most of the bodyweight in this stance is centered on the front leg, which allows the player to generate a lot of power. The neutral stance is used mostly for short balls. Since you end up moving forward after the shot, this stance is used when the player wants to get to the net faster.

Since this stance requires the player to put one leg in front of the other, it can be somewhat slow to set up. For this reason, it is not considered a great defensive stance. 

Step #3 – Tennis Forehand Swing
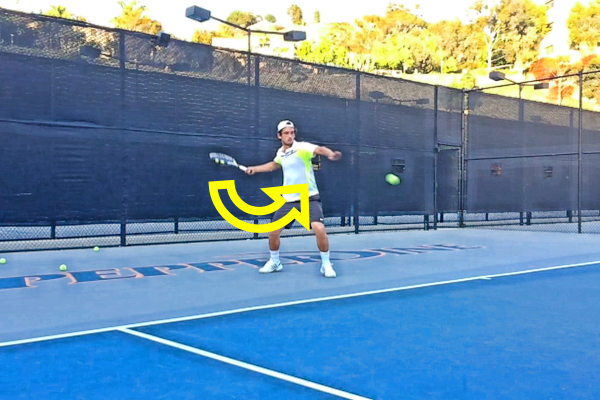
The forehand swing may seem a little complicated at first, as you need to coordinate a lot of things at the same time. However, it is actually not that complicated. Once you break it down into smaller steps, it becomes simple and every step should flow smoothly. We have broken down these steps for you below:

  1. Rotate Torso: Once you have your feet properly positioned, you should start rotating your torso. You should do so while keeping your non-dominant hand on the racket, so you rotate both arms together. 
  2. Separate Hands: When your non-dominant shoulder (left for right-handers, right for left-handers) is facing the ball, you should begin separating your hands. The hand with the racket moves back and away from the ball, while the other hand starts pointing to the ball. 
  3. Half-Circle Loop: Your dominant arm should make a half-circle loop, first raising your hand and then letting it come down towards the ball. You should raise your hand somewhere between your ribs and your face (the higher the ball, the higher the hand). 
  4. Rotate Torso #2: You should keep the non-dominant hand pointing to the ball as long as possible. When your arms are wide open (one facing the ball, the other away from it), you should start swinging the racket towards the ball. Remember to rotate your whole torso, not just the arm. 
  5. Hit The Ball, Swing Leg Through: The contact with the ball should happen in front of your body. Once that happens, your back leg should begin moving forward. That will allow you to gather some momentum, putting more weight into the shot. 
  6. Follow-Through: Ideally, your swing will end with your left hand catching the racket around your left shoulder. 
  7. Back Leg Steps Through: Finally, your back leg will land either in line with your front leg or ahead of it. The swing will be officially done then. 

The video below will show you how the steps mentioned above come through in a proper forehand swing. 

Step #4 – Tennis Forehand Topspin
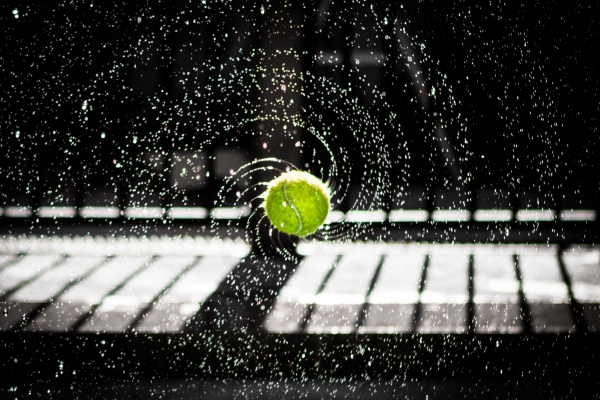
A forehand is usually executed with topspin. A shot with topspin will bounce pretty high after it lands on the opponent’s court and tends to push the opponent back. These shots are used to keep an opponent in a defensive position. Some of the grips we mentioned above will naturally add more topspin to the forehand (like Western and Semi-Western), while the Eastern grip will usually result in flatter shots. Shots with a lot of topspin are ideal for slow and bouncy surfaces, like clay or some slow hard courts. 

In order to hit a shot with topspin, you should brush over the ball, basically starting in the middle and moving forwards. This will cause the ball to rotate forward.

Step #5 – Tennis Forehand Follow-Through
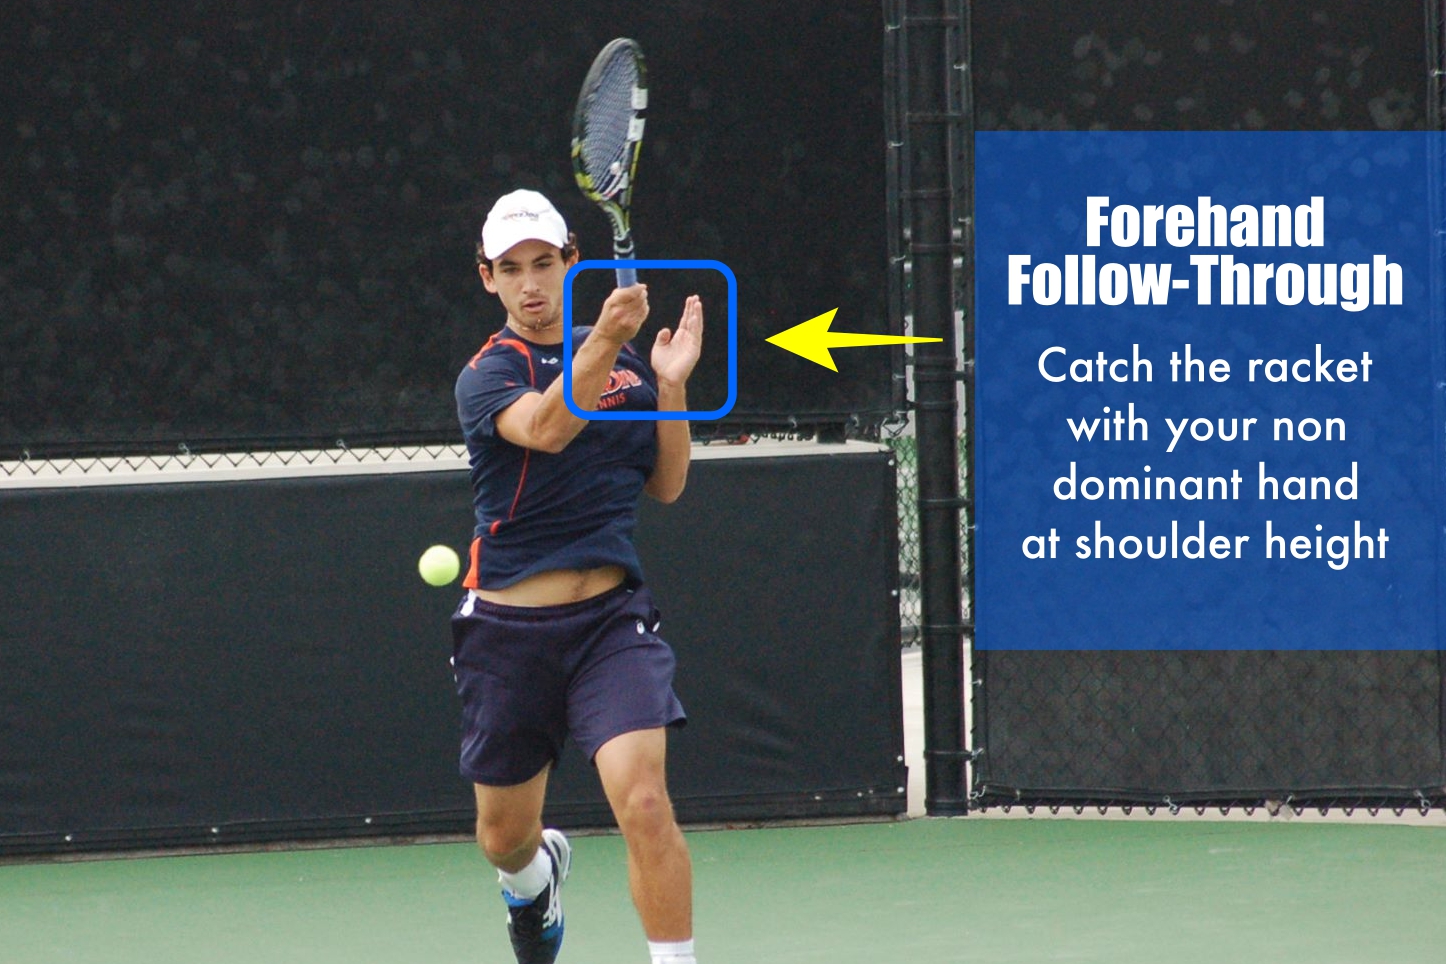
While you naturally end up focusing more on your swing before you make contact with the ball, you should pay as much attention to what you do after you hit it. A proper follow-through will make sure that your technique remains correct, that you are hitting the ball in the right spot, and that you minimize the risk of injuries.

A good forehand follow-through will have your non-dominant hand catching the racket at about the same height at your left shoulder. In order to make it easier to understand, one of my old coaches used to tell beginners that, at the end of each forehand, you should try to “kiss the biceps” of your dominant arm. By doing so, you will finish the stroke at the perfect height.

Recently, it has become increasingly common to finish a forehand behind the player’s head. However, this is not considered the best technique and should be reserved for advanced players. 

One of the main mistakes for beginners is to hit the “windshield wiper” forehand. When trying to maximize topspin on the forehand, a player will end up finishing the shot around hip height. This incorrect technique will not only decrease overall power but can also cause injuries.

Best Tennis Forehand Tips

These are some of the best tips in order to hit an awesome forehand:

  1. It’s All About The Legs: While it may look like most of your forehand power will come from a fast swing, the actual power will come from your legs. Work out those legs and make sure you’re using them well on your forehands.
  2. Use The Right Stance: Don’t get too caught up in using one forehand stance. Tennis is a game where you need to adapt all the time, so each shot will require a different stance. It’s all about using the right stance for that specific forehand. 
  3. Always Move Forwards: Always try to make sure your body weight is moving forward when you hit your forehand. That will reduce mistakes at the net and will give you more power.
  4. Hit It In Front: Try to always make contact with the ball right in front of your body, ideally at hip height. Don’t let the ball get too high, otherwise, it will become more difficult to time the shot properly. 
  5. Focus On The Whole Shot: Don’t forget to do the proper follow-through!
  6. Faster Is Not Always Better: One big misconception for beginners (and some advanced players) is that you need to hit your forehand hard in order to win points. That is completely incorrect, and in most cases, a well-placed forehand will be better than a fast one. 
  7. Change It Up: I’ve always had a pretty decent forehand, but it was not the speed of it that made it good. I always tried to change things up, like angles, directions, and speed. That will make your opponent lost, which is a great advantage. So make sure you are training every single type of forehand out there!

Weekly Digest #1 – 12/30 to 01/05 – New Decade, New Faces


Weekly Digest #1 - 12/30 to 01/05 - New Decade, New Faces

It’s a new decade and tennis has come back in style! The new tournament ATP Cup has kicked off this week, and we’ve seen some very interesting matches so far. Some NextGen stars have been stealing the spotlight, including Casper Ruud, Alex De Minaur, Daniil Medvedev, Denis Shapovalov, and Stefanos Tsitsipas. However, they’ve been playing mostly against each other and haven’t faced any of the Big 4. So while things are looking very exciting, it’s a little too early to tell if we will have a new contender for the Australian Open title.
In terms of Big 4, only 2 of them have been in action this week. Both Nadal and Djokovic didn’t play their best against Basilashvilli and Anderson, respectively, but they still managed to come out on top. As usual. And Andy Murray has announced that he will be out for the Aussie Open due to a groin injury, which means that we will need to wait a little longer to see him back in action. 

Australia, Russia, and Bulgaria have been the best teams of the week, with 2 wins each. However, out of the 3, I only see Russia as having a real chance of taking the title away from Spain. 

Some cool off-court news is that Nick Kyrgios and other Australian Players have initiated a campaign where they will donate money to people affected by the fires in Australia – for every ace they hit during the Australian summer. The ATP has joined the campaign, and athletes from other sports have done so as well. Maybe Kyrgios was just trying to clean up his image, but what is important is that this campaign should help a lot of people. Good start to 2020!
Winners Of The Week

Alex De Minaur

Vs. Dennis Shapovalov – 6/7(6) 6/4 6/2

Vs Alexander Zverev – 4/6 7/6(3) 6/2

Daniil Medvedev

Vs. John Isner – 6/3 6/1

Vs. Fabio Fognini – 1/6 6/1 6/3

Casper Ruud

Vs John Isner – 6/7(3) 7/6(10) 7/5

Vs Fabio Fognini – 6/2 6/2

Biggest Upsets

  • Casper Ruud x John Isner – 6/7(3) 7/6(10) 7/5
  • Casper Ruud x Fabio Fognini – 6/2 6/2
  • Denis Shapovalov x Stefanos Tsitsipas – 7/6(6) 7/6(4)
  • Borna Coric x Dominic Thiem – 7/6(4) 2/6 6/3
  • Dan Evans x David Goffin – 6/4 6/4

Injuries

  • Juan Martin Del Potro – Knee pain, will probably miss Australian Open
  • Andy Murray – Pelvic injury, will miss Australian Open
  • Kei Nishikori – Right elbow, will miss Australian Open
  • Nick Kyrgios – Back injury, sat out in Australia vs Canada tie

Match of The Week

Alex De Minaur vs Alexander Zverev – 4/6 7/6(3) 6/2

Top Shots & Highlights

Stefanos Tsitsipas

Alex De Minaur & Alexander Zverev

Our Top Content Of The Week

What We’re Looking Forward To

We’re excited to see how the first-ever ATP Cup will end. Some of the Next Gen players seem to have put in the work during pre-season, and it will be interesting to see how these weeks before the Australian Open will go. Tuesday should be a great day for tennis, with matches that will most likely include Zverev vs Shapovalov, De Minaur vs Tsitsipas, Medvedev vs Ruud, and Goffin vs Dimitrov. 

After a tough first match, we will see if Novak Djokovic will be sharp enough to lead Serbia past Paire and Monfils’ France. It should be a decent test for him. Nadal, on the other hand, should not see any difficult matches until the Knockout stage. 

Group E should be interesting to watch as well, as Austria, Croatia, Poland, and Argentina all have a shot at coming out on top. While there are a lot of players playing well, I believe the only team that might take the title away from Nadal’s Spain is Russia – with Khachanov and Medvedev. 

On top of that, we’ll have the ATP 250 in Doha happening this week. With most of the main players currently competing in the ATP Cup, Doha ended up with Wawrinka, Rublev, Tsonga, and Raonic as the first 4 favorites. Rublev and Wawrinka should cruise through the semis, while Tsonga and Raonic might struggle. We’ll keep our eyes on Wawrinka as Rublev, as they are the best contenders to do some damage in the Australian Open. 

On the women’s side, we’ll have Shenzhen, Brisbane, and Auckland this week. We’re mostly looking forward to Brisbane, as 6 of the top 10 are in that draw. It should give us a good idea of who’s gonna have a shot at taking the Australian Open title home. 

What We’re Up To

This week, Karue is in Brisbane with Naomi Osaka’s team. He will be focused on helping her win the title and get ready for the Australian Open. Karue has been working on getting a lot of good content from the ATP Cup as well and uploading it to our Youtube and Instagram channels. 

Gui has been working consistently on getting some more tutorials on our website, especially some very thorough guides for beginners. 

Stay tuned for a lot of cool content coming out this week! 

Tennis Rules (The Extremely Easy Guide)


Tennis Rules – Everything You Need To Know

Tennis can be a quite complex sport when it comes to rules. For a beginner, these rules can be quite intimidating. Even if you have played the sport for several years, you might still come across a rule or two that you had no idea existed. And if you watch tennis on tv, you will see that even the top players in the world will have arguments with umpires about certain rules.

Tennis rules cover several different areas of the game, which include scoring, violations, court boundaries, time limits, and more. On top of that, different rules apply to singles and doubles matches. While the list of rules is quite extensive, it does not have to be complicated.

In this article, we will cover every tennis rule you need to know. Whether you are a beginner, intermediate or advanced tennis player, you should be able to enjoy the information below and, by the end of the post, feel like you have a great understanding of tennis rules.

Court Boundaries & Layout

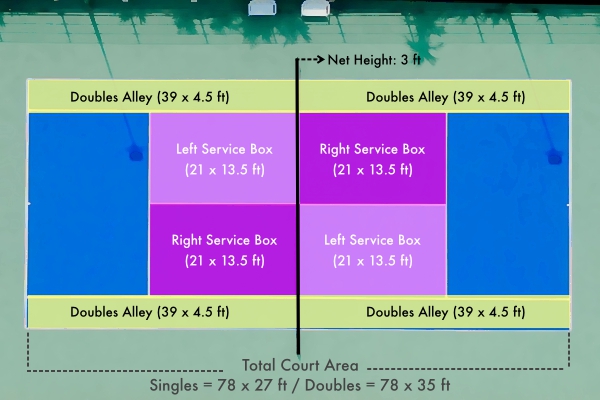
Before getting to the actual rules of tennis, it is important to understand the layout of a tennis court. By doing so, it will be easier to understand the scoring rules and the differences between singles and doubles. Below is a tennis court diagram with the basic specifications.

Court Lines

The picture above contains the name of every line on a tennis court. This is the purpose of each line:

  • Baseline: The baseline indicates the boundary of the court lengthwise. It serves two purposes: 1) When a player is serving, he or she must stand behind the baseline; and 2) If a player hits a shot that lands past the baseline, the shot is considered out and the player will lose the point. 
  • Doubles Line: As the name indicates, the doubles line is only relevant during doubles matches. During a doubles match, it indicates the boundary of the court widthwise. During singles matches, it is irrelevant. 
  • Singles Line: It is the equivalent of the doubles line, but for singles matches. Indicates the widthwise boundaries of the court in a one-vs-one match. Any shot that bounces outside these lines is considered out, which results in the player losing a point. 
  • Center Service Line: This line is aligned with the center mark, and it divides the court into a left and a right half. As with the center mark and the service line, it is only relevant during a player’s serve. Depending on the score, a player needs to serve either to the right or to the left of this line. If the player misses the target, the serve is considered a miss.
  • Service Line: When combined with the center service line, the service line forms the area known as the service box (see below). The service line indicates the lengthwise limit of the area where a player’s serve must land. If a serve lands beyond the service line, it is considered a miss. 
  • Center Mark: This line’s sole purpose is to indicate where the player who is serving must stand before the serve. A server will start serving a game serving on the right side of the center mark, and will alternate between left and right every point after. Baseline

Court Areas

When the lines indicated above are combined, they form the areas indicated below.

  • Left and Right Service Boxes: The most important area you should understand now. These are the areas where players need to hit their serves. For now, you just need to understand that a player will have to alternate each point, hitting the right service box in one point and the left one on the next. We’ll explain with more details below.
  • Doubles Alley: These areas are only relevant during doubles matches. Think of them as an “extension” to the singles court. Since there are 4 players in a doubles match instead of 2, the court becomes a little bigger. 
  • Total Court Area: As mentioned above, the doubles court area is bigger than the singles one. A total court area is where every player’s shot (except serves) must land on. 
  • Net Height: While the net height is not technically an area, it is worth mentioning. Each shot a player hits must clear the net. Otherwise, it is considered an error and results in a lost point.

Tennis Points – How Do They Work?

Now that you have a basic understanding of the layout of a tennis court, you are ready to learn about how the actual game works. The first part of the learning process is to understand what a tennis point is.

In essence, a tennis point is the most basic unit in the tennis scoring system. A tennis match is nothing more than several points played in a row. Every time you see players hitting shots, they are playing points. And after a player wins enough points, he or she wins the match. So how do you play a point?

When a tennis match starts, the players need to decide which one of the players will start the match serving. This is usually done by a coin toss, with the winner getting to choose who starts serving. The player who is serving is called the server, and the player not serving is called the receiver. After that step is done, players will start playing the first point. 

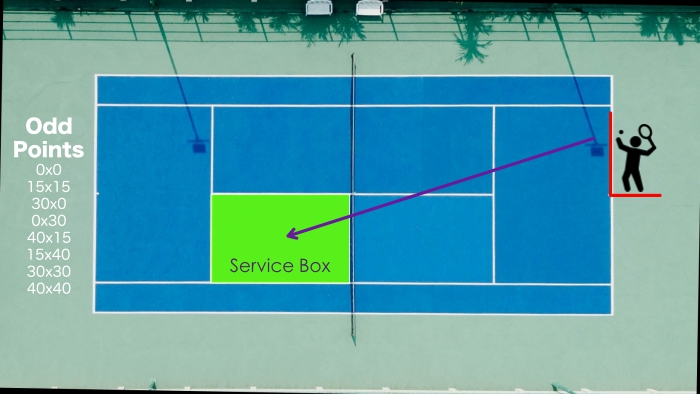
In order to do so, the player who starts serving must go to his side of the court and stand behind the baseline. On the first point, he will start on the right side of the center mark. On the second, he will start on the left side, and will alternate every point after. In order to successfully start a point, the player who is serving must hit his serve (see what a serve is here) on the service box located over the net and diagonally from him. So if a player is standing on the right side of the court, she needs to hit her serve on the right service box across the net, and vice versa. 

A player has the right to two serves on each point. If she misses her first serve, she has another attempt to hit the service box on her second serve. If the player misses both serves (either at the net or outside the service box), she has hit a double fault and consequently lost the point. 

If the player was able to hit the serve inside the service box, the point will have officially started. From then on, each player’s goal is to hit the ball over the net and inside the court area, until one of them wins the point. After the ball has bounced on the service box for the first time, players can either hit the ball directly in the air or let it bounce once on their court. There are 5 ways a player can win a point:

  1. If the opponent misses two serves in a row (double fault)
  2. If the opponent misses a shot at the net
  3. If the opponent hits a shot over the net, but outside the court area – either long or wide
  4. If the player hits a shot that goes past her opponent
  5. If the player hits a shot that bounces twice on the opponent’s court before the opponent can hit it

Tennis Let Rules

Another important tennis rule is regarding lets. In tennis, a let is short for let’s play again, and it can happen in two different ways. First, a let can happen if a player’s serve hits the net and subsequently bounces inside the correct service box. If that is the case, the player has a chance to retake that same serve. 

The second occurrence of a let will happen if any type of interference happens between a point. Whether the let is caused by a spectator yelling outside the court, by a second ball entering the court, or by a crazy fan streaking the court, it can be called out by either player or by the umpire. If this type of let happens, the point is replayed with the server getting back his two serves. 

Tennis Scoring Rules

After understanding how tennis points work, you are ready to move on to the most complex part of the tennis rules: the scoring system. We have written a complete guide on how the scoring system works (you can check it here), so we will keep it short and sweet in this article.  

The first part is to understand that tennis follows a pretty unique counting system. When a player wins points, his points will accumulate until he wins a game. Once the player wins enough games, he will win a set. When a player wins multiple sets, he will have finally won the match. So when reading the next few paragraphs, keep in mind that the scoring system follows this pattern:

Point→ Game → Set → Match

As we have mentioned above, players can win a point in 5 different ways. Once they win points, they get on the scoreboard. Instead of counting points like 1, 2, 3, 4, tennis points are counted as 0, 15, 30, and 40. So if the player who is serving wins the first point of the match, the score goes to 15 x 0. If he loses the first point, the score is 0 x 15 (you always count the score of the server first). 

Once a player has a point score of 40 and wins another point, he will have won a game. If both players are tied at 40 x 40 (also called deuce), the first player to obtain a margin of two points wins the game. So if the score is 40 x 40, the counting sequence is 40 → Ad → Game. If the score is Ad x 40 and the player with Ad loses the point, the score goes back to 40 x 40. 

After a player wins a game, the point score goes back to 0 x 0 and the server and receiver switch roles. Players keep accumulating games until one of them wins 6 games. Whenever a player wins 6 games, he will have won a set. If players are tied at 5 games to 5, the first one to win 7 wins the set. If the players tie again at 6 games to 6, they need to play a tiebreak

A tiebreak is a special type of game, designed to break a tie between two players (hence the name). The point scoring system ina tiebreak works differently than other games (0, 15, 30, 40), and you should count the points using the regular numerical system (0, 1, 2, 3, …). The first player to reach a total of 7 points wins the tiebreak, and consequently the set. If players are tied at 6 points to 6 in the tiebreak, the first player to obtain a 2-point margin wins the tiebreak.  

The serving turns also work differently during a tiebreak. The player who begins serving serves for one point, and then the players switch roles. From then on, each player will serve for two points until the tiebreak is over. The player who started the tiebreak as the receiver begins the new set as the server. 

In most tournaments, the first player to win 2 sets wins the match. During Grand Slam tournaments (Australian Open, Roland Garros, Wimbledon, and US Open), a player needs to win 3 sets in order to win a match. 

If you were able to understand the rules mentioned above, that means by now you understand about 85% of all tennis rules! From this point on, things should get a lot easier, and you will be done quickly. If for some reason you don’t get how the scoring system works yet, below you will see a video tutorial we made on how everything works.

https://youtu.be/MziMoHgh7mo?t=78

Changeover Rules

If you ever watch a tennis match, you should have noticed that – from time to time – players keep going from one side of the net to the other. This is not done at random, as the players have to follow the changeover rules

Players have to follow these rules in order to make the game fair. Sometimes one side of the court may have more wind or maybe be facing the sun, so players switch sides in order to make sure they have equal exposure to the conditions. 

Once a match starts, players will change sides after the first game is over. From then on, they will switch sides every time the sum of the game scores is odd (2×1, 3×0, 4×3, 6×5). With the exception of the first changeover of each set (1×0), players get to sit down on their chairs and take a timed break before switching sides. Players are not allowed to sit down during the first changeover of the set, but they might drink a sip of water or quickly grab something from their bag. 

Every time a set ends, players get to take a set break. They are allowed to sit down on their chairs and even go to the bathroom if they need to. However, they will only change sides if the final set ended with an odd sum of games (6×1, 6×3, 7×6). If the game sum was even, the players will go back to the same side after sitting down. 

Clock Rule

One of the most recently developed rules is the clock rule, which was designed as a way to make tennis matches faster. Some players used to take too long between points when they were serving, so the clock rule was able to end that. 

According to the clock rule, players have 25 seconds between the end of one point and the start of the next point. The first time a player goes over the 25 seconds, he or she receives a warning. After that, each time the player takes longer than 25 seconds to start a point he or she will lose a serve. The receiver must play according to the server’s pace. 

Tennis Violations

Another relevant set of rules is in regard to violations. The most important tennis institutions (Association of Tennis Professionals, International Tennis Federation, United States Tennis Association) have a similar code of conduct, and if a player acts in disagreement with such code of conduct, he is considered to have committed a violation. A violation can lead to fines, the loss of points, games, and matches, and even suspension from tournaments. 

The most frequent tennis violations are:

  • Ball Abuse: When a player aggressively and purposefully hits a ball outside of the point, whether the ball stays on the court or is hit outside the court
  • Racket or Equipment Abuse: When a player aggressively hits or throws his racket or other equipment
  • Physical Abuse: When a player physically abuses another player, an umpire, spectator, or staff member
  • Verbal Abuse: When a player verbally abuses another player, an umpire, spectator, or staff member
  • Audible Obscenity: If a player says any audible obscenity, regardless of the language, loud and clear enough so others can hear it
  • Visible Obscenity: If a player makes an obscene gesture that is seen by others
  • Best Efforts: When a player does not try her best, giving clear indications that she is not trying to win the match
  • Coaching: When a coach gives instruction to a player during a moment he is not allowed to do so (see this article for full details)
  • Timing Violation: If a player does not follow the rules regarding the rhythm of the match, whether he breaks the clock rule or takes too long to come back from the restroom

While the violations above are the most common, there are other rules in existence as well. Tennis is considered a very elegant sport, and players should behave accordingly. If a player commits the violations mentioned above, the punishments usually follow the pattern below:

  • 1st Violation = Warning
  • 2nd Violation = Point Penalty
  • 3rd Violation & Any Subsequent Ones = Game Penalty

Doubles Rules

Some of the rules for doubles work differently than singles. For one, as we mentioned earlier, the court is extended by the doubles alleys. Second, serving turns work differently in doubles. Each doubles pair will take turns serving and receiving, similarly to the way they would if it were a singles match. However, the same player from a doubles pair should not serve twice in a row. So if a doubles match was being played by player A and player B against player X and player Y, a sample serving rotation would look like A, X, B, Y, A, X, …). Once a set ends, the players may choose to switch serving turns, which means that a player from a doubles pair could be the last one to serve in a set and the first to serve in the next set. 

Another extra rule is that the doubles pair must decide, before the set starts, who is responsible for receiving serves on the left side and right side of the court. After the set starts, the players need to stick to those sides until the set is over. When a set ends, players must choose to switch sides. 

Finally, when a player is serving, his partner might stand anywhere on the court. While beginners usually tend to cover the other side of the court, professional tennis players might choose to stay on the same side as the server. 

Unusual Tennis Rules

Some of the rules mentioned below are not known by many people, but they do exist. By understanding them, you will be a step above every other tennis player. 

  • Can’t Touch The Ball – This rule is usually implied, but a player can only use his racket to hit the ball to the other side. If the ball makes contact with any body part or other materials, the player loses the point. 
  • Can’t Touch The Net – A player cannot touch while a point is in play. If the player makes contact with the net, whether intentionally or unintentionally, he will lose the point. 
  • The Racket Needs To Be In Contact With The Player’s Body – A player’s racket must be in contact with his body when hitting the shot. If the ball is out of reach and the player manages to throw his racket, hit the ball with it, and get the ball on the opponent’s court, he still loses the point because the racket was not touching his body. 
  • Players Can’t Make Any Noise – While tennis players are allowed to grunt, they cannot make noises that might distract their opponent. If an umpire finds that this rule has been broken, hyndrance will have occurred and the player who made the noise will lose the point. 
  • Can Hit The Ball Around The Net – A player can hit a shot around the net, as long as the shot lands on the opponent’s court. This shot is not only valid, but it is considered extremely skilled. A player cannot, however, hit a shot through the net (i.e. if there is a hole in the net and the ball goes through it).
  • No Ad Rule: Some matches may follow a “No-Ad” format, which means that when the point score in a game is 40 x 40, the player who wins the next point wins the game. This format is designed to make matches faster. In a doubles match, the receiving pair gets to choose which player will receive the serve. 

Final Thoughts

Even though that was a lot, you made it through the end. If you understand the rules mentioned above, you understand tennis better than the majority of the population. If you do have any further questions regarding tennis rules, let us know in the comment section below and we will get you an answer!

What Are Tennis Courts Made Of? (The 11 Surfaces)


The Different Types Of Tennis Court Surfaces (Explained)

As you learn more and more about tennis, you’ll begin to understand how the different court surfaces may impact a player’s game. If you know a little bit about tennis, you know that Rafael Nadal is the king of clay courts. You may also know that Roger Federer is probably the best grass-court player of all-time. But why is that? Why are two of the all-time greatest tennis legends capable of performing so differently on different surfaces?

Basically different types of tennis court surfaces are constructed in different ways and using different materials. Their different construction and composition affect several aspects of a tennis match, including the velocity of the shots, the ball bounce, and the players’ capacity of moving around. Some players, like Roger Federer, adapt better to courts with faster surfaces, while others like Rafael Nadal perform better on slower and bouncier courts. 

Most of us may have played on one or maybe two surfaces before, but what you may not know is that there are many more court surfaces out there, each one affecting the player’s game in a different way.

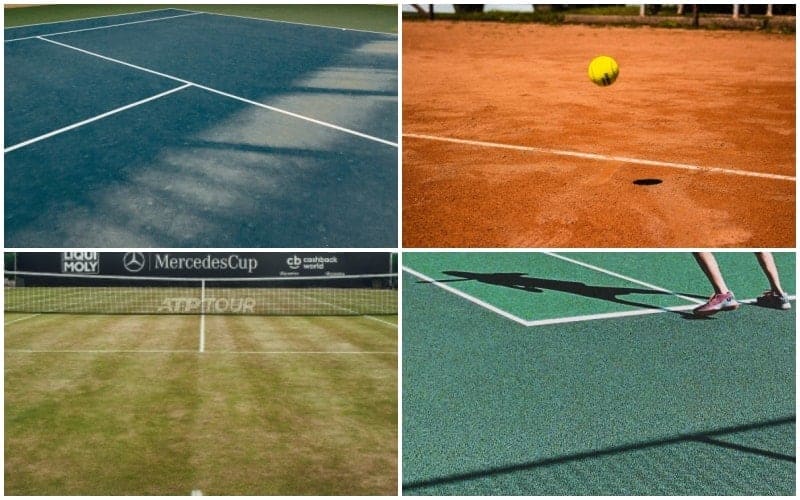
The 11 types of tennis court surfaces are acrylic, asphalt, concrete (called hard courts), artificial clay, clay, hybrid clay (clay courts), artificial grass, grass (grass courts), carpet, and others like wood and tile. Pro tournaments happen only on clay (slow), hard (medium), and grass (fast).

In addition to those, you may also find indoor courts with each one of the surfaces below, so we will also cover how indoor courts might impact your game. 

How Are Tennis Courts Made?

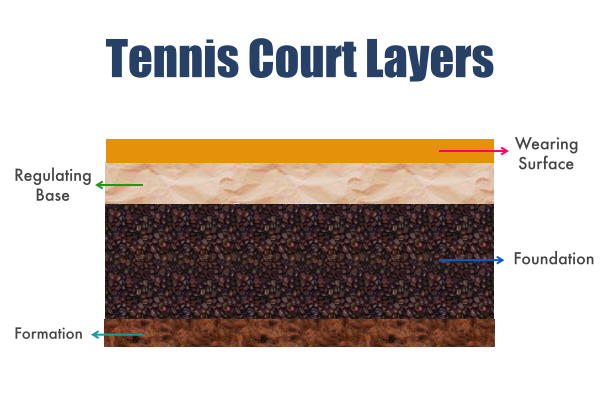
While the surface of tennis courts may be different, the construction process for all courts generally involves the same steps. Tennis courts are made of several layers, and the surface we can see (clay, hard, grass) is usually the smallest layer of all. Standard tennis courts are made of 4 different layers – formation, foundation, regulating base, and wearing surface. 

The first layer is usually the formation, and its goal is to serve as a barrier between the ground and the actual court. It is also known as the sub-grade, and it blocks roots and organic matter from damaging the court. The formation layer provides a flat soil for the court to be built on. 

The second layer is called the foundation, and its main purpose is to prevent the court from frosting. Therefore, this layer is added in order to allow the court to drain, preventing any possible frosting. The foundation (also known as sub-base) usually measures between 14 and 28 mm and should lay about 150 mm below the actual surface. The drainage feature of a court’s foundation will differ depending on the surface; since clay and grass courts require some moisture, the foundation should not drain 100%. 

The third layer is the regulating base, and its composition varies greatly depending on the surface. This layer serves to create a stable and flat surface where the actual surface will lay on. 

Finally, the fourth and final layer is called the wearing surface. This is the layer we actually see when we look at a tennis court. This layer can be made out of several smaller layers, depending on the surface.

In 2008, when Gustavo Kuerten played his last match ever at Roland Garros, he was honored with an award that represented a piece of the tournament’s central court.

The Different Types of Tennis Court Surfaces

The ITF (International Tennis Federation) currently classifies tennis court surfaces into the following categories:

Acrylic / Polyurethane (Hard) Courts

Usually classified as hard courts, acrylic or polyurethane court surfaces are by far the most popular courts in the United States.

Hard tennis courts are made of a regulating base made with concrete or asphalt and have a finishing wearing surface made of acrylic or polyurethane. These substances are used to paint the white lines and the courts in different colors. These courts may also have a cushioned layer under the acrylic layer, depending on the desired court speed. 

Courts with this surface are usually considered medium, medium-fast, or fast. The more sand added to the mixture used to paint the wearing surface, the slower the court becomes. The majority of the biggest professional tournaments are played on acrylic/polyurethane courts, including two Grand Slams (Australian Open and US Open), the ATP Finals, and 6 ATP 1000s (Indian Wells, Miami, Canadian Open, Cincinnati, Shanghai, and Paris). 

While they tend to be fast, these courts can also be bouncy – allowing for long rallies. Hard courts are great for big servers, as it can become quite easy to hit a lot of aces. Generally, these courts become faster when exposed to sun and heat. This means that a player may have a different experience playing on the same court but during two different times of the day. 

Clay

Clay courts are extremely popular in Europe and South America, and they are considered significantly slower than hard courts.

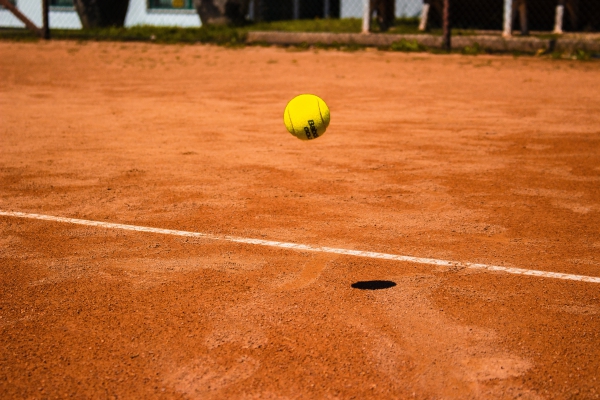
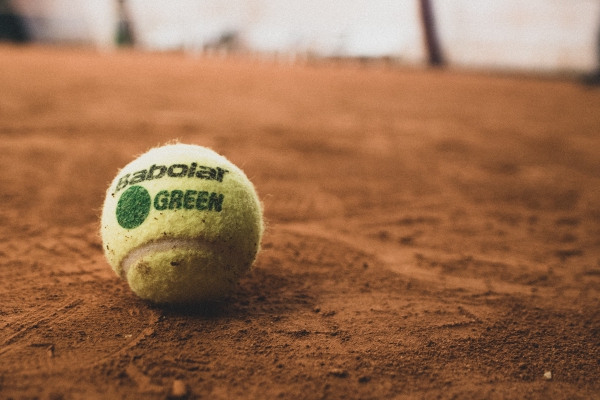
Clay tennis courts are made of a top layer of fine crushed aggregate – which can be stone, brick, shale, or other unbound material. Below this top layer, there is usually another thicker layer made out of the same material, but in a compacted form. 

The construction of clay courts makes them slow and bouncy, which makes it great for strong baseliners and players who use a lot of topspin in their shots. Clay courts also count with an interesting feature, as players are able to slide around the court. Clay courts also require more maintenance than hard courts since they require frequent maintenance routine that involves irrigation, rolling, and brushing. 

There are two main types of clay courts: red clay and green clay (also known as claytech or har-tru). Green clay courts are faster and more popular in the United States, while red clay courts are slower and more popular in South America and Europe. Red clay is the second most popular surface on the professional tour, as it is the surface of one Grand Slam (Roland Garros) and 3 ATP 1000s (Madrid, Monte Carlo, and Rome). 

Rafael Nadal is considered the greatest clay-court player of all time. He has won a total of 12 Roland Garros and 59 clay court titles, and an overall clay-court winning percentage of 91.8% (436 wins and 39 losses). 

Grass

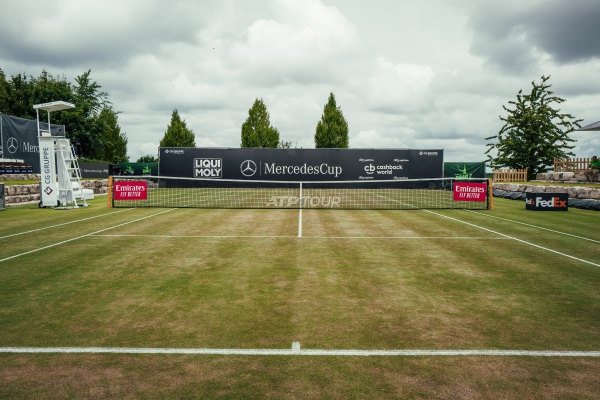
Considered the most elegant of all surfaces, grass courts are somewhat difficult to find nowadays. Grass courts used to be a lot more popular in the past, and during 1905 and 1974 3 Grand Slams were played on grass (Australian Open, Wimbledon, and US Open). With the decline in popularity of courts with this surface, only one Grand Slam is currently played on grass (Wimbledon). No ATP 1000s are played on grass. 

The reason behind the decline in popularity of grass courts is that they require a lot more maintenance and that they cannot be played on if there is even a little rain. For those reasons, clay courts and hard courts took over as the main tennis court surfaces. 

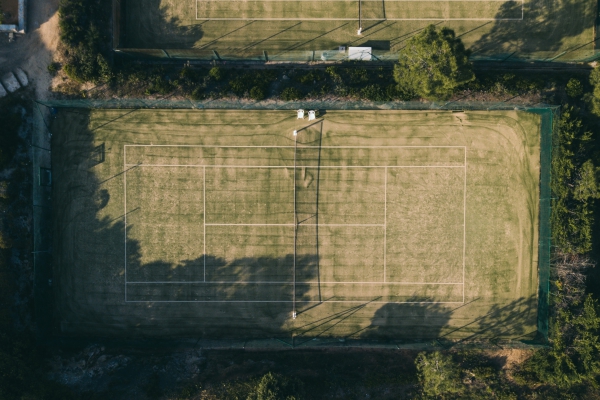
Natural grass tennis courts are made of a thick layer made out of clay, silt, and sand, and a wearing surface made out of natural grass. These courts also require a drainage pipe in the foundation layer, in order to avoid water accumulation. 

Grass courts tend to allow the ball to slide when it bounces, which makes the overall game a lot faster. In addition, the ball tends to stay low and close to the ground, which means that shots with slice are usually more effective than shots with topspin. Players who hit flat shots, big servers, and good volleyers are usually very successful on grass courts. It can be extremely difficult to break serves on grass courts, and as a result, some of the longest matches in tennis history were played on grass courts

Asphalt

Asphalt tennis courts are usually constructed the same way as acrylic courts. However, asphalt courts do not have the final layer of acrylic added to them – which makes them more susceptible to environmental damage. With time, exposure to direct sunlight and heat can cause asphalt courts to develop cracks that may need to be repaired. 

Usually, the initial costs to develop asphalt tennis courts are smaller than other types of surfaces. This is the reason why many public courts are constructed with an asphalt surface. However, with the costs to maintain and repair cracks, the overall long-term costs may end up being greater. 

There are no professional tournaments played on asphalt courts, as all of the hard court tournaments are played on courts that have a final layer of acrylic or polyurethane applied to them. 

Carpet

In the past, carpet courts used to be seen often on the professional tour. In fact, the ATP 1000 in Paris used to be played on carpet. However, in 2009 the ATP stopped having major tournaments on carpet courts, in a campaign to move towards hard courts. With the change, the number of surfaces chosen for major professional tournaments went from 4 to 3 (hard, clay, and grass). In 2019, the ATP Challenger tour still counted with 3 carpet tournaments (Kaohsiung in Taipei & Eckental and Ismaning in Germany).

Carpet courts are constructed by creating asphalt layers similarly to hard courts and then laying a special carpet or mat on top of it. This carpet is usually manufactured in rolls. Carpet courts are known to be extremely fast, which favored big serves and big hitters. These courts are good for serve and volleyers as well. 

Artificial Clay

Artificial clay courts have a similar feel to regular clay courts, but they are made quite differently.

Artificial clay courts are built by laying a special carpet as a base, instead of creating a layer of fine crushed aggregate. Once that step is done, a layer of sand or clay is added on top of it, which creates a similar feel to standard clay courts (slow shots and ability to slide). 

This surface was developed in order to reduce maintenance requirements, as there is no need to water the court or to roll it. Artificial clay courts are somewhat new, so they are not nearly as popular as the courts mentioned above. However, they have been seen more frequently and their number is expected to increase. Currently, there are no tournaments played on such a surface. 

Artificial clay courts may resemble clay courts, but the game feels different. While you have the ability to slide like on clay courts, the ball does not bounce as much on artificial clay. This makes the game faster than regular clay courts. 

Concrete

Tennis courts made out of concrete look and play very similarly to asphalt courts. The main difference is obviously the substance used during the construction. Concrete courts have been found to show fewer cracks than asphalt courts.

There are no professional tournaments played on concrete courts. 

Artificial Grass

Tennis courts made with artificial grass are built similarly to artificial clay or carpet courts. After building a regulating base layer, a special turf is placed on top of it. The top layer looks like a grass court, but it requires a lot less maintenance and is much easier on the body. 

This surface plays similarly to grass courts, as the ball ends up sliding and staying close to the ground. However, this surface is not as slippery as normal grass courts, which gives a lot more traction to players. They are a great alternative for tennis courts built in a private residence or a park. There are no professional tournaments played on artificial grass courts. 

Hybrid Clay

Hybrid Clay is a new trademarked technology developed recently in Europe, and it has already been recognized by the ITF as a new court surface. It gives the same feel as a regular clay court, but it requires a lot less maintenance. This surface is considered slow by the ITF. 

Currently, there are only a handful of Hybrid Clay courts in the world (all in Europe), and there are no tournaments played on them. This new surface can be built on top of any other existing surface, which is extremely interesting. While the construction process is kept private (since it is trademarked), some of the benefits proposed by the HybridClay brand include less maintenance costs, the fact that it is frostproof, and market-leading water drainage. 

Personally, I have not yet played on this surface but I have seen great reviews about them. The technology seems very promising and it looks like we could be seeing a lot more of these courts in the near future. 

Others

Some other court surfaces recognized by the ITF include tile, wood, and canvas. These courts are extremely rare and there are no tournaments played on them. They are usually much faster than other surfaces and can be quite difficult to play on. 

I’ve played on a tennis court with a wood surface once in my life, in a tournament in Italy. The tournament was originally supposed to be played on clay, but due to several rain delays, we were sent to the nearest indoor court – which had a wooden-ish surface. I remember it being almost impossible to return any serve, and the overall experience barely felt like actual tennis. 

Indoors

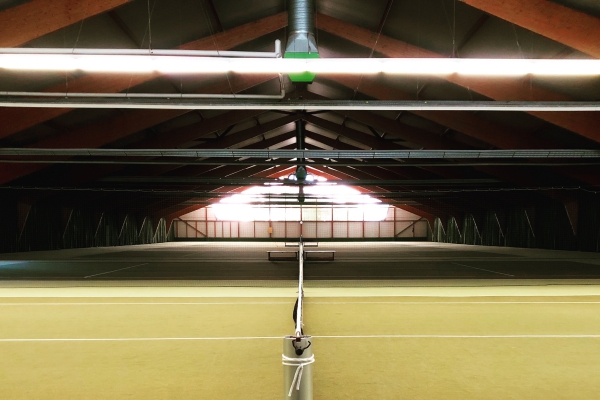
Finally, while indoor tennis courts are not necessarily a different surface, they are worth mentioning. An indoor tennis court may have any of the surfaces mentioned above, but the roof makes the overall feel a little different. 

For once, indoor tennis courts have no windows – which means that there is no wind coming in. Consequently, players have a more accurate idea of where their shots will land, which allows them to take more risks. 

Secondly, indoor tennis courts are not exposed to the sun and heat as much as their indoor counterparts. Due to that fact, they do not suffer as much damage and do not become faster. 

Finally, I find that indoor tennis courts seem to feel faster than outdoor tennis courts. I’ve heard that it happens because the air inside indoor courts is more compressed, giving the impression that the game is faster. I’m not sure if there’s any science behind these claims, so please don’t take them to heart. 

Currently, only one ATP 1000 is played exclusively indoors (Paris). Several other ATP 500 & 250, and Challengers are also played indoors. In addition, as of 2020, the main courts of all Grand Slams have a retractable roof, which means that players may end up playing indoors in case of bad weather. 

Tennis Court Surfaces Comparison

Court Surface TypeMade OfSpeedTournaments
Acrylic/PolyurethaneTextured, pigmented, resin-bound coatingMedium & Medium FastUS Open, Australian Open, Indian Wells, Miami, Canadian Open, Cincinnati, Shanghai, and Paris
ClaySand-dressed and/or rubber-dressed surface with the appearance of claySlowRoland Garros, Madrid, Monte Carlo, Rome
GrassSynthetic surface with the appearance of natural grassFastWimbledon
AsphaltBitumen-bound aggregateMedium & Medium FastNone
CarpetTextile or polymeric material supplied in rolls or sheets of finished productFastChallengers
Artificial ClayUnbound mineral aggregateSlow & Medium SlowNone
ConcreteCement-bound aggregateMedium & Medium FastNone
Artificial GrassNatural grass grown from seedFastNone
Hybrid ClayClay-dressed systems supported by a carpet matrixSlowNone
OtherE.g. modular systems (tiles), wood, canvasFastNone
IndoorsIndoor courts can have any of the surfaces mentioned aboveAll SpeedsParis, Grand Slams (main courts have retractable roofs)

Tennis Grips: The Ultimate Guide (with Photos)


Tennis Grips: The Ultimate Guide (with Photos)

When you’re working on your tennis game, improving some small details can have a big impact on your overall level. Whether you are an advanced player or a beginner, holding the racquet with the right grip is extremely important. 

During the 15 years I played tennis competitively, I went through a lot of struggles when it came to my grips. I’ve changed my grip unintentionally a few times because I was getting used to a different court surface; at other times, I changed it because I was trying to avoid touching a blister I had in one of my hands. Even worse, there were times I changed my grip just because my brain woke up that day and decided it wanted me to change my grip. Regardless of the reason, every time my grip changed, I had to go back a few steps and make the necessary corrections on my game. Those corrections sometimes take weeks – and trust me, the last thing you want is to have to fix a forehand or serve right before a competition. 

As you become older and more experienced, your grip starts changing less and less. Your muscle memory becomes stronger and accidental changes happen less frequently. However, we are all exposed to a few unfortunate and unintentional changes. And sometimes, you may try to change a grip because you think that it is going to improve your game. In any case, it is important that you are knowledgeable of the different kinds of grip and the best ones for your game. With a good foundation, you will be able to reach your peak a lot faster. 

In this article, we wanted to cover everything related to tennis racket grips. By the time you’re done reading, you should be ready to go back to the court and start practicing. 

How To Hold A Tennis Racket

When learning how to hold a tennis racket, it is important to first understand the grip of your racket. In short, grip might mean two things: 1) the part of your racket which you hold; and 2) the way or position in which you hold your racket. I’ll cover the 2nd definition later, so now let’s focus on the 1st.

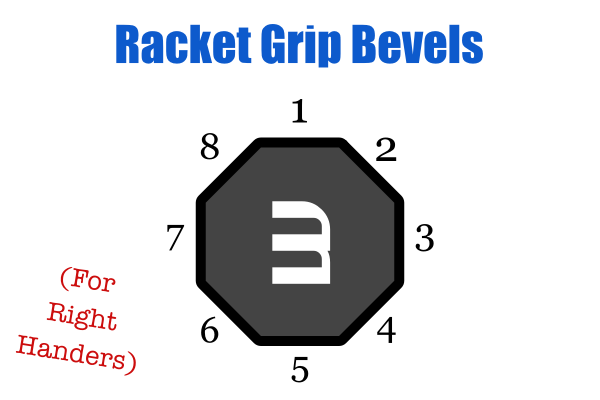
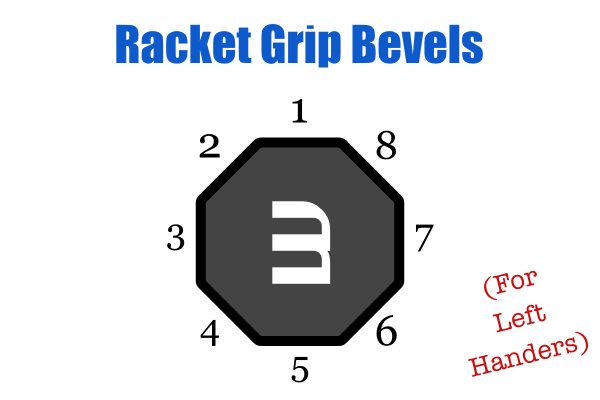
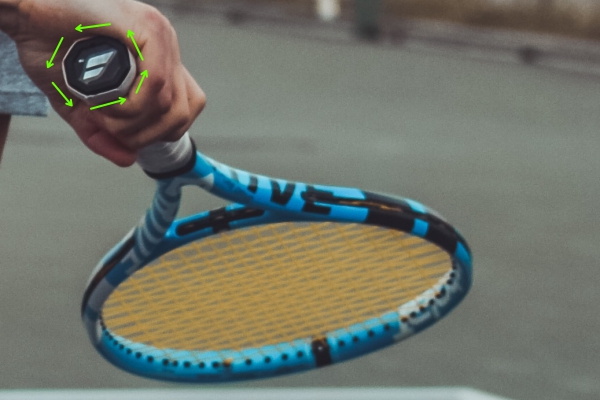
Every tennis racket has a grip (or handle) with 8 different sides. Each one of these sides is called a bevel, and they are numbered from 1 to 8 for easier identification. As you rotate your hand around those bevels, you will end up with your hands in a new position or grip.

This is the second definition of the word grip in tennis. Some grips are widely used by players, so they have their own name (Continental, Eastern, Western) – which I will explain later. 

As you can see in the images below, the bevels are numbered differently for right-handed players and left-handed ones. However, one numeration is just a “mirrored reflection” of the other. 

The important thing to know is that there is no universally perfect way to hold a tennis racket and that each grip will have its own benefits and drawbacks. We will cover them below.

Tennis Grip Styles

A particular grip style is determined by which bevel your index finger and heel pad lay on. Players normally adopt one grip style for each stroke (serve, backhand, forehand) and change the grip according to each shot they hit.

Throughout time, a few grips have emerged as the most prevalent grips adopted by players. Some of them are better suited for slower courts (since they generate more topspin) while others are better for fast courts. Below we will cover all the important grips and their pros and cons.

Continental Grip

The Continental grip is the foundation of every beginner tennis player’s game. Since this grip is ideal for shots like serves, slices, volleys, and overheads, beginners end up using this grip for every stroke so they don’t have to worry about changing grips. 

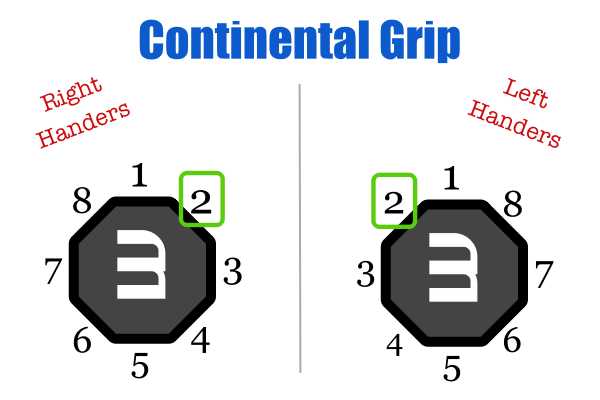
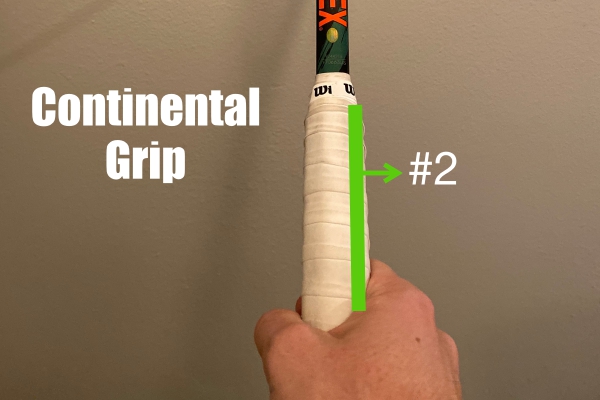
In order to use a Continental grip, you should hold your racket as if you were “giving it a handshake”. The bottom of your index finger should be right on bevel #2. The Continental grip is excellent for hitting shots that do not require much topspin, like serves, volleys, slices, and overheads. 

In the past, players used to serve and volley more often and therefore used Continental grips all around. However, modern tennis players need to hit heavier shots, which means they need more topspin. Since it can be very tricky to add topspin to groundstrokes when using a Continental grip, players usually tend to choose either Eastern or Western grips for shots like forehands and backhands. 

  • Shots: Serve, Slices, Volleys, Overheads
  • Ideal For: Shots that require quick reflexes and that don’t require much topspin
  • Drawback: Hard to generate topspin
  • Bevel: #2

Eastern Forehand Grip

The next grip on the scale is the Eastern Forehand grip. You just need to rotate the racket one bevel (counterclockwise for right-handers, clockwise for lefthanders), which means that the base of your index finger should lay on bevel #3. 

The Eastern Forehand group allows players to hit forehands with more topspin than Continental grips, yet less than Semi-Western ones. The Eastern forehand grip is great if you play mostly on fast surfaces, since it allows you to hit flat shots and to quickly switch grips between forehand and serves or slices. 

While this grip is more popular than the Continental grip, it is not used by many players. The reason behind it is that it can cause a lot of stress on your wrist. Juan Martin del Potro is the only player who hits forehands with a true Eastern grip, and he has had to have several wrist surgeries because of that. Roger Federer hits his forehands with a grip that resembles the Eastern grip, yet it is slightly modified. 

  • Shots: Forehand
  • Ideal For: Flat groundstrokes and fast courts. Quick changes from continental grip
  • Drawbacks: Might cause wrist injuries and doesn’t generate topspin easily
  • Bevel: #3

Semi Western Forehand Grip

The Semi Western Forehand grip is located one rotation after the Eastern grip, which means that the base of your index finger should be on bevel #4. This grip is probably the most popular forehand grip among professional players, as it is an all-surface grip.

When compared to the Eastern grip, the Semi-Western grip allows players to add much more topspin, while adding less stress to the player’s wrist. The drawback of using this grip is that it can be slightly challenging to hit shots close to the ground and to change your grip quickly. 

Players like Novak Djokovic, Andy Murray, and Stan Wawrinka all use either a Semi-Western grip or a slight variation of it.

  • Shots: Forehand
  • Ideal For: Heavy topspin shots. More topspin than Eastern but easier to hit low shots than Western.
  • Drawbacks: Slower changes from Continental and hard to hit shots close to the ground
  • Bevel: #4

Full Western Grip

The next and last forehand grip is the Western Grip. In order to hit it, your index finger should be laying on bevel #5. It is on the end of the forehand spectrum, and it may seem weird at first. 

The more you rotate the racket, the easier it is to add topspin to your forehand. As such, this grip is ideal for players who have a solid baseline game and play on slow courts that require a lot of topspin. However, it also becomes even more difficult to change grips and to hit shots close to the ground. 

This is also a fairly popular grip among tennis players. Rafael Nadal and Alexander Zverev are among the players who use the Western grip.

  • Shots: Forehand
  • Ideal For: Most topspin of all grips, good for slow and bouncy courts
  • Drawbacks: Quite challenging to hit low shots and change grip from continental
  • Bevel: #5

Eastern Backhand Grip

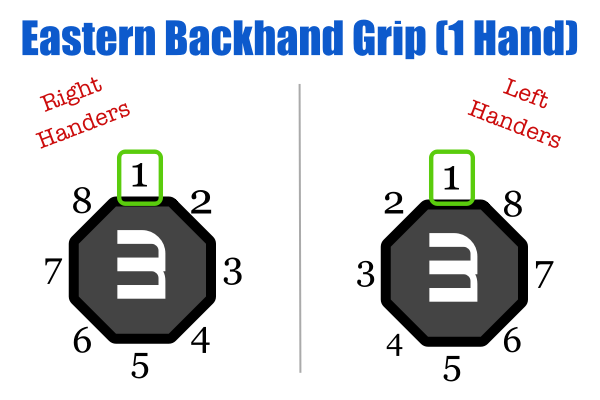
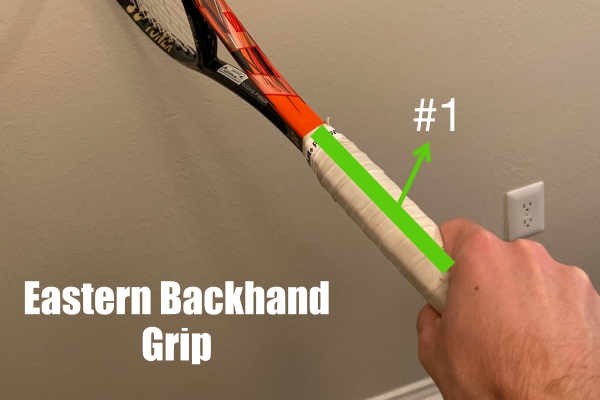
The Eastern Backhand grip is a popular choice among players who hit one-handed backhands. This grip is characterized by positioning the base of your index finger on bevel #1. Remember that, for a backhand, the back of your hand will be facing your opponent.

This grip allows for easy grip changes if the player uses the Western grip for his forehand. The only thing a player needs to do then is to switch the face of the racket, while still maintaining the same grip.

Roger Federer and Stefanos Tsitsipas both use the Eastern Backhand grip or a slight variation of it.

  • Shots: One-Handed Backhand
  • Ideal For: Flatter backhands and quick changes from Continental grip
  • Drawbacks: Not as much topspin as Semi-Western
  • Bevel: #1

Semi-Western Backhand Grip

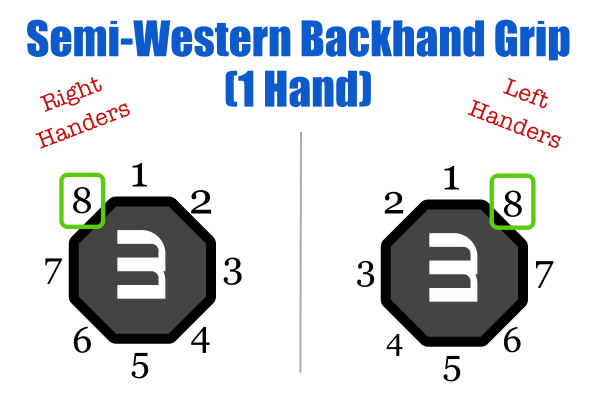
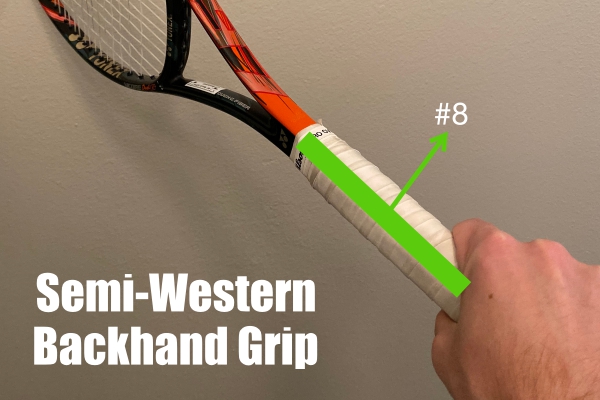
The next backhand grip on the scale is the Semi-Western backhand grip. It is also a grip for one-handed players, and it allows players to add more topspin to their backhand shots. However, this grip is located on bevel #8, which means that players need to execute a bigger change when going from a backhand slice to a backhand topspin.

If the player uses a Semi-Western grip for the forehand as well, he or she doesn’t need to change the grip between shots. All that she needs to do is to change the face of the racket.

While some current professional players use grips close to the Semi-Western one, no player uses a full Semi-Western grip.

  • Shots: One-Handed Backhand
  • Ideal For: Heavy topspin shots and players with Semi-Western forehand grips
  • Drawbacks: More difficult changes from Continental grip.
  • Bevel: #8

Double-Handed Backhand Grip

Finally, we arrive at the traditional Double-Handed Backhand grip. It has become the most popular grip on the professional tour, as more and more players develop two-handed backhands.

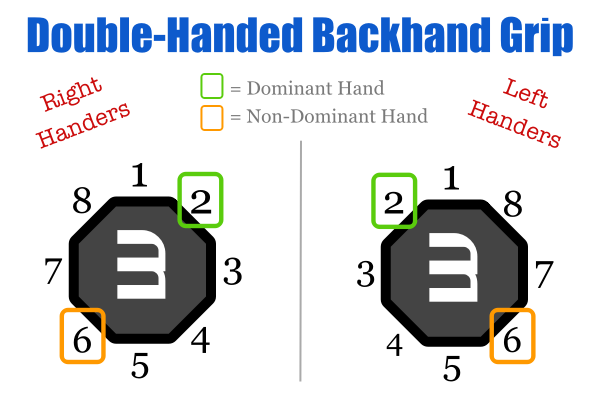
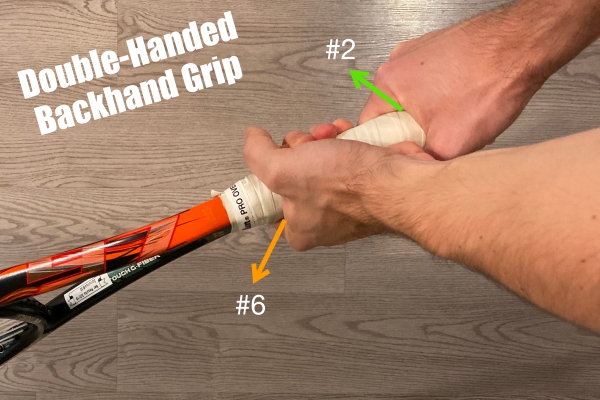
This grip is characterized by positioning the player’s dominant hand’s index finger on bevel #2 and the index finger of the non-dominant hand on bevel #6. Notice that, in order to switch to a continental grip, all the player needs to do is remove the non-dominant hand. 

While this is the standard grip for double-handed backhands, players use all sorts of variations that allow them to optimize their overall game.

  • Shots: Double-Handed Backhand
  • Ideal For: All-Around game
  • Drawbacks: Less topspin and less reach than one-handed
  • Bevel: 2 & 6

Tennis Grip Size

Now that we have covered the best ways to hold a tennis racket, we should cover another important aspect of your tennis grip: the grip size. Each racket can be purchased with different grip sizes, and it is important that you choose the right one. A grip that is too small will require extra strength in order to keep the racket from spinning in your hand. A grip that is too big will make it difficult to change grips and will make adding spin to your shots more difficult. In the long run, using a racket with the wrong grip size can cause injuries – including tennis elbow.

Grip Sizes Chart

When you’re looking for a racket, you will usually find options with the following grips sizes:

Grip Size – USA (in inches)Grip Size – EuropeanSize in Millimeters
0100 – 103 mm
4 1/81103 – 106 mm
4 1/42106 – 110 mm
4 3/83110 – 113 mm
4 1/24113 – 118 mm
4 5/85118 – 120 mm

How To Measure Your Tennis Grip Size

When searching for the right grip size for you, there are generally 3 different ways you can find it. The first one involves using tennis rackets, the second one involves using a ruler, and the third one requires a printer. We’ll cover each method below. 

  1. Index Finger Method: The first method to measure your tennis grip size requires a few tennis rackets with different grip sizes. You should align the palm of your hand with your racket’s strings. Then, slide down your hand to the grip, and hold it as if you were hitting a forehand. The bottom of your index finger should be laying on bevel #3. As you hold on to the racket, you should try to fit the index finger of your non-dominant hand into the space between your ring finger and the palm of your hand holding the racket. Your index finger should fit just right. If the space is too big, the grip is too big. If the space is too small, the grip is too small. 
  2. Ruler Method: The second method is easier and requires only your hand and a ruler. In order to determine the right grip size, you should open your hand while keeping your fingers together. You should then use the ruler to measure the distance between the top of your ring finger and the bottom lateral crease on your hand. This space will be generally between 4 and 4 ⅝ inches. You should then find the appropriate grip size based on the chart above. 
  3. Chart Method: The third and final method requires a printer and US Letter sized printing paper. Wilson has a useful chart which you can print here, and all you need to do is fit your hand in the chart. You will know the best grip size for you if you follow this method correctly. If you can, however, I recommend you follow one of the first two methods as this one is susceptible to image scaling errors. 

If you follow one of the methods mentioned above, you should be able to measure and identify the best tennis grip size for you. Notice that you can usually find a racket’s grip size either at the bottom cap of the grip or at the racket specs section printed below the racket’s head. 

If you find that your hand falls between two sizes mentioned below, you should choose the smaller of the two grips. The reason behind that is that you can always make a grip thicker by adding overgrips, while you cannot make a grip thinner. 

Tennis Overgrips

After learning about grip styles and grip sizes, the final thing you should pay attention to is the racket’s overgrip. When you buy a new tennis racket, it usually just comes with a black or white built-in grip. Players usually add overgrips on top of the grips, whether to improve sweat absorption or to increase thickness and/or comfort. 

While grips usually have a sticky side, overgrips only have a tiny sticky portion in one of its sides. You can find dozens of different overgrip options out there from all sorts of different brands, but essentially you can divide all of them into 3 different categories: dry, tacky, and all-around. Each one of them has different benefits, and you should choose the one that best fits your game. Below we will cover each one of the 3 categories. 

On a side note, you should usually stick to white or light blue overgrips. The majority of professional and advanced players choose these colors, and you can be seen as a beginner if you choose different colors. 

Tennis Dry Overgrips

These overgrips are excellent for players who tend to sweat a lot or who normally play in humid weather. They are generally thinner and absorb moisture extremely well, giving you great control of your racket – even if you are drenched in sweat.

Unfortunately, I’ve gone through the experience of cracking a few rackets after they slipped out of my hand after a serve. Trust me, it’s a horrible feeling and you don’t want to go through that mistake. These dry grips really help to avoid that, so if you tend to sweat when you’re playing you might want to try these. The best dry grips I would recommend are from Tourna Grip, and you can get them for some nice prices on Tennis Warehouse. 

The drawback of these grips is that, since they are thinner, they can get old fairly quickly and you might need to change them often. If that doesn’t sound good to you, you can try some Tacky or All-Around overgrips. 

Tennis Tacky Overgrips

Tacky overgrips are on the other end of the spectrum, and they usually have a very “sticky” feel. They will give you a good grip on your racket at all times, and they are usually nicely cushioned and last longer than dry grips. 

I’ve personally used tacky overgrips throughout most of my career, as I loved the feeling I got when using them. I’ve never struggled with sweat too much, so the tacky overgrips provided me with the perfect grip. The best brands I recommend for tacky overgrips are Tourna Grip and Wilson. I’ve used both in the past and they are equally good. I find the Tourna Grip one to be the tackiest of both, but the Wilson overgrips are slightly cheaper. They are both good and you can also get them cheap on Tennis Warehouse. 

Tennis All-Around Overgrips

Finally, you also have the option of choosing all-around overgrips. They are a mix between both Dry and Tacky overgrips, as they start off with a tacky feel and turning into a drier grip after a few uses. They are a good option if you’re not particularly passionate about any of the two overgrips mentioned above. 

The best option of all-around overgrips is Babolat’s Pro Tour, as they provide both the tacky feel and still are considered very absorbent. 

How To Regrip A Tennis Racquet

If you’re looking to make your overall grip a little thicker or if your old grip has gotten too dry, it may be time for you to replace or add an overgrip. It is very easy to do so and you can do it yourself by following the instructions on the short video below.

Tennis Serve: How To, Rules, Grip, & Tips (with Photos)


Tennis Serve: How To, Rules, Grip, & Tips

One of the most important shots in tennis, the serve is also one of the most complex ones. Professional players base their whole game around their serves, while beginners dread it every time they begin to serve. The complexity of the tennis shot makes it a very interesting shot to learn, but it can be quite difficult to do so. If you are just starting to learn tennis, you will find this article extremely useful. We have broken down all the rules and technique tips we believe will help you. 

If you have any further questions, let us know and we will answer them. Otherwise, enjoy your reading! This is what you will find on this page:

  • What Is A Serve In Tennis?
  • Serve Rules In Tennis
    • Who Starts Serving
    • Basic Rules
    • Where To Stand
  • How To Serve In Tennis
    • Step 1 – Feet Position
    • Step 2 – The Grip
    • Step 3 – Toss
    • Step 4 – Backswing
    • Step 5 – Jump
    • Step 6 – Shoulder Rotation
    • Step 7 – Wrist Snap
  • Different Types Of Serves
    • Kick
    • Flat
    • Slice
    • Wide
    • Body
    • T
    • Underhand
  • 7 Best Tips For A Better Tennis Serve

What Is A Serve In Tennis?

In tennis, a serve (also known as service) is defined as the shot players hit to start every point. At any point during a tennis match, only of the players is considered to be the server. The serve is usually a shot in which a player tosses the ball above his head, hitting it while still in the air.

However, a few players choose to use underarm serves (see more below) occasionally – which is also allowed. For the majority of professional tennis players, their serve is considered their main weapon. 

Serve Rules In Tennis

The serve is considered one of the most difficult shots for beginning tennis players. Besides the difficulty of the stroke itself, one of the most puzzling aspects of the serve is all the rules it is subject to. If you are a beginner, you might be concerned about just trying to hit the ball without hurting yourself, and following the proper rules might not even be on your mind. However, if you ever plan on playing a tennis tournament, you will need to know all the rules that apply to tennis serves. Below, we will try to cover all the rules you need to know in the simplest way possible, so after reading this your only concern will be how to improve your serve. 

Who Starts Serving

The first step before the match starts is to decide who serves first. This is usually done by either tossing a coin or by spinning a racquet. In professional matches, the standard is to use a coin. In club matches, players usually spin a racquet. The way that is done is player A covers the bottom of a racquet’s grip and begins spinning it. Player B chooses either “big line up” or “big line down” (if the racquet is a Babolat), or “M” or “W” (if the racquet is a Wilson). Player B then tells player A when to stop spinning, and the outcome of the spin will determine who wins it. 

The winner, then, can choose one out of 4 options:

  1. To begin the match serving;
  2. To begin the match receiving;
  3. Choose which side of the court he wants to start on;
  4. Defer the choice.

The loser of the spin gets to make the next choice. If player A chose to begin serving, for instance, player B gets to choose which side of the court he wants. If player A chose to defer the choice, player B gets to choose either the side of the court or to begin serving/receiving. Once these choices are made, the players are ready to start the match. 

Basic Rules

  1. Only one player will serve during a specific game (except tiebreaks)
  2. The player currently on serve has the right to two serves per point
  3. The server’s feet must stand behind the baseline (see below) before hitting the ball
  4. If the player’s feet touch the baseline, it is defined as a foot fault, and it is considered a missed serve
  5. If the player misses a serve at the net or outside the service box, it is also considered a missed serve
  6. If the player misses both serves for the same point, it is considered a double fault, which results in the loss of that point
  7. If the ball touches the net and subsequently falls inside the correct service box, it is considered a let, and the player can reattempt to hit that serve; if it falls anywhere else it is considered a missed serve
  8. During a tiebreak, one player will serve for the first point, and then each player will serve for two points
  9. If the player who is receiving the serve touches the “served” ball before it bounces, the player who is serving automatically wins the point
  10. If players have to play a tiebreak, the player who served during the first point of the tiebreak will NOT serve first in beginning of the following set

Where To Stand

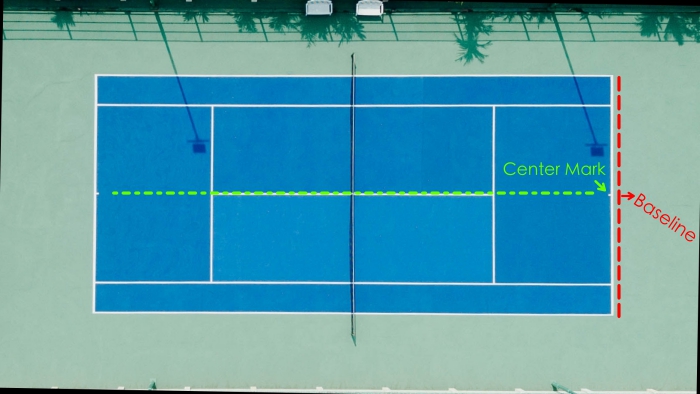
One of the most common questions related to serves is where to stand. The rules are actually quite simple. If you look at the picture below, you will see that there are 2 main lines on the court you should pay attention to. The first one is the baseline (in red), and you should make sure you are standing behind it every time you are about to serve. If any of your feet touch this line before you hit the ball during a serve, it will be considered a foot fault. If that happens, that serve will be counted as an error. You are, however, allowed to land inside the court after you hit your serve.

The second line you should pay attention to is the center mark. This line draws an imaginary line across the court, and its only use is during the serve. A player who is serving will always stand either to the right or the left of the center mark (depending on the point), and he will try to hit the serve inside the service box located diagonally to him. 

 Every time a new game begins, the player who is serving starts at the right side of the center mark. He will then try to hit the service box located to his left (highlighted in green below). The player who is receiving will attempt to hit the ball back over the net, and the point will be on. 

When the point is over, the player on serve will then stand to the left side of the center mark. He or she will then attempt to hit the service box to his right. Players will then alternate sides every point until the game is over. In order to make it simpler, a player will stand to the right of the center mark during odd points (1st, 3rd, 5th, etc) and to the left during even points (2nd, 4th, 6th, etc). 

How To Serve In Tennis

The tennis serve is one of the most difficult shots for beginners to learn. The reason behind it is that it requires the coordination of several different movements, all involving different parts of the body. A serve starts with the proper positioning of the player’s feet, combined with the right grip of the racquet. It is followed by an uniform toss of the ball with the left hand while the right hand lifts the racquet in a semi-circular movement. Once that movement is done, the player needs to bend his knees and jump, while rotating his shoulders and pronating his wrist.

If it is difficult to even describe the tennis serve as a whole, imagine actually executing it. Several beginner players try to just copy what they see on TV, and end up developing the wrong technique due do the complexity of the serve movement. And once you develop the wrong technique, it can be hard to change it due to muscle memory.

It is extremely important to develop a good serving technique as you begin playing tennis. If you feel like you currently don’t have a good technique, there’s no need to panic though. With some purposeful practicing, you can certainly develop a great serve. The best way to learn the correct serve technique is to break it down into smaller steps, which when combined form a progression. By doing so, both beginner and advanced players can understand their own serves better and focus on the parts they need to improve.

In order to learn how to serve in tennis, you will need to learn the following steps:

1)    The Feet Position

2)    The Grip

3)    The Toss

4)    The Backswing

5)    The Jump

6)    The Shoulder Rotation

7)    The Wrist Snap

Step 1 –  Feet Position

The way you position your feet before serving is absolutely vital for a good serve. Beginners usually have a tendency to point their feet to the other side of the court, but that is not the right way to position yourself. The proper stance when serving is to point your front foot to the net post, and keep your back foot parallel to the baseline. If you’re right-handed, you should point your front foot to the right net post, and if you’re left-handed, you’ll point your front foot to the left post. 

Step 2 – Grip

When you’re learning how to serve, one of the most confusing aspects of it is how to hold the racquet. The best serve grip is the continental grip, and it is by far the most used by players across all levels. 

When finding a continental grip, the first step is to hold the grip at the base of the racquet. You shouldn’t hold the racquet in the middle of the grip, as that will limit your motion significantly. Then, you should rotate the grip until the little “cushion” between your thumb and your index finger is aligned with the side of the racquet (just like the picture above). 

Step 3 – Toss

A good toss is key to a powerful serve. You might have an amazing technique, strong legs, and a fast arm, and yet if your toss is poor your serve won’t be effective.

When you’re training your toss, it’s important to focus on consistency. In order to do so, it’s very important to have the right technique. You start by holding the ball with your non-dominant hand, between your thumb and the other 3 or 4 fingers. The ball should be slightly separated from the palm of your hand (like the picture above). 

Your arm should be in line with your front leg. Notice that the toss and the backswing should happen at the same time, so it’s important to time everything properly. As you lift your arm holding the ball, you should release the ball by the time your arm reaches your eye-level. Continue lifting your arm until you reach the “trophy position.”

Step 4 – Backswing

The backswing portion of the serve is the step that varies the most between players. There are several ways the backswing can be executed, so you should aim for something that works for you. The general rule is that the simpler the better.

You will to a semi-circle movement with your arm holding the racquet, and stop once you reach the “trophy position”. The bottom of your racquet should be almost touching the back of your head. Finally, both arms should be aligned.

Step 5 – Jump

Your jump is actually one of the most important parts of your serve. Once you reach the “trophy position”, both of your knees should be slightly bent. Also, most of your weight should be on your front leg – which will propel you to jump forwards.

You should jump with both legs, towards a 45 degree direction (up AND forwards). You should land on your front leg, and that leg should land inside the court.

Step 6 – Shoulder Rotation

While you jump, the shoulder rotation step should happen as well. These steps should be synchronized, so you don’t waste any of the energy you have built throughout the movement. It is extremely important that you maintain your body relaxed throughout this step, otherwise you will not hit the serve as fast as you can. 

The rotation will come from your shoulder, core, and hips. Essentially what you’re trying to do is to bring your back hip and shoulder in line with your front hip and shoulder. By the time this step is done, your arm holding the racquet should be about to make contact with the ball.

Step 7 – Wrist Snap

Finally, it is time to hit the ball. Your wrist should be firm yet relaxed. This step is what will dictate whether you hit a kick, slice, or flat serve. You will “snap” your wrist as your racquet hits the ball and then follow through with your arm.

The Different Types Of Tennis Serves

A powerful and effective serve can be a very important aspect of your game, regardless of the level you are playing. It is the one shot in which you have total control of how you hit it, and – if executed correctly – can put your opponent in a lot of trouble. Once you learn the basic techniques mentioned above, you will be able to add different spins and directions to your serve, which means that your opponents will have a harder time returning those serves. Below we will cover the major different types of serves that you will eventually master.

Different Spins

Adding different spins to a serve will change the direction and height of the ball after it bounces. Players serve with different spins in order to make their opponents’ lives more difficult, since it makes it harder for them to identify where the serve is coming. There are 3 different spins used by players: kick, flat, and slice. 

Kick Serve

A Kick Serve happens when a player hits the ball with topspin, which normally causes the ball to bounce higher than it would otherwise. Kick serves are generally used in slower and bouncier court surfaces (clay, har-thru, or slow hard courts), as these courts maximize the effect of such serves, making them more difficult for returners. An effective kick serve will make the ball bounce higher than the returner’s shoulder line, making it difficult to attack the serve. Normally kick serves are used during the second serve, since the added spin reduces the overall speed of the serve.

So how do you hit a kick serve in tennis? In order to do so, your racquet needs to hit the ball on your non-dominant side (left side for right-handed, right side for left-handed) and then brush the ball from above. This movement will make the ball rotate forward, which will cause it to bounce higher.

While it can be counterintuitive at first, you should feel like you’re hitting the ball upwards. You will then use your wrist rotation in order to “cover” the ball, which will make the ball come down after it has cleared the net. The picture below shows where your contact point for a kick serve should be, and how the ball will rotate afterward. 

Flat Serve

As you can imagine, a flat serve means that it does not have any spin added to it. It is normally the first serve you will learn when being introduced to tennis, as it is the simplest of the 3 serve variations. The benefit of hitting a flat serve is that the ball will reach the maximum possible speed, decreasing the reaction time of the receiver. The fastest serves hit by professional players are usually flat serves, and can easily reach speeds of 130 mph. The drawback of the flat serve, on the other hand, is that the ball will not change direction after it bounces. If the returner can predict where you will hit a flat serve, it will be fairly easy to return it. Therefore, if you do not have a fast serve, a flat serve will be less effective than a kick or slice serve.

How can you hit a flat serve in tennis? Since you are not using any spin generated by your wrist, all you have to do is hit a normal serve. The contact point between the racquet and the ball will dictate where the ball will land. Generally, you should attempt to hit the ball somewhere close to the middle, as you can see in the picture below.

Slice Serve

A slice serve is known to be the opposite of a kick serve. Such spin makes the ball stay close to the ground and bounce leftwards for right-handed servers (and rightwards for left-handed ones). Slice serves are used on all surfaces, but are specially effective on courts that already tend to keep the ball low (like grass or indoor courts). Slice serves are also very effective for doubles matches, as they force the returner to hit the ball upwards, allowing the player at the net to hit an easier volley.

How can you hit slice serves in a tennis match? In order to be effective, your racquet should hit the ball on your dominant side (right for right-handed, left for left-handed), and then brush it horizontally. By doing so, the ball will move left after it bounces (move right for left-handers). The picture below shows the ideal contact point for a slice serve and the normal trajectory of the ball (for a right-handed serve). 

Different Directions

While the ball contact point will be different for right and left-handers, the different directions of the serves have nothing to do with a player’s dominant hand. A wide serve will be the same regardless of which one is your dominant hand or which spin you add to the ball. 

Players choose to change the direction of their serves because it might allow them to explore a strength in their own game or a weakness in their opponent’s game. If your opponent has a weak backhand, you can use your serve to take advantage of that. If you have a good forehand, you can use wide serves to open up the court and get shorter balls in your forehand. There are several different possibilities you can explore, and you can start the process by learning what each serve means.  

Wide Serve

Wide serves are aimed towards the outer extremes of the service box, as you can see in the picture above. If you are serving from the right side of the court (deuce side), a wide serve will hit the left side of the left service box. If you are serving from the left side (ad side), a wide serve will hit the right side of the right service box. Wide serves are great to open up the court since it will force your opponent to hit it outside of the singles court (X marks above). You will then have the whole court open to hit the second shot. 

The drawbacks of wide serves is that they give your opponent a great degree of angle. If she serve is not effective, your opponent will be able to hit an aggressive shot either crosscourt or down-the-line. 

Body Serve

Body serves are literally aimed at the receiver’s body. By hitting an effective body serve, you will remove all the angles from your opponent. A well-executed body serve will be aimed towards the receiver’s hip on his or her dominant side. By doing that, the player will have a hard time hitting either a forehand or a backhand. The drawback from body serves is that it can be very difficult to hit aces. 

T Serve

Finally, T serves are aimed towards the inner portion of the service box. T serves are an excellent choice as they remove angles from the receiver, yet they can easily result in aces. 

Underhand Serve

Underhand serves, while not frequently used, are a serve variation used by some players. When doing so, a player hits the ball as a forehand slice instead of hitting it above his head. The reason behind hitting an underhand serve is that it breaks the rhythm of the match, as the receiver is not expecting such a shot. Since the receiver is expecting a fast serve and thus waiting far behind the baseline, a short underhand serve might result in a double bounce. 

Underhand serves are seen by many as unethical, or as “cheap shots”. However, they have been used more frequently by players like Nick Kyrgios. 

7 Best Tips For A Better Tennis Serve

  1. Choose the right racquet: some racquets will give you more control, while others will give you more power. If you naturally have good serve control or power, you might want to choose a racquet that will complement your natural skills. 
  2. Stay relaxed: as you try to hit a faster serve, you begin to tense up your whole body. However, if you watch the pros playing, you will see that they are relaxed when they serve. It’s all about acceleration, not strength. 
  3. Strong legs = more power: While it looks like a powerful serve depends on strong arms, the power actually derives from the legs. Having strong legs will allow you to jump better, so don’t forget leg day at the gym.
  4. Hit the ball at the peak: An important step in order to improve your serve is to hit the ball at its highest point. That will optimize your effort and increase velocity with the same amount of effort. 
  5. A well-placed serve might be better than a fast one: This is extremely important. A well-placed serve with good topspin or slice can be much more effective than a flat serve in the middle. Roger Federer is not the fastest server out there, but he has an unbelievable winning percentage on his serve games. This is because he can place his serves very well, and combine them with effective second shots. 
  6. Explore the opponent’s weakness: Regardless of how good your serve is, if you have a good strategy, you can win a lot of points because of your serve. You usually want to aim most of your serves at your opponent’s weakest shot. 
  7. Percentage is key: Having a first-serve percentage above 65% is extremely important for your overall game. If you are missing too many serves, you might be trying to hit them too hard. Making sure you’re making first serves keeps your opponent in a defensive position.