If you are just starting to work on your tennis game, hitting some shots will seem incredibly complex while hitting others will seem to come naturally. Most beginners find that the forehand is a shot that actually feels very natural and intuitive, and you may be able to hit successful forehands even if it is your first time ever playing tennis.
If you are a more advanced player, chances are that your forehand is your favorite shot and that you may even consider it your “weapon”. My game was always built around my forehand, as it was the shot I felt the most comfortable and the one I was able to win the most points with. And yet, because I didn’t have a flawless technique, I went through periods of inconsistency and low confidence in my forehand.
A tennis player’s forehand has the potential to be a game-changing shot. The physics of the forehand allows for both more spin and more power than other baseline shots, so players should take advantage of it. However, in order to do so, you need to have the right forehand technique and to practice it countlessly.
In this article, we will cover everything you will need to know in order to have a great forehand. If you are a beginner, you will understand what exactly is a forehand and how to hit one step-by-step. If you are a more advanced player, you will also find tips that might give you that extra forehand power and speed you have been looking for.
Since this is a pretty thorough article, feel free to skip to the parts that are more relevant for you. The information you will find below is structured in the following way:
- What Is A Forehand In Tennis?
- How To Hit A Tennis Forehand
- Step #1 – Tennis Forehand Grip
- Eastern Forehand Grip
- Semi-Western Forehand Grip
- Western Forehand Grip
- Step #2 – Tennis Forehand Stances
- Open Stance
- Semi-Open Stance
- Closed Stance
- Step #3 – Tennis Forehand Swing
- Step #4 – Forehand Topspin
- Step #5 – Forehand Follow-Through
- Step #1 – Tennis Forehand Grip
- Best Tennis Forehand Tips
What Is A Forehand In Tennis?
For the vast majority of tennis player, their forehand is their best shot. A player hits a forehand when he allows the ball to bounce once on his court before hitting it, and hits it on his dominant side. With very few exceptions, players hit forehands using only one arm. In some rare cases, a player will have both a double-handed forehand and a double-handed backhand.
Tennis forehands are called forehands because normally, the front (fore) of your dominant hand (the one holding the racquet) will be facing your opponent when your racquet makes contact with the ball.

Generally, when people refer to forehands, they mean a forehand with topspin – which means that the player hits the ball on the top, causing it to spin forwards. Technically, a forehand can be hit with slice, but people mostly refer to those shots as slices (brushing the ball from under, which causes a type of backspin). For right-handed players, a forehand is executed on the right side. For left-handed players, it is executed on the left side.
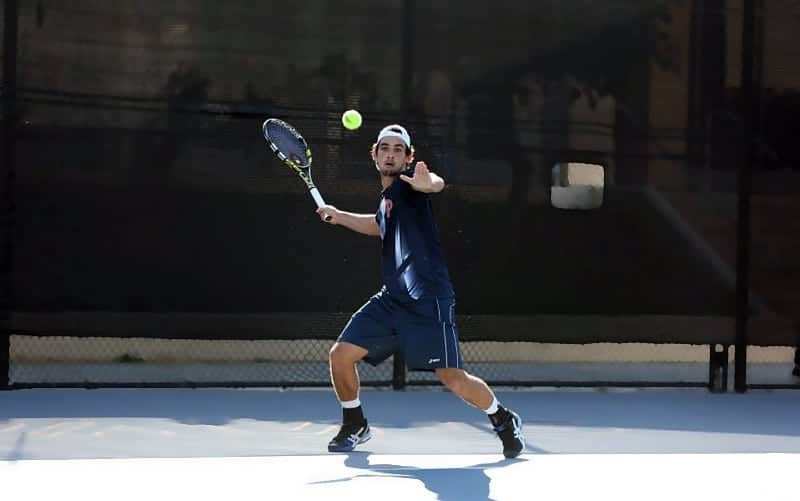
Below is a short video of what a simple forehand looks like.
How To Hit A Tennis Forehand
While the forehand shot seems very intuitive, it is very important that you begin practicing it correctly as soon as possible. If you start hitting forehands with the wrong technique, your brain develops muscle memory with the wrong form and it will be more difficult to change it in the future.
In order to learn how to hit forehand easily, you should break down the shot into small steps, which include the grip, the stance, the swing, the topspin, and the follow-through. If executed correctly, you should end up with a forehand that is smooth, effortless, and powerful.
We have broken down the steps below.
Step #1 – Tennis Forehand Grip
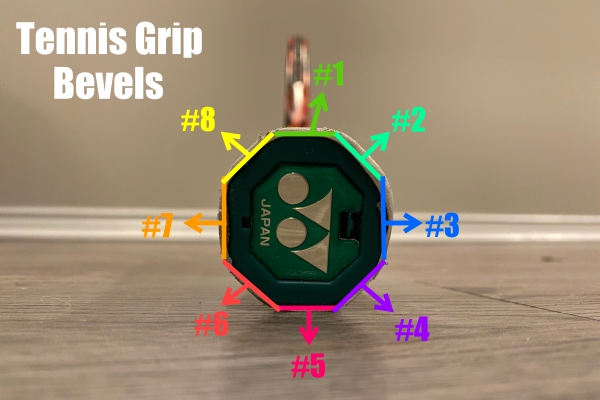
If you are just becoming familiar with tennis terms, a grip is defined as the way you hold the racquet while hitting a tennis shot. A tennis racquet handle has an octagonal shape, and each side (also called bevel) is numbered from 1 to 8. Usually, a specific grip is characterized by which bevel the base of your index finger lays on. Some grips will give you more power while others will give you more spin, so you can choose the one that better fits your game. There are currently 3 main forehand grips: Eastern, Semi-Western, and Western.
Eastern Forehand Grip
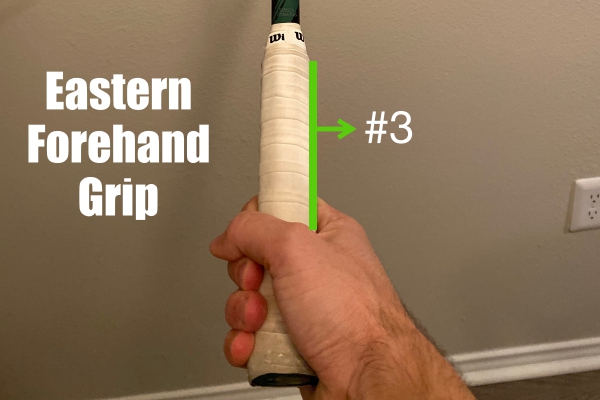
The Eastern grip is identified when the base of the player’s index finger lays on bevel #3. In order to find this grip, you can hold your racket perpendicular to the floor and then hold it like you were giving it a handshake. Then, all you need to do is rotate your hand one bevel to the right if you’re right-handed or one to the left if you’re left-handed. If you do this right, you should end up with the base of your index finger on bevel #3.

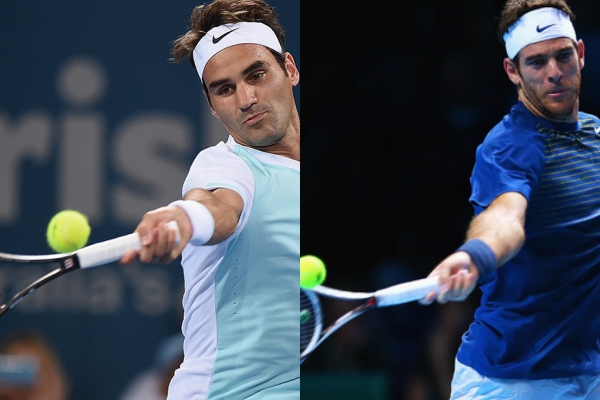
The Eastern forehand grip is great if you play mostly on fast surfaces, since it allows you to hit flat shots and to quickly switch grips between forehand and serves or slices. This grip is not frequently used by professional players, though. The reason behind it is that it can cause a lot of stress on your wrist. Juan Martin del Potro is the only player who hits forehands with a true Eastern grip, and he has had to have several wrist surgeries because of that. Roger Federer hits his forehands with a grip that resembles the Eastern grip, yet it is slightly modified.
Below is a close-up picture of what a forehand Eastern Grip should look like.
Semi-Western Forehand Grip
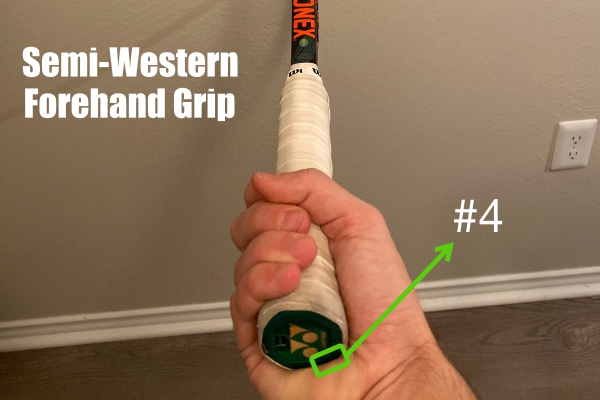
The Semi Western Forehand grip is located one rotation after the Eastern grip, which means that the base of your index finger should be on bevel #4. This grip is probably the most popular forehand grip among professional players, as it is an all-surface grip. In order to hold it correctly, you should hold the racket perpendicular to the floor with your non-dominant hand, grip it with your dominant hand as if giving it a handshake, and rotate your hand 2 bevels (to the right if right-handed, to the left if left-handed).
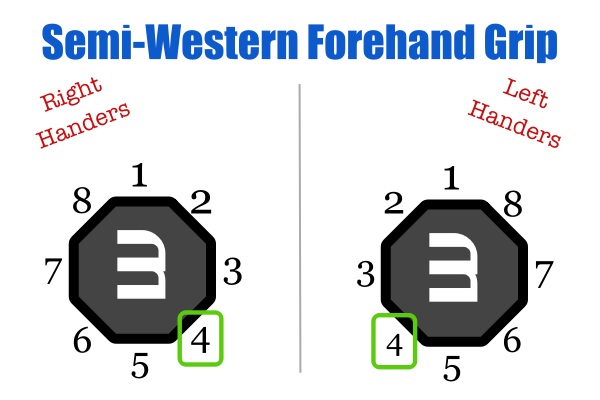
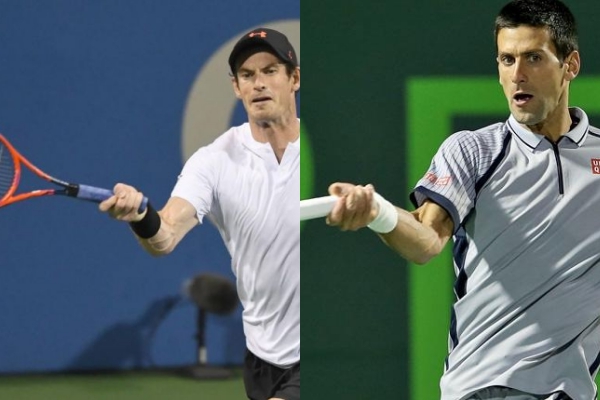
When compared to the Eastern grip, the Semi-Western grip allows players to add much more topspin, while adding less stress to the player’s wrist. The drawback of using this grip is that it can be slightly challenging to hit shots close to the ground and to change your grip quickly. Players like Novak Djokovic, Andy Murray, and Stan Wawrinka all use either a Semi-Western grip or a slight variation of it.
A Semi-Western grip should look like the photo below.
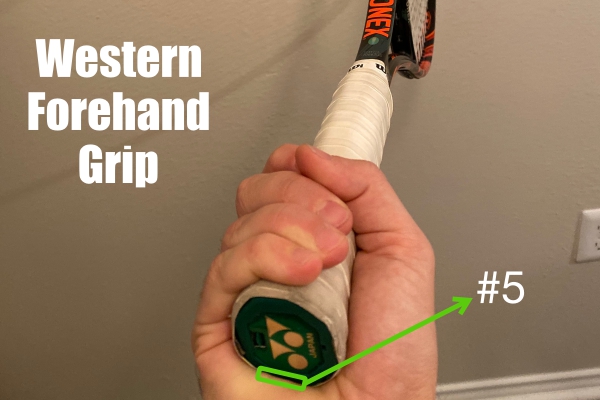
Western Forehand Grip

The next and last forehand grip is the Western Grip. In order to hit it, your index finger should be laying on bevel #5. It is on the end of the forehand spectrum, and it may seem weird at first. In order to hold it correctly, you should hold the racket perpendicular to the floor with your non-dominant hand, grip it with your dominant hand as if giving it a handshake, and rotate your hand 3 bevels (to the right if right-handed, to the left if left-handed). When you do that, the base of your index finger should lay on bevel #5.

The more you rotate the racket, the easier it is to add topspin to your forehand. As such, this grip is ideal for players who have a solid baseline game and play on slow courts that require a lot of topspin. However, it also becomes even more difficult to change grips and to hit shots close to the ground. This is also a fairly popular grip among tennis players. Rafael Nadal and Alexander Zverev are among the players who use the Western grip.
The picture below shows a standard Western forehand grip.
Step #2 – Tennis Forehand Stances
Once you have your grip sorted out, it is time to move on to another extremely important step – the way you position your legs when hitting a forehand. These positions are also called stances, and there are 3 main ones: Open Stance, Semi-Open Stance, and Neutral Stance. Differently from a forehand grip (where you should stick to just one), you will be using all 3 forehand stances during a tennis match. We will cover each one below and show you when to use each.
Forehand Open Stance
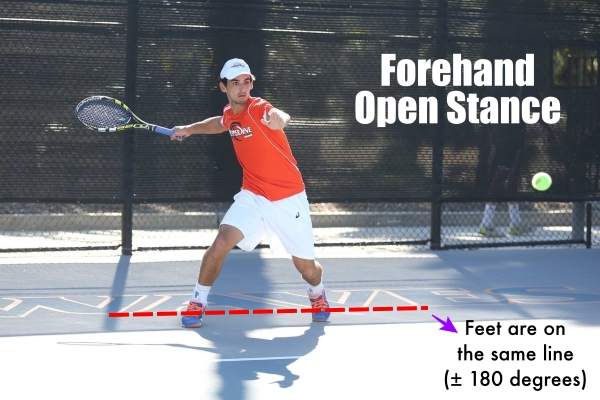
The open stance forehand is the most commonly used stance for defensive shots. The preparation for the open stance is significantly faster than the other two stances, which makes it ideal to return fast shots. In addition to that, this stance allows for a much faster recovery, as all the player needs to do is cross the outside foot in front of the inside foot and head back to the middle.
As you can see in the picture above, the forehand open stance is executed when both feet are horizontally aligned. If you draw an imaginary circle around your hips, your feet would be positioned at a 180-degree angle. You should notice that most of the player’s weight is on the outside foot (right foot for right-handers, left for left-handers). Your knees should be bent according to the ball, as lower balls will require a greater bend. Once your feet are properly aligned, all you need to do is rotate your hips and shoulders about 90 degrees and swing through the ball. Make sure you keep your non-dominant hand pointing at the ball until the last second so you do not end up rotating your torso too early.
Technically, the open stance does not require the player to swing the outside leg through. However, you may choose to cross the outside leg over the inside one in order to recover faster.
Forehand Semi-Open Stance
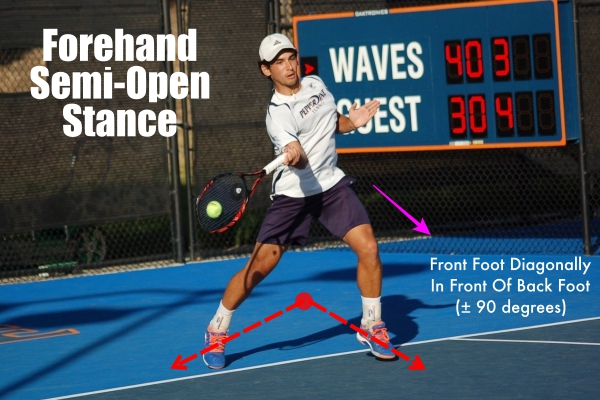
The forehand semi-open stance is similar to the open stance, but it is considered slightly more aggressive. This position is great as it is fairly quick to set up but allows the player to transition from a defensive position to an aggressive one.
This is the best stance for all surfaces, as it’s very dynamic. When preparing for the semi-open stance, your front foot should be positioned diagonally to your back foot. If you draw an imaginary circle around your hips, your back foot would be on the “3 o’clock” position, and your front foot would be on the “12 o’clock” one (forming a 90-degree angle).
Your bodyweight should be between both feet, transitioning from back to front as you hit the shot. This way you will be able to use your body weight for the forehand, which will translate into a more powerful and aggressive shot.
Forehand Neutral Stance
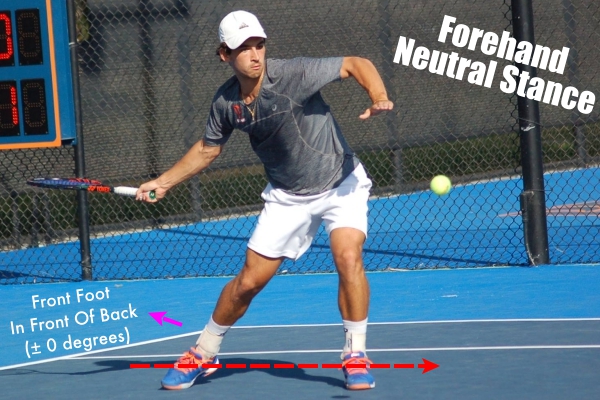
The forehand neutral stance is probably the most aggressive of all stances. In this stance, your front foot is positioned directly in front of your back foot, forming an angle close to 0 degrees.
As you can see in the picture above, most of the bodyweight in this stance is centered on the front leg, which allows the player to generate a lot of power. The neutral stance is used mostly for short balls. Since you end up moving forward after the shot, this stance is used when the player wants to get to the net faster.
Since this stance requires the player to put one leg in front of the other, it can be somewhat slow to set up. For this reason, it is not considered a great defensive stance.
Step #3 – Tennis Forehand Swing
The forehand swing may seem a little complicated at first, as you need to coordinate a lot of things at the same time. However, it is actually not that complicated. Once you break it down into smaller steps, it becomes simple and every step should flow smoothly. We have broken down these steps for you below:
- Rotate Torso: Once you have your feet properly positioned, you should start rotating your torso. You should do so while keeping your non-dominant hand on the racket, so you rotate both arms together.
- Separate Hands: When your non-dominant shoulder (left for right-handers, right for left-handers) is facing the ball, you should begin separating your hands. The hand with the racket moves back and away from the ball, while the other hand starts pointing to the ball.
- Half-Circle Loop: Your dominant arm should make a half-circle loop, first raising your hand and then letting it come down towards the ball. You should raise your hand somewhere between your ribs and your face (the higher the ball, the higher the hand).
- Rotate Torso #2: You should keep the non-dominant hand pointing to the ball as long as possible. When your arms are wide open (one facing the ball, the other away from it), you should start swinging the racket towards the ball. Remember to rotate your whole torso, not just the arm.
- Hit The Ball, Swing Leg Through: The contact with the ball should happen in front of your body. Once that happens, your back leg should begin moving forward. That will allow you to gather some momentum, putting more weight into the shot.
- Follow-Through: Ideally, your swing will end with your left hand catching the racket around your left shoulder.
- Back Leg Steps Through: Finally, your back leg will land either in line with your front leg or ahead of it. The swing will be officially done then.
The video below will show you how the steps mentioned above come through in a proper forehand swing.
Step #4 – Tennis Forehand Topspin
A forehand is usually executed with topspin. A shot with topspin will bounce pretty high after it lands on the opponent’s court and tends to push the opponent back. These shots are used to keep an opponent in a defensive position. Some of the grips we mentioned above will naturally add more topspin to the forehand (like Western and Semi-Western), while the Eastern grip will usually result in flatter shots. Shots with a lot of topspin are ideal for slow and bouncy surfaces, like clay or some slow hard courts.
In order to hit a shot with topspin, you should brush over the ball, basically starting in the middle and moving forwards. This will cause the ball to rotate forward.
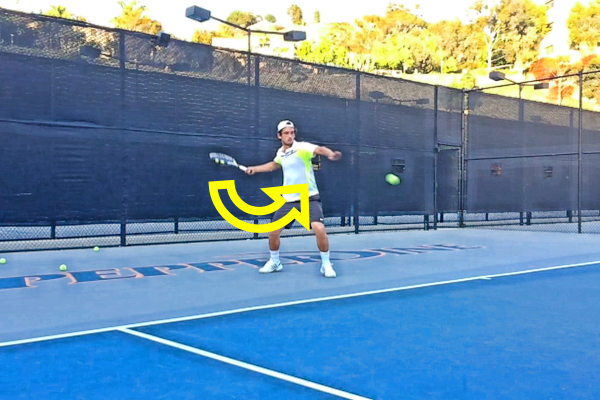
Step #5 – Tennis Forehand Follow-Through
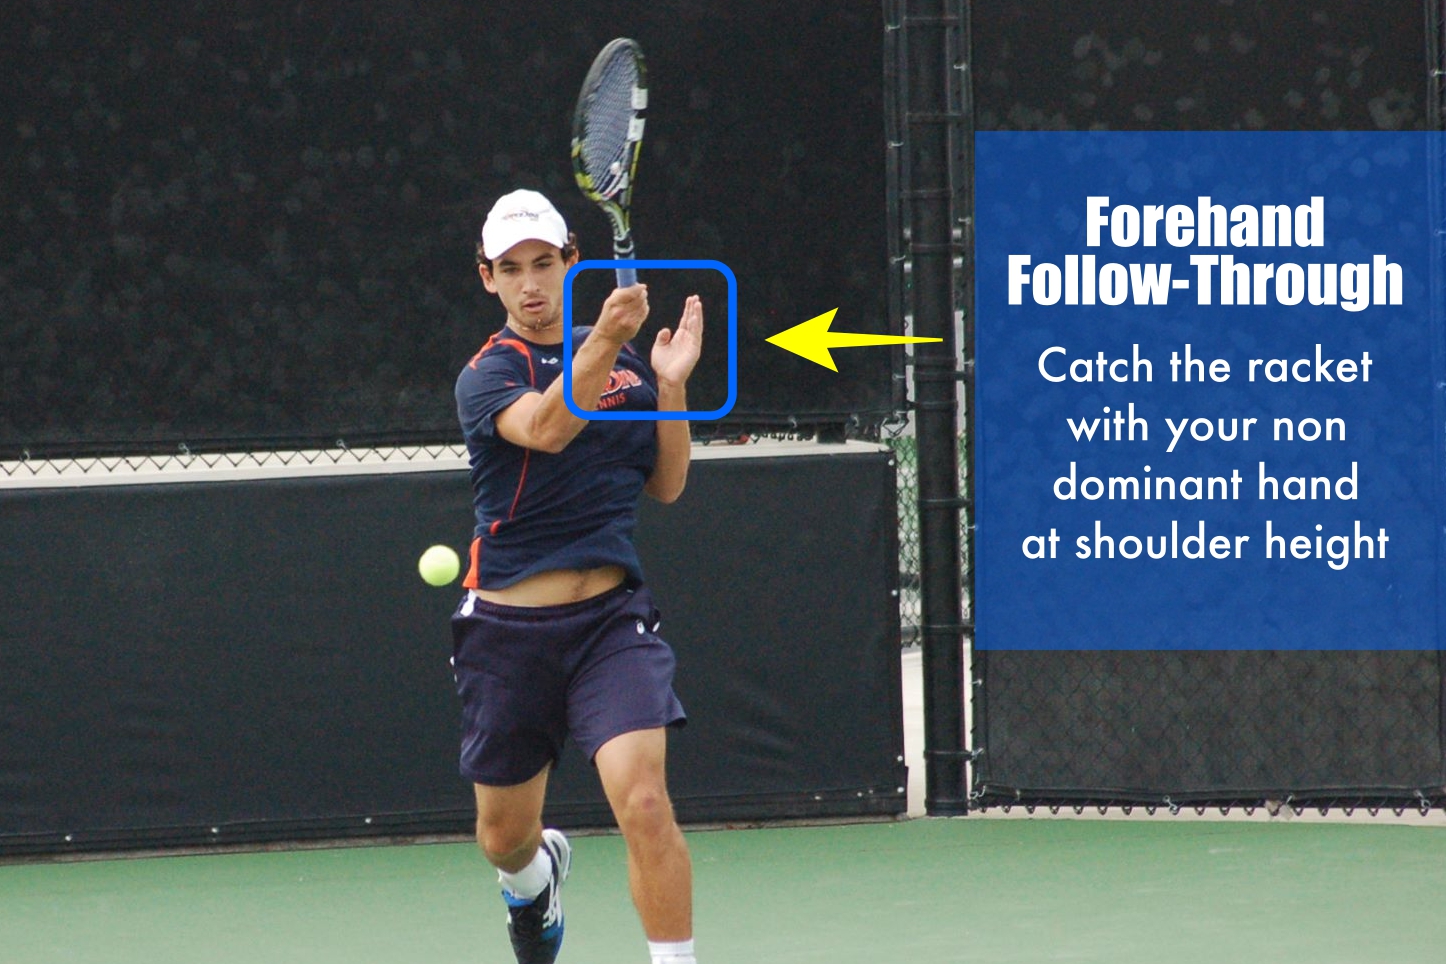
While you naturally end up focusing more on your swing before you make contact with the ball, you should pay as much attention to what you do after you hit it. A proper follow-through will make sure that your technique remains correct, that you are hitting the ball in the right spot, and that you minimize the risk of injuries.
A good forehand follow-through will have your non-dominant hand catching the racket at about the same height at your left shoulder. In order to make it easier to understand, one of my old coaches used to tell beginners that, at the end of each forehand, you should try to “kiss the biceps” of your dominant arm. By doing so, you will finish the stroke at the perfect height.
Recently, it has become increasingly common to finish a forehand behind the player’s head. However, this is not considered the best technique and should be reserved for advanced players.
One of the main mistakes for beginners is to hit the “windshield wiper” forehand. When trying to maximize topspin on the forehand, a player will end up finishing the shot around hip height. This incorrect technique will not only decrease overall power but can also cause injuries.
Best Tennis Forehand Tips
These are some of the best tips in order to hit an awesome forehand:
- It’s All About The Legs: While it may look like most of your forehand power will come from a fast swing, the actual power will come from your legs. Work out those legs and make sure you’re using them well on your forehands.
- Use The Right Stance: Don’t get too caught up in using one forehand stance. Tennis is a game where you need to adapt all the time, so each shot will require a different stance. It’s all about using the right stance for that specific forehand.
- Always Move Forwards: Always try to make sure your body weight is moving forward when you hit your forehand. That will reduce mistakes at the net and will give you more power.
- Hit It In Front: Try to always make contact with the ball right in front of your body, ideally at hip height. Don’t let the ball get too high, otherwise, it will become more difficult to time the shot properly.
- Focus On The Whole Shot: Don’t forget to do the proper follow-through!
- Faster Is Not Always Better: One big misconception for beginners (and some advanced players) is that you need to hit your forehand hard in order to win points. That is completely incorrect, and in most cases, a well-placed forehand will be better than a fast one.
- Change It Up: I’ve always had a pretty decent forehand, but it was not the speed of it that made it good. I always tried to change things up, like angles, directions, and speed. That will make your opponent lost, which is a great advantage. So make sure you are training every single type of forehand out there!